Belgian Neuromuscular Diseases Registry: Spinal Muscular Atrophy
Belgian Neuromuscular Diseases Registry: Spinal Muscular AtrophyWelcome to the technical documentation pages for the project "Belgian Neuromuscular Diseases Registry: Spinal Muscular Atrophy (SMA)", provided by the service healthdata.be (Sciensano).
These pages provide information about the technical processes of the project. The following sections are (will be) provided:
- General project information
- The data collection
- The data transfer (documentation in progress)
- The data validation (documentation in progress)
- The data analysis (documentation in progress)
- The data reporting and visualisation (documentation in progress)
For scientific information of the project, please contact the primary organization that oversees implementation of project (see section "General project information").
This documentation is under construction. We try to provide as correct, complete and clear as possible information on these pages. Nevertheless, if you see anything in the documentation that is not correct, does not match your experience or requires further clarification, please send us an email via support.healthdata@sciensano.be to report this documentation issue. Please, do not forget to mention the URL or web address of the page with the documentation issue. We will then adjust the documentation as soon as possible. Thank you!General BNMDR-SMA project information
General BNMDR-SMA project informationProject name
Belgian Neuromuscular Diseases Registry: Spinal Muscular Atrophy
Project abbreviation
BNMDR-SMA
Project code
HDBP0198
Primary organization that oversees implementation of project
- Sciensano
Partner organization participating in project
- Not available
Organization that commissioned this project
- National Institute for Health and Disability Insurance (RIZIV-INAMI)
Organization providing monetary or material support
- National Institute for Health and Disability Insurance (RIZIV-INAMI)
Brief project description
Spinal muscular atrophy (SMA) is a rare genetic neuromuscular disorder characterized by a loss of motor neurons in the spinal cord and the brainstem, leading to muscle weakness and atrophy. The estimated incidence is around 1:10,000 live births.
TREAT-NMD is a neuromuscular network that aims to ensure that the most promising new therapies reach patients as quickly as possible. The TREAT-NMD Global Network of SMA Registries (n=49) collects a common core dataset and is governed by the TREAT-NMD Global Database Oversight Committee (TGDOC). Researchers and industry can request anonymised and aggregated data via the committee, offering a single point of access to this diverse and extensive dataset.
The TREAT-NMD SMA core dataset containing 23 data items was established in 2008 when the main purpose of the registries was clinical trial readiness and recruitment. In the current SMA landscape there is a need for more widespread longitudinal data collection to support future research and post marketing surveillance (PMS) requirements for emerging therapies. With this in mind TREAT-NMD reviewed and expanded the core dataset for their SMA Registries.
Regulatory framework of this project
Consult the regulatory framework information published on the fair.healthdata.be pages.
The BNMDR-SMA data collection
The BNMDR-SMA data collectionOrganizations and/or individuals that provide data
Not available
Start date of the data collection
Not available
End date of the data collection
Ongoing
Periodicity of the data collection
Continious
The BNMDR-SMA Data Collection Definition (HDBP0198)
The BNMDR-SMA Data Collection Definition (HDBP0198)In the file below you can find the Data Collection Definition (DCD) specifications of the project Belgian Neuromuscular Diseases Registry: Spinal Muscular Atrophy (BNMDR-SMA). It is a detailed description of the content of one DCD with field names, formats, values, validation rules, help texts, warning texts, translations ... These specifications were used to build the forms, csv's, and API's for this project, which you also can find in this project manual.
The SMA Dataflow Description
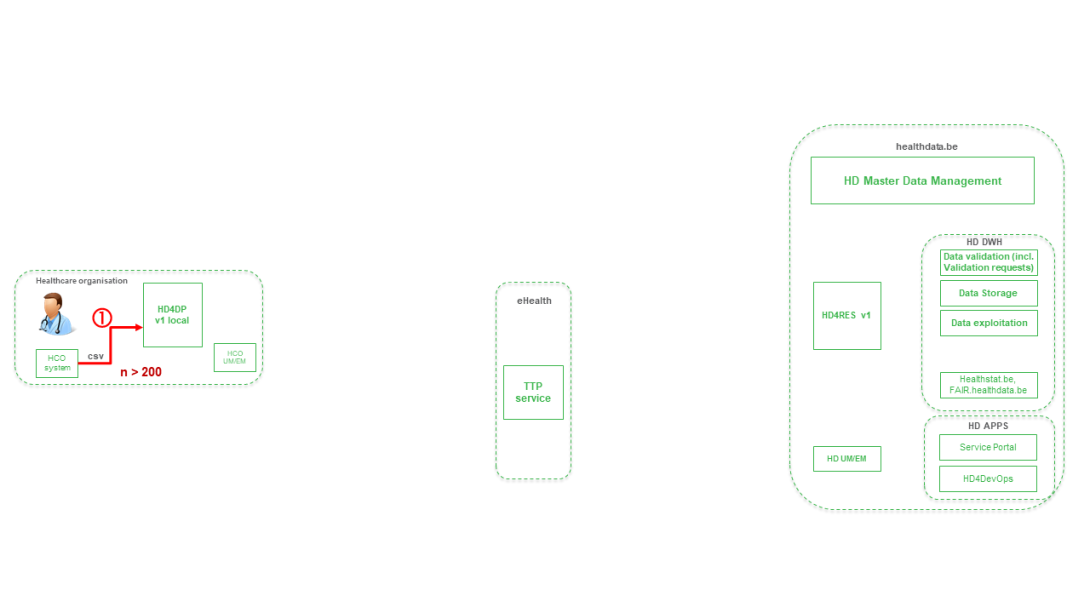
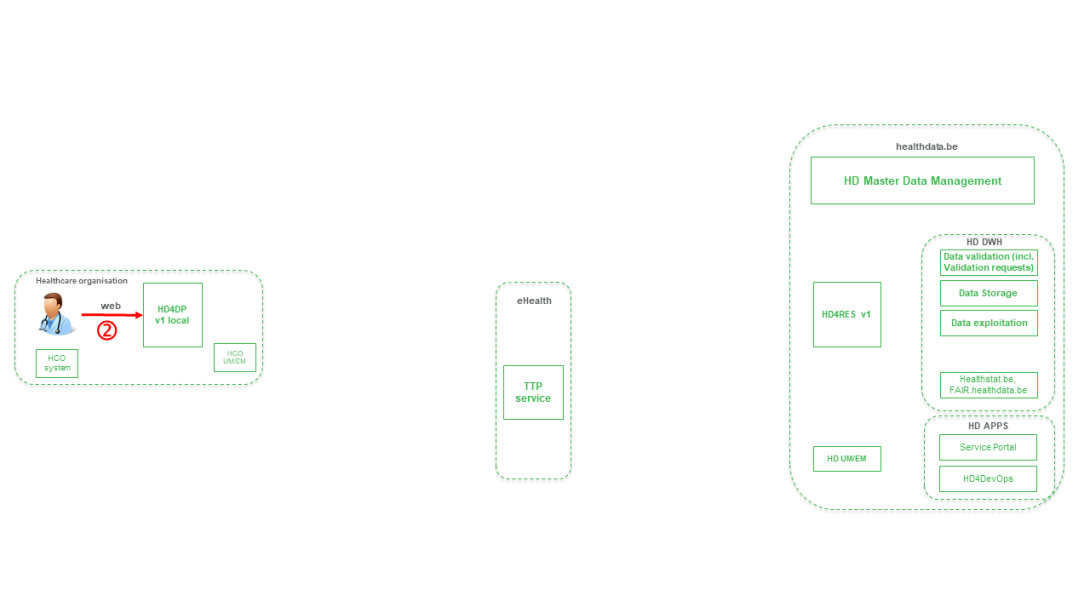
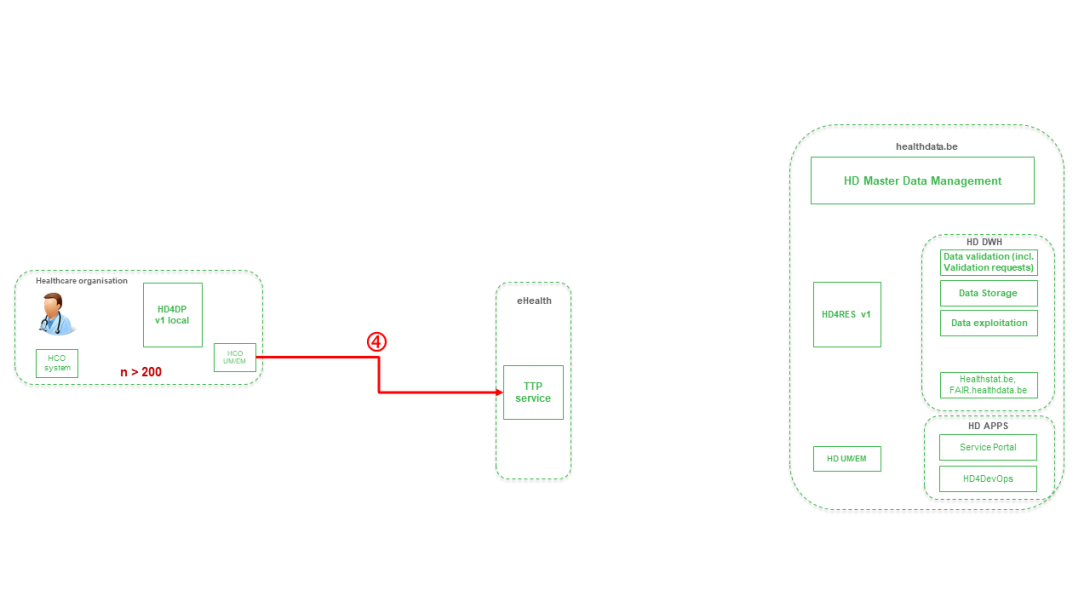
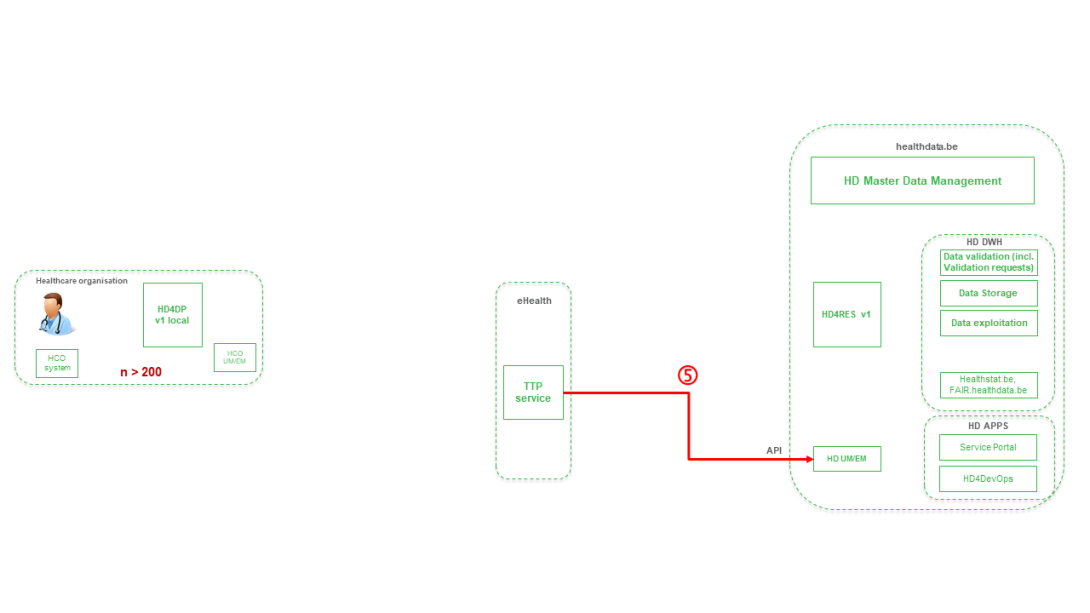
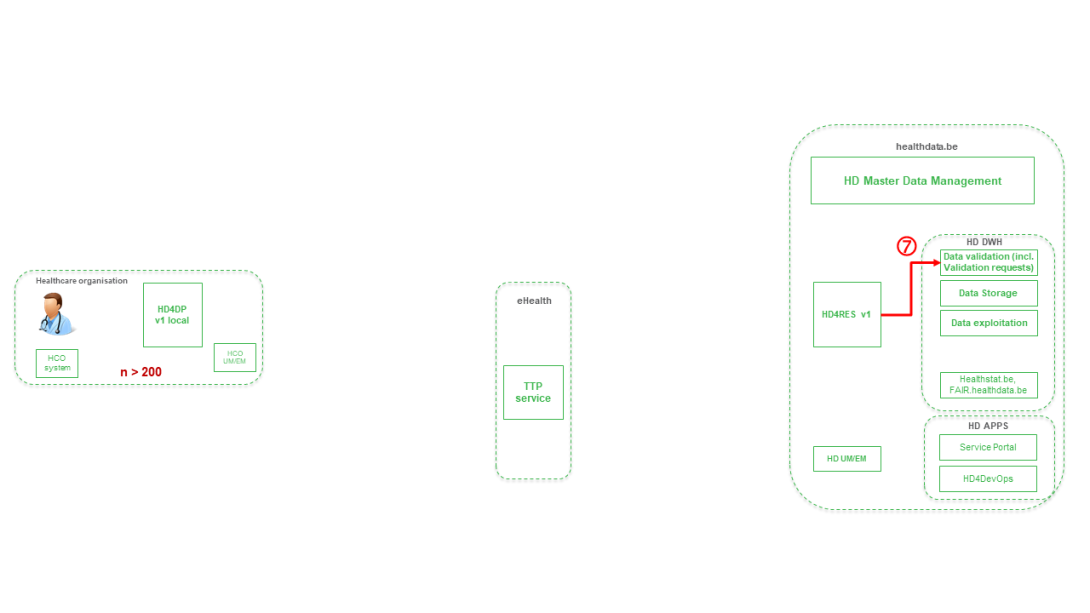
The SMA Dataflow DescriptionBelow we describe (high level) the SMA dataflow between the data provider and the healthdata.be platform.
Step 1. (Automatic) data export from systems of data provider towards HD4DP v1 and prefill of forms if not complete.
Step 2. Manual registration (de novo or completion) of data in form component of HD4DP v1.
Step 3. Transfer of patient identifiers and registry data from HD4DP v1 towards eHBox messaging client of HCO (HCO UM/EM)

Step 4. Transfer of patient identifiers and registry data from eHBox messaging client of HCO (HCO UM/EM) towards TTP service of eHealth.
Step 5. Transfer of pseudonymized patient identifiers and registry data from TTP service of eHealth towards eHBox messaging client of HD (HD UM/EM)
Step 6. Transfer of pseudonymized patient identifiers and registry data from eHBox messaging client of HD (HD UM/EM) to HDRES v1
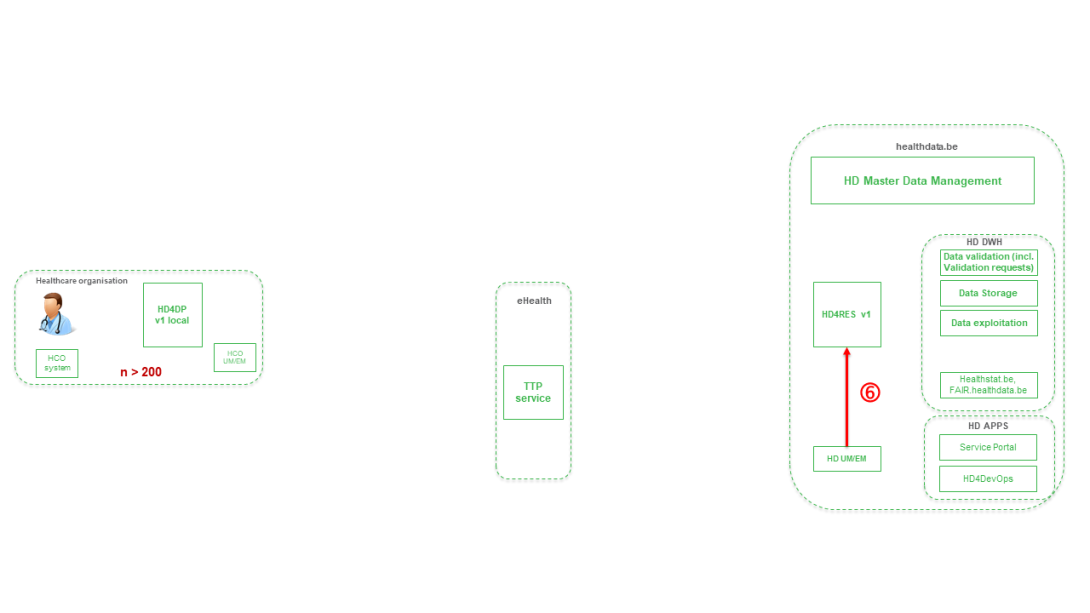
Step 7. Transfer of pseudonymized patient IDs and registry variables from HD4RES v1 towards Data Validation environment on HD DHW.
HD4DP v1
HD4DP v1 johanvanbusselGeneral description of the application HD4DP v1
General description of the application HD4DP v1 Bart.ServaesUser manual of the application HD4DP v1
User manual of the application HD4DP v1An extensive user manual, for both participating healthcare organizations and their IT service providers, is available on this docs.healthdata.be portal: https://docs.healthdata.be/hd4dp-v1.
Request account for HD4DP v1
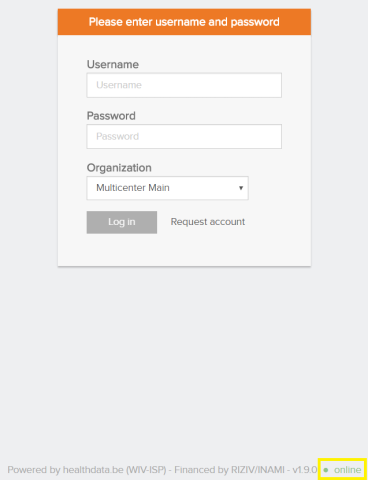
Request account for HD4DP v1To access the HD4DP v1 application, you need an account, a username and a password. If you do not have an account, you can request one by following the steps below. If you have an account, follow the "sign in" instructions at the end of this page.
- Open the link for the HD4DP v1 application. You will see this screen:
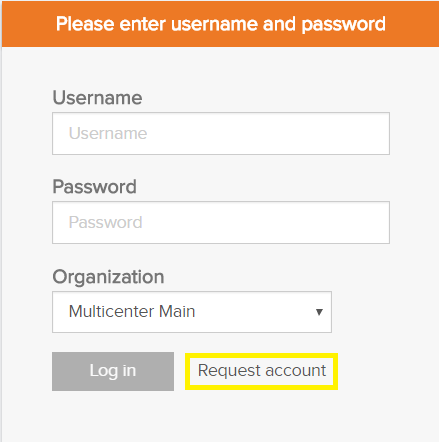
- Click on the Request account link on the login page.
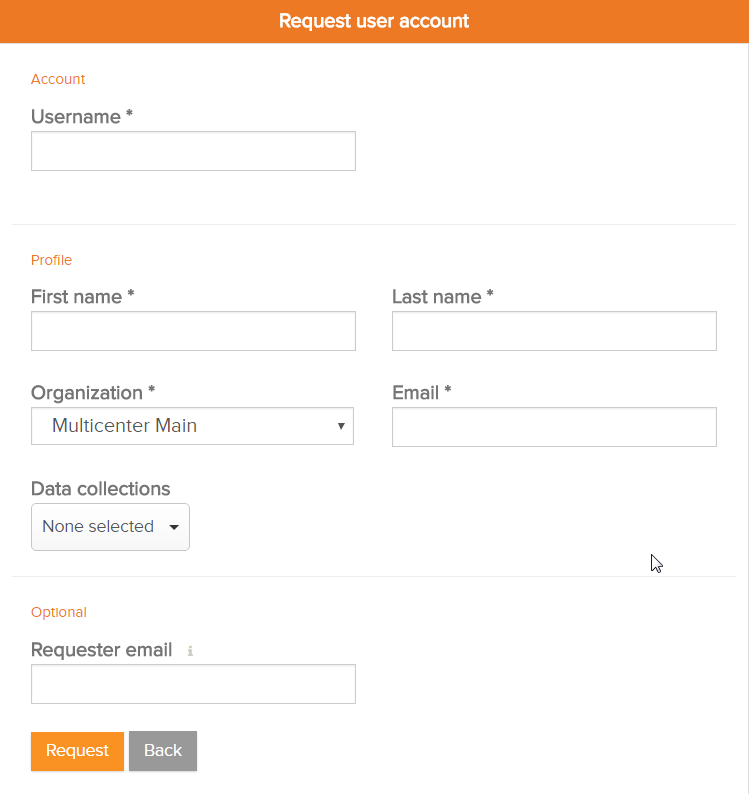
- Fill out the request form:
- Enter a username, first name, last name and e-mail address
- Select the organization and data collection(s)
- Fill in the Requester e-mail field if a person requests an account for a third person
- Submit the request user the Request button
- Confirmation e-mails are sent to the person for whom the account was requested as well as the requester, if the field "Requester e-mail" was filled.
- The approval or rejection for the user account is confirmed by mail. Depending on your organization, this could take a few hours.
- This action will be done by an HD4DP v1 administrator in your organization
- The confirmation mail will include all the necessary information to log in
Sign in
Logging in to the HD4DP v1 application is done in 3 steps:
- Enter your username and password in the appropriate fields
- Select the correct organization
- Click on "Log in"
Create a registration in HD4DP v1
Create a registration in HD4DP v1The Data Collection view leads a user to the existing registers. A user can start collecting data from this view.
Creating and submitting a registration consists of 4 steps:
- Select the register for creating a registration.
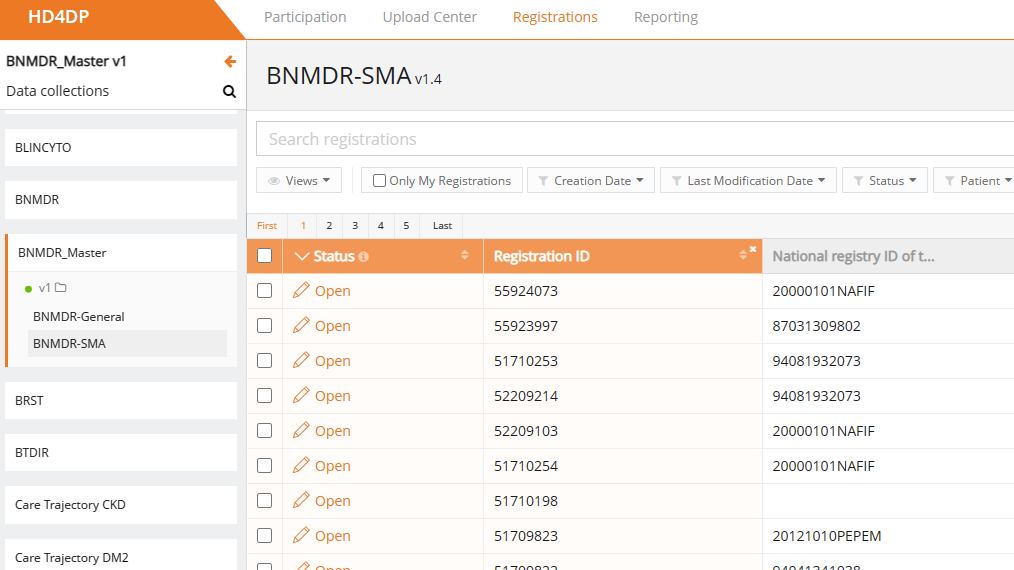
- Click on "New registration" button.

- Fill in the registration form and save or submit the registration

- Save the registration temporarily if needed. The status of the record will be "Open" for saved registrations.
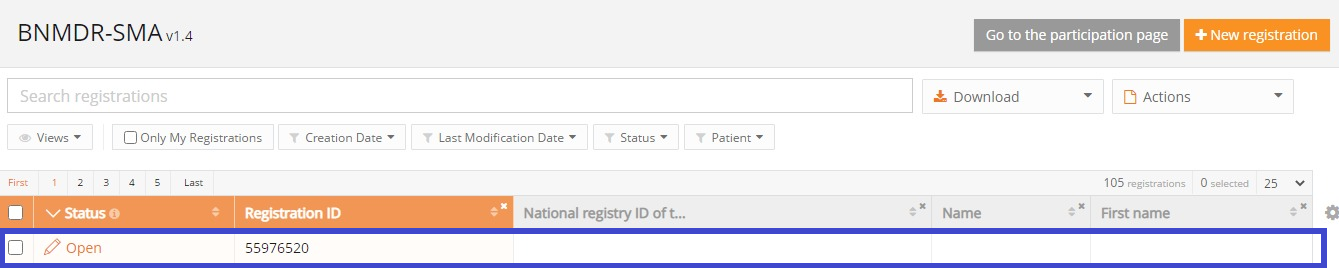
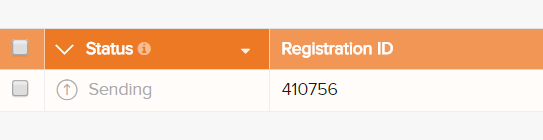
- Submit the registration if no validation errors present. The status of the registration will change to "Sending".

- When the record has been processed, the status will change to "Submitted".

As soon as a registration is sent, the "status confirmation" column will show "Pending".
- It shows "OK" once the registration has arrived, and "NOK" if the registration did not arrive within 48 hours. If the status is "NOK", the software will automatically try to resend the registration up to 10 days after the initial submission.
- For the statuses "Sending","Corrections needed" and "Approved" the status confirmation will be empty because the registration has not yet been submitted.
- A registration can be "Reopened" if needed as long as the status of the registration is "Submitted".
Change a registration in HD4DP v1
Change a registration in HD4DP v1A user can modify and complete a registration in four steps:
- Select the register from which you wish to modify one or more registration(s).
- Click on the registration to be changed, and complete the form in full. The status of the record is then:
- Open for registrations saved manually or by uploading a csv file
- Corrections needed for registrations with errors

- Save registration temporarily if necessary. Record status becomes Open for stored registrations.

- Send the registration if there are no more validation errors.
- Registration status changes to Sending
- When the record is processed, the status changes to Submitted.

Once a registration is sent, the message Pending appears in the status confirmation column.
- When the registration is received, the message OK appears; if the registration is not received within 48 hours, the message NOK appears. With the status "NOK", the software will automatically try to send the registration up to 10 days after the initial submission.
- For the statuses Sending, Corrections needed and Approved, the status confirmation is empty because the registration has not yet been sent.
- A registration can be Reopened if necessary, as long as the status of the registration is "Submitted".
Delete a registration in HD4DP v1
Delete a registration in HD4DP v1Only registrations with status Open or Corrections needed can be deleted.
The following steps are required to delete the registration:
- Select the record and version for which you wish to delete a registration
- Select the registration(s) you wish to delete
- Select the Actions button and select the Delete registrations option
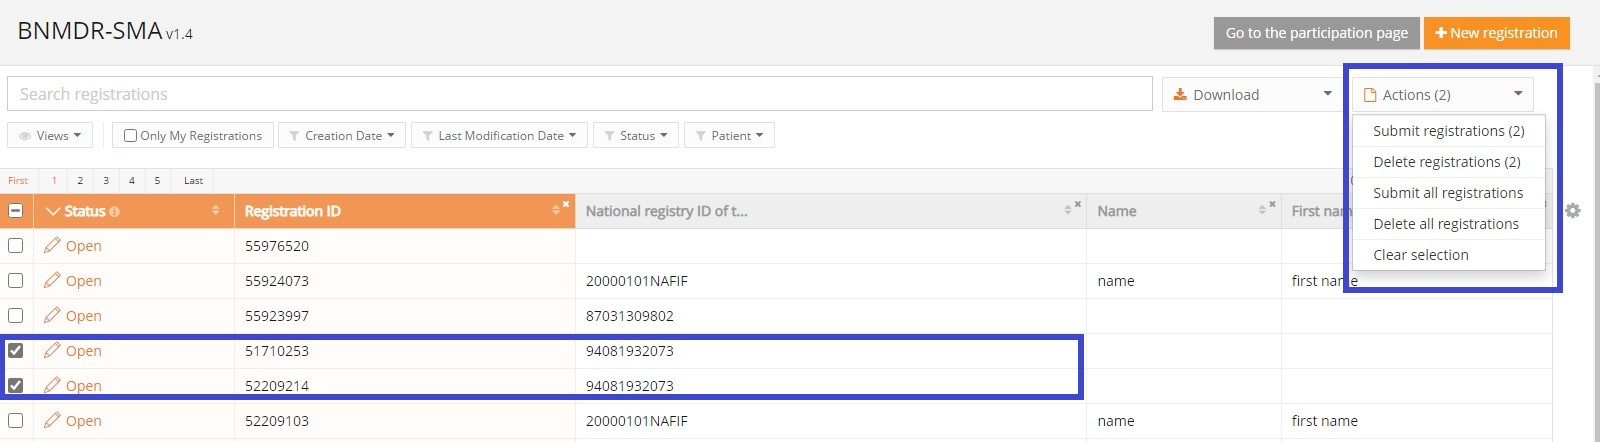
- Select Yes to confirm

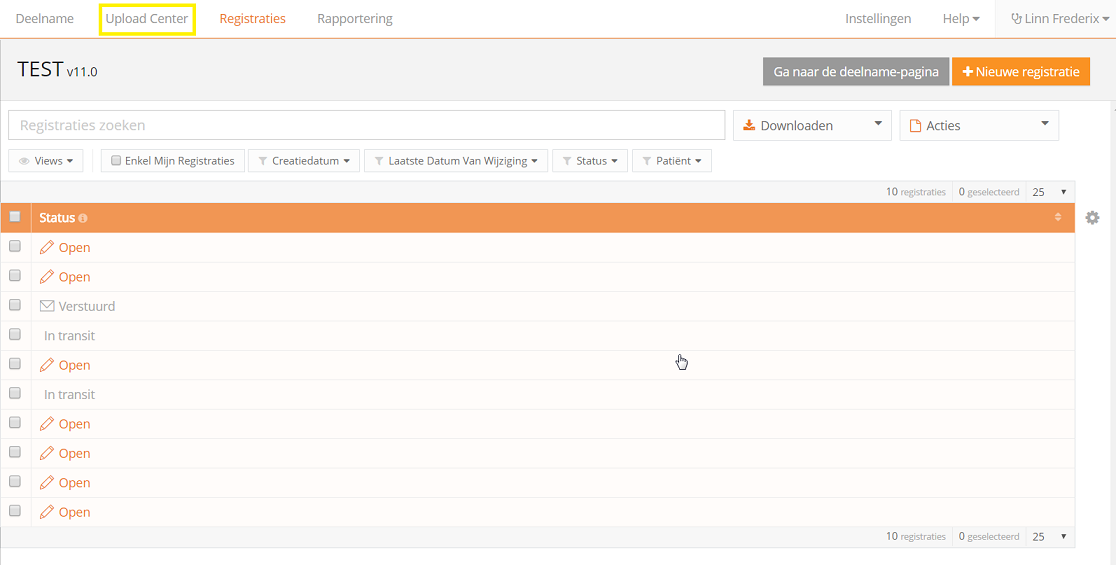
HD4DP v1 csv upload
HD4DP v1 csv uploadThe upload center is introduced to make the upload of multiple registrations more performant and user friendly.
The link to the upload center can be reached by the main menu:
If uploads are processed, an overview with the name of the uploade file, the status and a visual representation of the status, the number of records that were processed, the way of uploading, the user and the upload date is saved in the main screen of the upload center is given to the user a quick and visual impression of the data uploaded in bulk by using the upload center:
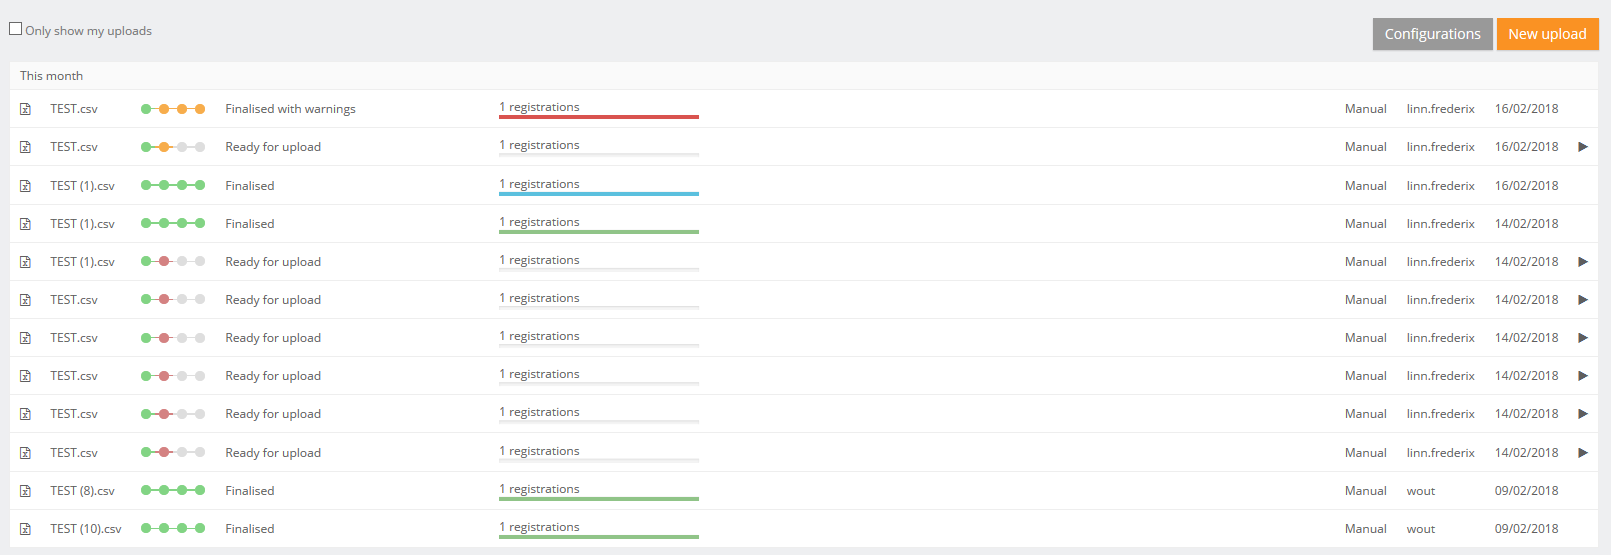
In the right upper corner two buttons are shown.
- Configuration: the default settings for a register can be set by any user that is authorized to participate in a register.
Following options are available:
- Conflict mode: what need to be done in case of conflict
- Conflict master: is the data from the new registration of from the record in the database saved in case of conflict
- Ignore duplicate records
- Autosubmit: send the data automatically for processing in HD4RES
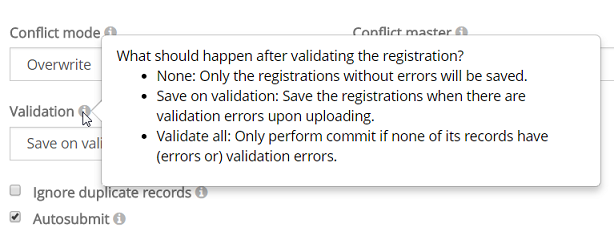
- Validation: what need to be done after validation the registration:
- None: only the registrations without errors will be saved
- Save on validations: Save the registrations when there are validation errors upon uploading
- Validate all: Only perform commit if non of its records have (errors or) validation errors
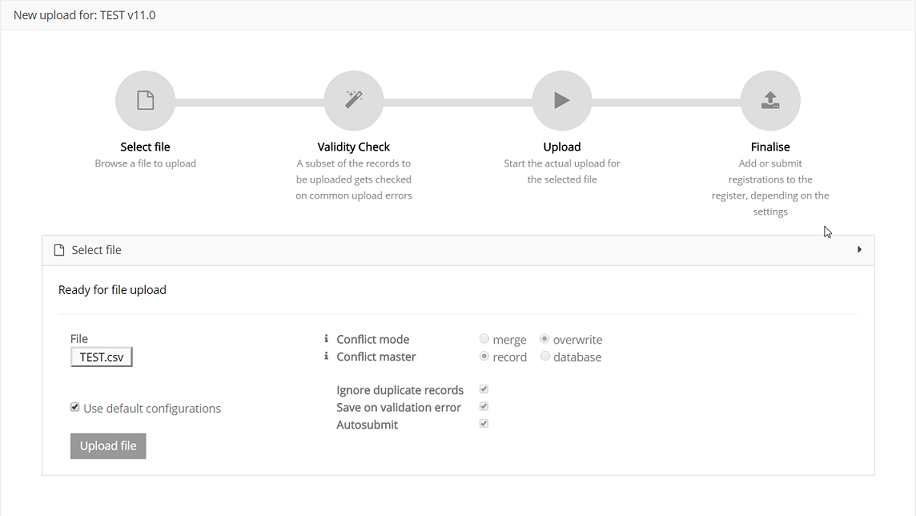
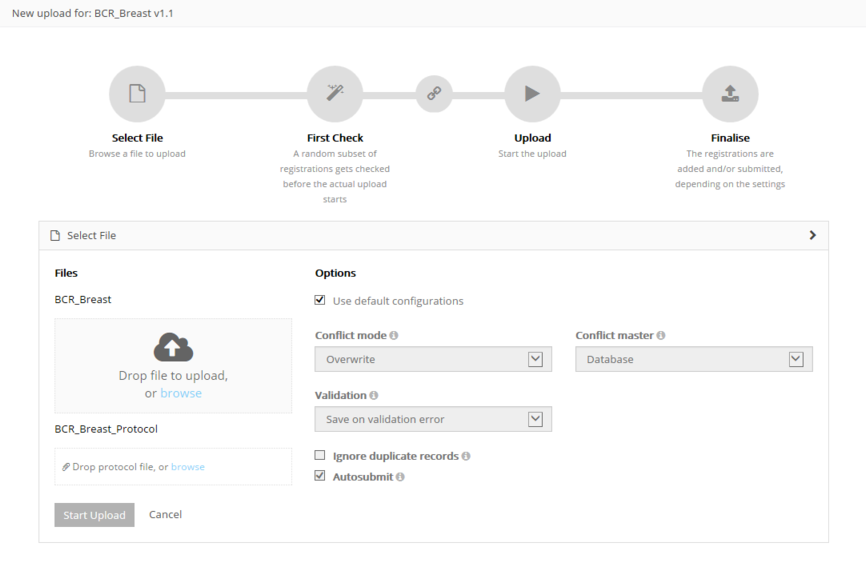
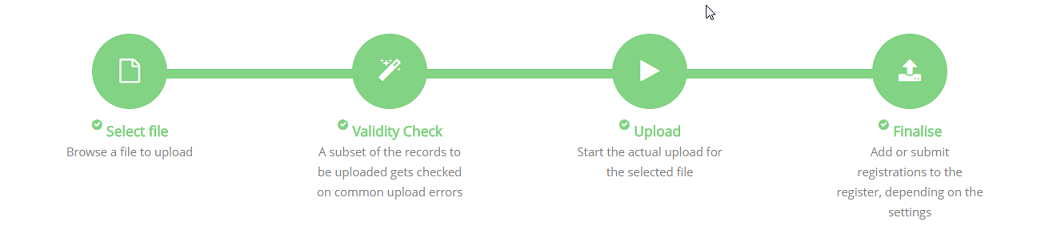
4 steps need to be executed for a new upload. When the titel bar of a separate step turns green, orange or red and the icon of the step in the overview, the step has respectively ended with success, with warnings or errors.
Step 1 - Select file
The first step is to select the CSV file with the data to be uploaded. The default settings for a register can be found in the Configurations on the main screen of the upload center.
Be sure to deselect the "Use default configurations" when changing the default settings:

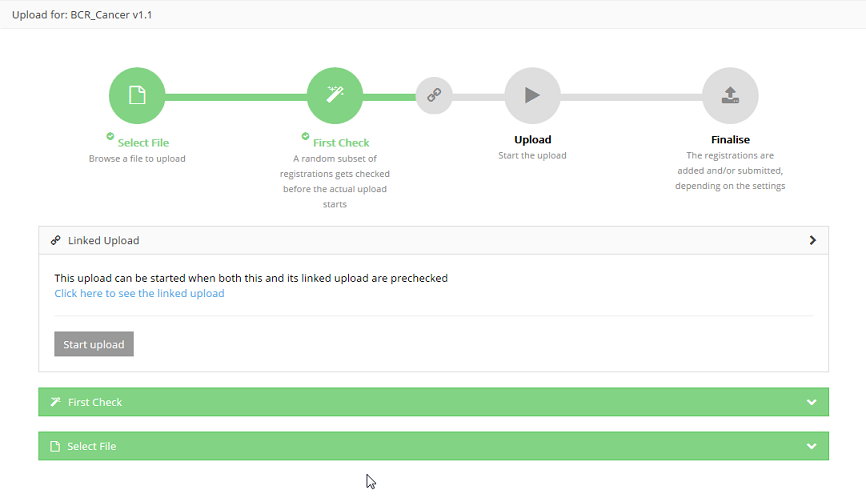
For the BCR register, the possibility exists to upload two files and link them during the process:
- Both documents will be validated separately. By using the link "Click here to see the linked upload" the user can switch between the linked documents. Refresh of push F5 on you to see the status of the upload.
After uploading succesfully, the title bar of this step will turn green.
Step 2 - Validity Check
Validation checks are executed for every record.

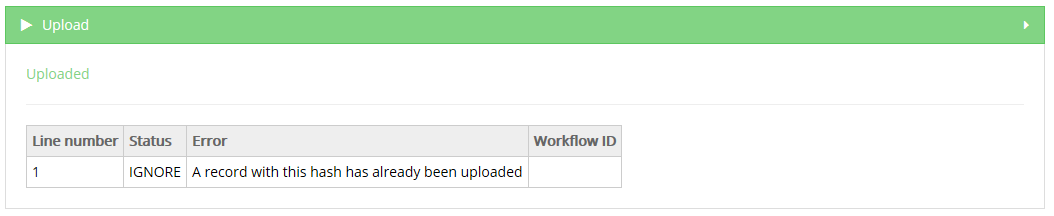
Step 3 - Upload
The file is being uploaded and the result is shown in this step per line of data added:
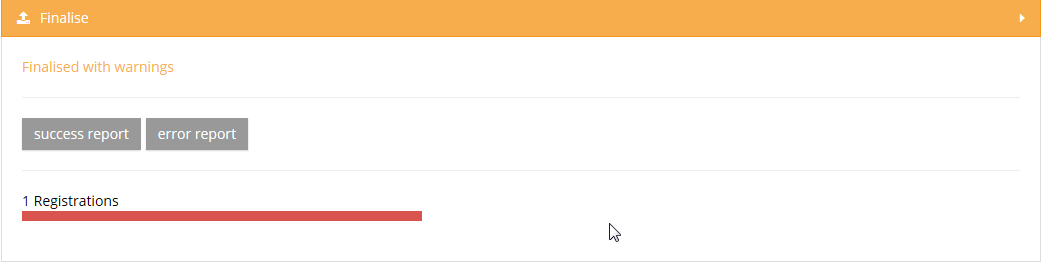
Step 4 - Finalize
The result is shown visually for all registrations and for all registrations in a CSV file in reports after finalization:
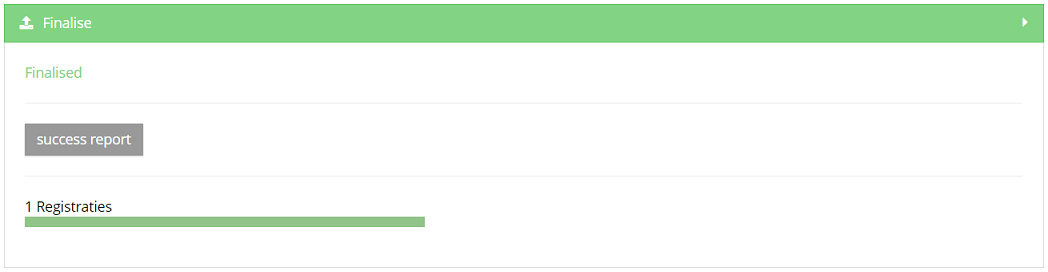
Succes report is a CSV file with all registrations who were processed succesfully.
In case of errors, a link to a detailed error report is shown too:
Please find below the movie that guides you through the functionalities of the Upload Center:
Create a csv for HD4DP v1
Create a csv for HD4DP v1Processing registrations in bulk is done by uploading CSV files. These files are plain text files which can contain multiple registrations at once and are extracted from your primary system.
The first step is to create the file correctly.
Using a CSV editor
While Excel is a fine tool to view CSV’s, we do not recommend it to edit CSVs. Instead use notepad++ or any other text editor. Here are a few risks you should be aware of when editing a CSV in Excel. Excel will interpret the content, which may lead to changes:
- Leading zeros disappear in fields that are recognized as numeric fields
- Entries like 3-9 can become March-9
- The only accepted date format DD/MM/YYYY can be modified (e.g. To DD/MM/YY)
- The decimal separator can differ from that in HD4DP, a semicolon wil lead to a correct upload
- When saving a file as .csv, Excel uses the default field separator. HD4DP only accepts CSV with a semicolon as separator. This default setting can be adapted in the properties of your computer.
- CSV encoding must be in UTF-8.
Setting up the document
Every column in the CSV file needs to be recognized as a field of the register by the HD4DP application. Therefor each column in the file must be identical by the technical name of the field in the register.
Tip: Downloading (manually) entered data from HD4DP will guide you in formatting a CSV file and may help during the development of the CSV extraction from the primary systems.
The Data Collection Definition (DCD) specifications for a register and its fields are defined and documented on this documentation portal.
Each field in the form can be completed through a value in a CSV file.
An example field is “Date of last follow-up”, shown in the screenshot below.
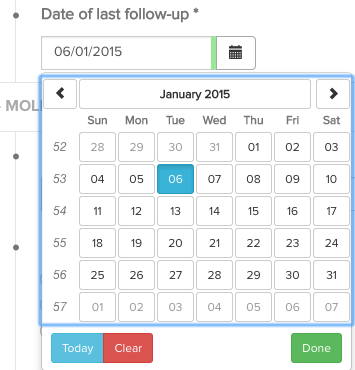
This field is of the type “date” and is required (*). Within the technical documentation of this data collection, this is shown as follows:
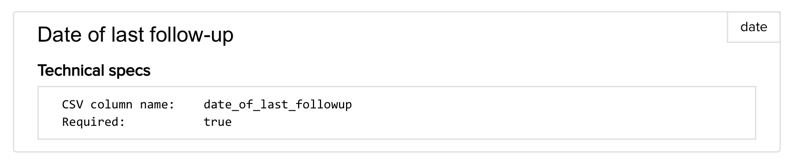
To include this field in a CSV upload file, it is sufficient to create a column with the name “date_of_last_followup” and populate it with the appropriate data i.e. a date in the format dd/mm/yyyy.
Fields can be required, read-only and computed (automatically calculated). Fields can also have a default value.
This information is present in the detailed technical description for each data collection.
General requirements
- The column separator is the semicolon (;)
- The decimal separator for numbers is the comma (,)
- The date format is dd/mm/yyyy
Basic content types
Depending on the type of the field, a different representation of the data is expected. The table below describes the different basic types and the rules on how to provide the content for these types.
| Content type | Expected format/content |
| boolean | TRUE, FALSE |
| date | dd/mm/yyyy |
| choice | code from choice list |
| list | option1_label|option2_label|etc. |
| multiline | free text |
| number | number (decimal separator = ,) |
| patientID | SSIN number. If the person does not have a SSIN, leave this field blank. |
| questionnaire | code from questionnaire answer list |
| text | ● free text ● if a binding reference list is used: a code from the reference list ● if a non-binding reference list is used: a code from the reference list or free text |
| attachment | ● expected format/content: Name of the file that must be attached (e.g. protocol.txt). ● expected extension: .txt ● file must be stored in the same folder as the folder that is used for the CSV-upload |
Advanced content types
Other than these simple types, more complex data structures can be used, as shown in the table below. Each of these types is explained in more detail below the table.
| Content type | CSV column name | Expected format |
| fields within fieldset | fieldset_label|field_label | depending on the field type |
| list (1 field) | list_label|field | value1|value2|etc |
| list (block of fields) | list_label|0|field1 list_label|0|field2 list_label|1|field1 list_label|1|field2 etc. | depending on the field type |
| nested fields below choice or multichoice | choice_label|nested_item | depending on the field type |
Fieldset
A fieldset is a collection of fields, as shown in the image below:
Anthropometry is the title of the fieldset, and this fieldset contains two fields, weight and height. Fieldsets fieldsets do not have a number cfr. image below - Anthropometry.

Sections do not have an impact on the CSV file, whereas fieldsets do. The title of the fieldset must be included in the field name column as follows: fieldset_label|field_label.
E.g. for the two Anthropometry fieldset fields weight and height below, the correct CSV column headers are: anthropometry|weight en anthropometry|height.
Lists
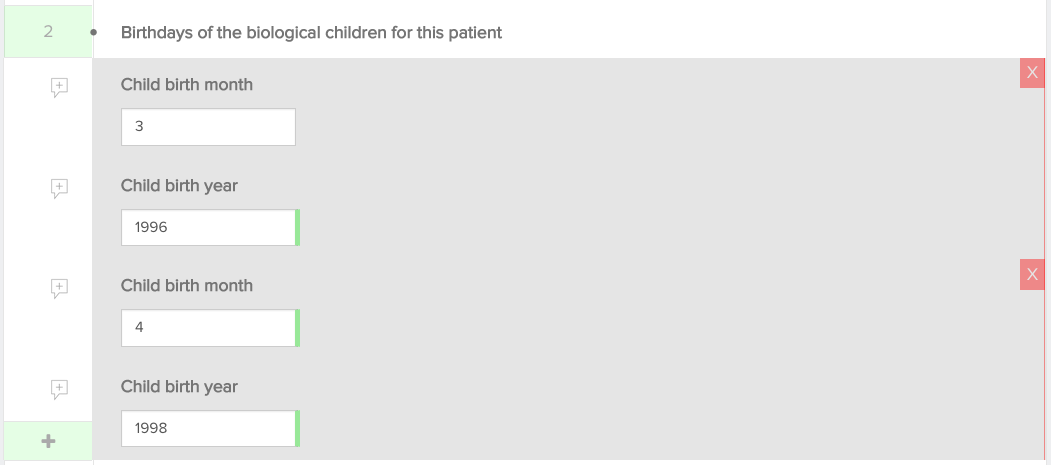
A list is also a collection of fields, like a fieldset, but with the additional property that the collection of fields can be repeated.
An example is shown in the image below: “Birthdays of the biological children for this patient” is a list. One list item consists of two fields, “Child birth month” and “Child birth year”. For each child, a list item can be added.
The CSV column names consist of the list header label and the field label (as for fieldsets), together with a counter to distinguish the different list items. The correct CSV column names for the two list items below are:
- birthdays_of_the_biological_children_for_this_patient|00|child_birth_month
- birthdays_of_the_biological_children_for_this_patient|00|child_birth_month
- birthdays_of_the_biological_children_for_this_patient|01|child_birth_month
- birthdays_of_the_biological_children_for_this_patient|01|child_birth_year
Please note that for every line, the numbers should increment, starting from 0 (|00|,|01|, .. is ok, |01|, |03|, ... is not). You can't have blank values for |00| and filled values for a higher number.
Please note that the numbering requires a stable format, meaning the number of characters used by the number has to be constant. You can't have one record using |00| and another using |0|. Generally we advice to use a string length of 2 digits.
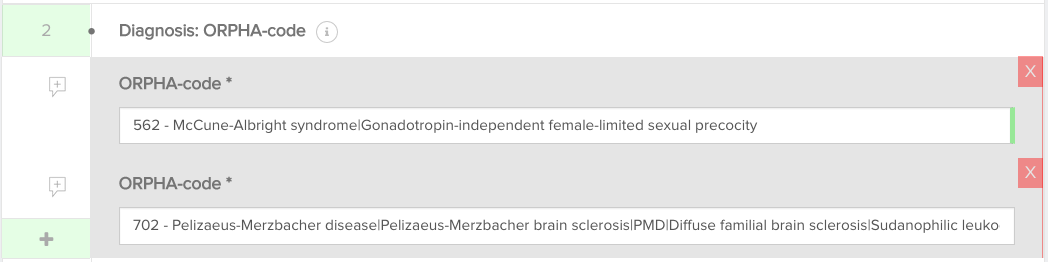
For lists consisting of 1 field a simplified implementation is possible. The CSV column header only consists of the list header label and multiple values are provided in the one column, separated by a pipe (|).
E.g. for the list in the image below, the CSV column header is diagnosis_orphacode and the content of the column is 562|702. This is the example of a text field with a reference list: providing the codes of the reference list is sufficient.
Nested fields
Nested fields are fields that only become available when specific options are selected in the form. An example is shown below: the field “Specify” only becomes available if the checkbox “Other” is marked. These fields also have a combined CSV column header, consisting of the choice list label and the field label. For the example below, the correct CSV column header is hence base_of_diagnosis|specify.

Attachments
When a CSV is prepared and put in the provisioning folder, it can contain references to attachments for data collections that specifically allow this.
These references are relative paths to the file location. If such a reference is present in the CSV file, the attachment content is uploaded and linked to the created registration. The attachment is then available in the HD4DP client as well as in the HD4RES client when the registration is submitted.
The maximum file size for attachments is 6 MB.
If a data collection permits you to send attachments you should have the column name to use in the CSV. If not, you should be able to find it at https://www.healthdata.be/dcd/#/collections or you can contact Support.Healthdata@sciensano.be.
Add the column name to the header of the CSV and add the file names as values in the column.
Example: “picture.png”
Put the CSV file in the correct provisioning folder (organization sub folder, then in the register sub folder), along with a “picture.png” file of your choice. The application picks the CSV file and creates a new registration.
Open the registration and verify the attachment has correctly been uploaded.
Support Service of healthdata.be
Support Service of healthdata.beThe Service Desk of healthdata.be (Sciensano) helps users of our applications and services and deals with requests and problems when they arise.
The Service Desk focuses on those services run by our IT Services (HD4DP, HD4RES, healthstat.be,...) and helps you with accounts and passwords. For questions about the content and objective(s) of the projects, we kindly refer to the managing research organizations.
For most efficient processing of your request, we advise you to use our service portal: https://sciensano.service-now.com/sp.
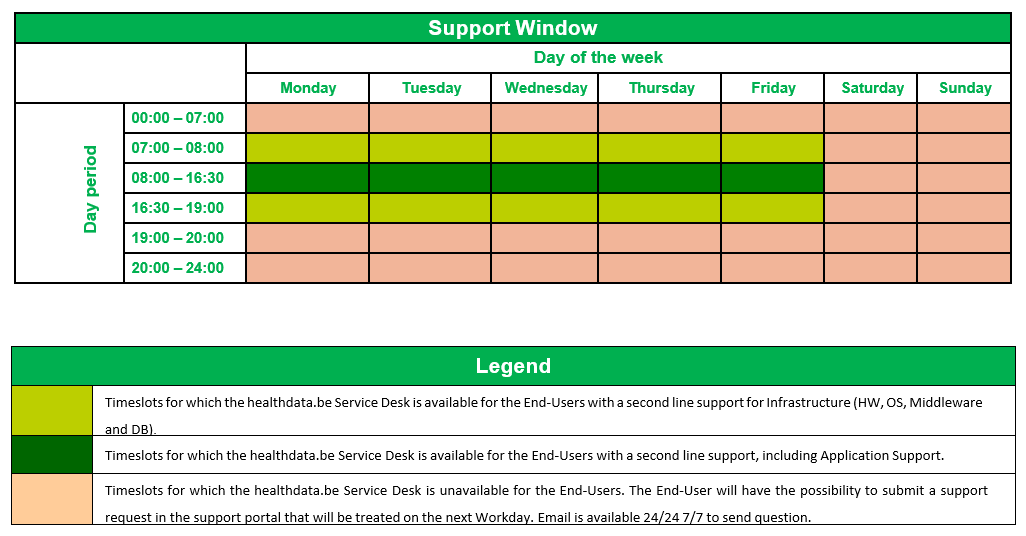
Please find below our support window hours:
How to report an incident
How to report an incidentTEST2
The healthdata.be service (Sciensano) processes each incident report according to a standard operating procedure (SOP). A public version of this SOP "HD Incident Management Process" is also available on this portal docs.healthdata.be.
To submit an incident related to projects and applications in production and facilitated or managed by Sciensano's healthdata.be service, you must first log into the HD Service and Support portal: https://sciensano.service-now.com/sp
After the login step, you will arrive at the main page of the portal.

On the main page, you must select "Get Help".

A new page with the title "Create an incident" will appear.
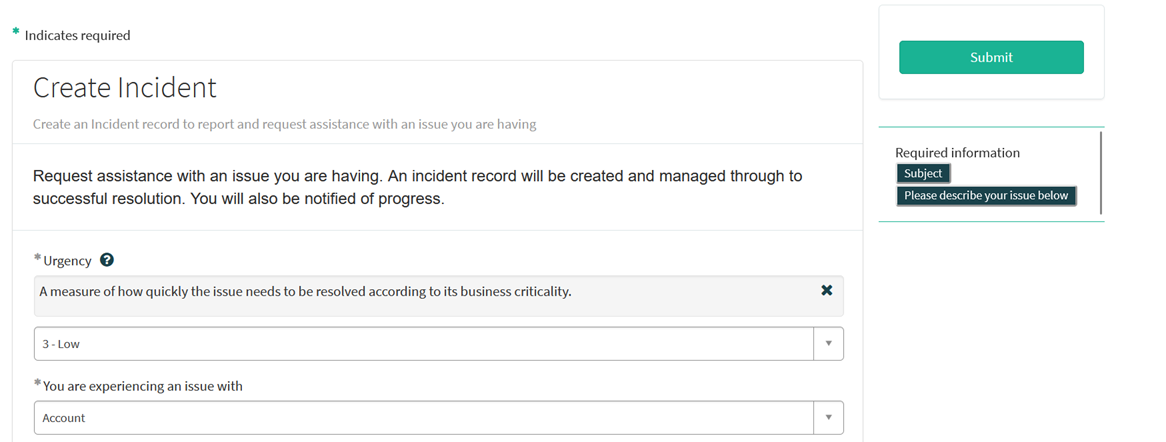
You can now document your incident or problem by providing the following information:
Please indicate the urgency of resolving your issue based on its criticality to the business.
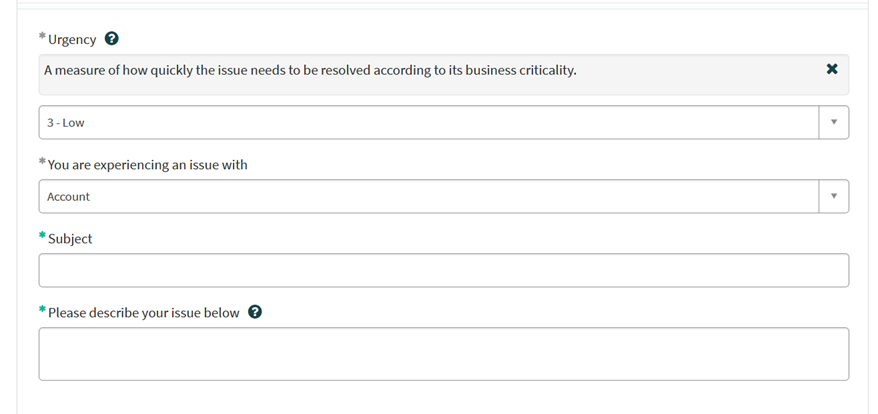
Please indicate the type of problem you are experiencing.

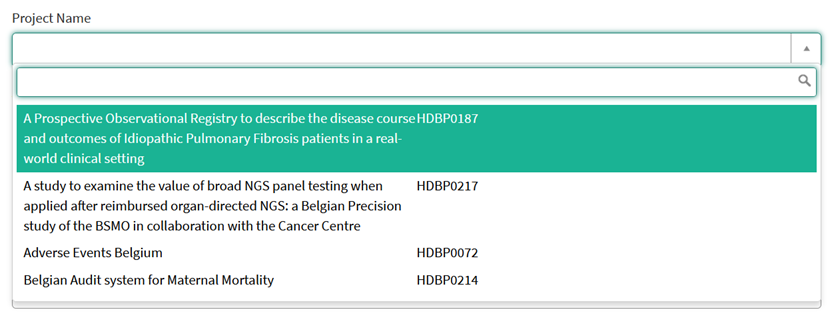
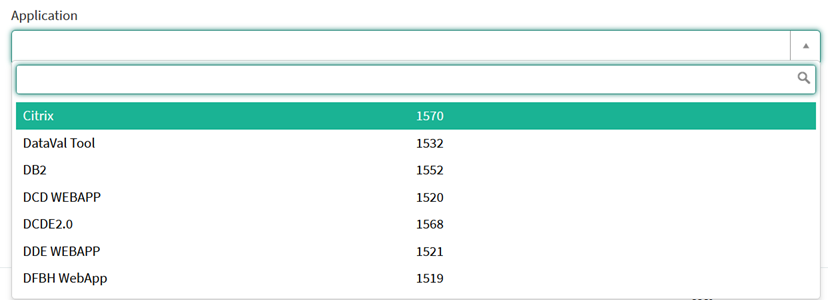
When the problem type "Application" is selected, two additional fields appear: "Project Name" and "Application".

Please select the appropriate information.
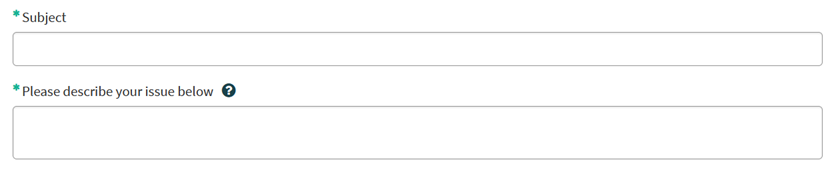
Please describe clearly and briefly (1 sentence) the subject of your problem.

Please describe the problem in detail. The following aspects are important for us to understand and solve the problem:
- a description of the actions you want to perform but fail to perform (e.g. provide us with a field name, a validation rule, a button, etc.)
- a description (if possible) of the sequential steps you follow to use the service or the application of healthdata.be for which you need support;
- a brief description of the technical problem you are experiencing (e.g. error messages)

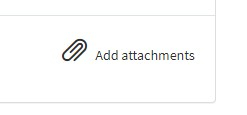
We strongly recommend that you add a screenshot describing the problem (IMPORTANT: do not provide us with patient data!).
You can add the screenshot by clicking on "Add attachments".
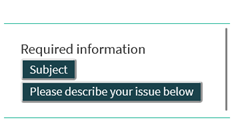
On the right side of the form, the mandatory information items of the incident form are listed. When these fields are completed, their names disappear from the "required information" box.
The form can only be submitted if all required fields are filled in, by pressing the green "Submit" button.
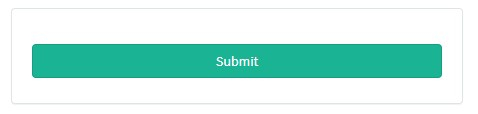
If all required fields have not been completed, a warning message will appear at the top of the form.

In addition, missing mandatory fields will be highlighted in green.
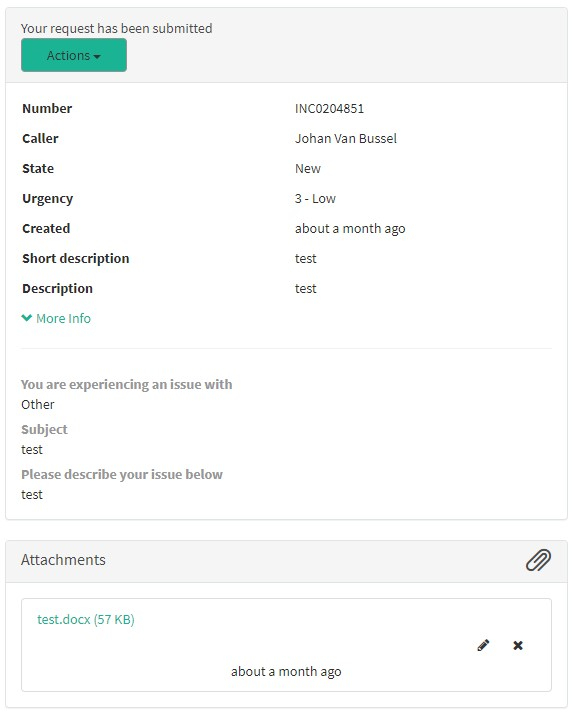
When the incident form has been successfully submitted, a preview of your submission appears in a new screen.
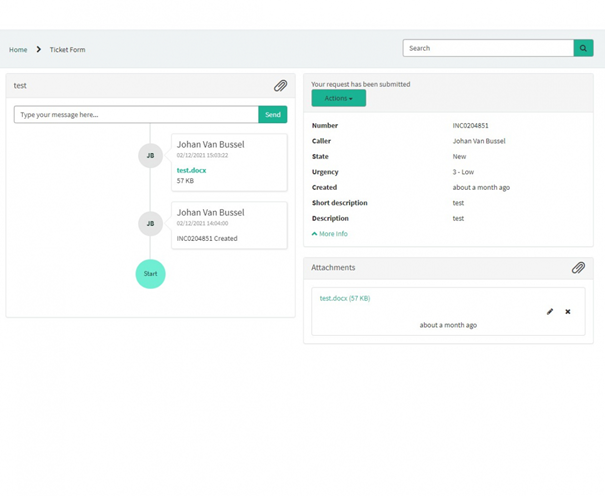
On the right side of the screen you will find the details, including the incident number.
On the left side of the screen, you will find a chronology of your incident processing, starting with your creation.
