HD4DP v1
HD4DP v1Wij willen u erop wijzen dat HD4DP v1 binnen afzienbare tijd wordt uitgefaseerd. Deze applicatie wordt vervangen door HD4DP v2.
De precieze datum waarop dit project beschikbaar zal zijn in HD4DP v2, wordt binnenkort gecommuniceerd.
Algemene beschrijving van de applicatie HD4DP v1
Algemene beschrijving van de applicatie HD4DP v1 Bart.ServaesGebruikershandleiding van de applicatie HD4DP v1
Gebruikershandleiding van de applicatie HD4DP v1Een uitgebreide gebruikershandleiding, zowel voor deelnemende gezondheidszorginstellingen als hun IT-dienstverleners, is beschikbaar op dit docs.healthdata.be portaal: https://docs.healthdata.be/hd4dp-v1.
Account aanvragen voor HD4DP v1
Account aanvragen voor HD4DP v1Om toegang te krijgen tot de HD4DP v1 applicatie, heeft u een account nodig, een gebruikersnaam en een wachtwoord. Als u geen account hebt, kunt u er een aanvragen door de onderstaande stappen te volgen. Als u een account hebt, volg dan de instructies onder 'Aanmelden' aan het einde van deze pagina.
- Open de link voor de HD4DP v1 applicatie. Het volgende scherm wordt geopend:
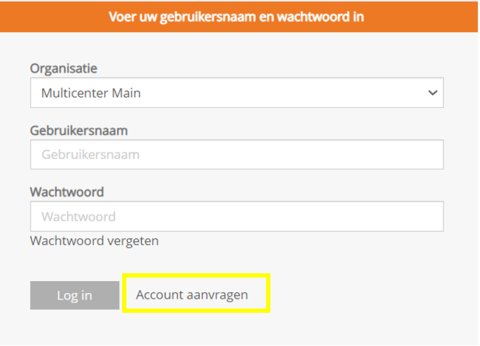
- Klik op de link Account aanvragen op de inlogpagina.
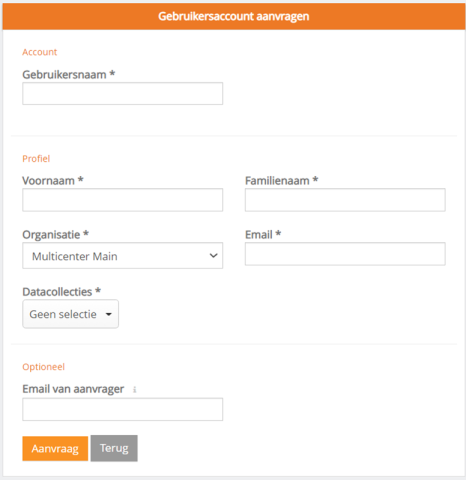
- Vul het aanvraagformulier in:
- Vul een gebruikersnaam, voornaam, familienaam en e-mailadres in
- Selecteer de organisatie en de datacollectie(s)
- Vul het veld E-mail van aanvrager in als een persoon een account aanvraagt voor een derde persoon
- Druk op de knop Aanvraag om het verzoek in te dienen
- Bevestigingsmails worden gestuurd naar de persoon voor wie de account is aangevraagd, alsook naar de aanvrager, indien het veld "Email van aanvrager" is ingevuld.
- De goedkeuring of afwijzing van de gebruikersaccount wordt per e-mail bevestigd. Afhankelijk van uw organisatie kan dit een paar uur duren.
- Deze actie wordt uitgevoerd door een HD4DP v1 beheerder in uw organisatie
- De bevestigingsmails zal alle nodige informatie bevatten om in te loggen
Aanmelden
Aanmelden bij de HD4DP v1 applicatie verloopt in 3 stappen:
- Vul uw gebruikersnaam en wachtwoord in de daartoe bestemde velden in
- Selecteer de correcte organisatie
- Klik op "Log in"

Een registratie creëren in HD4DP v1
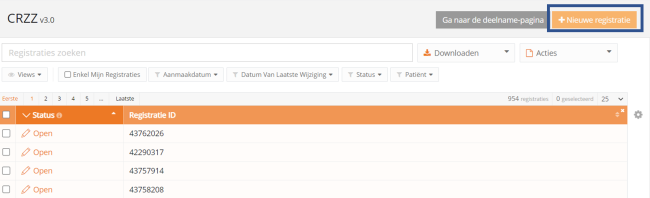
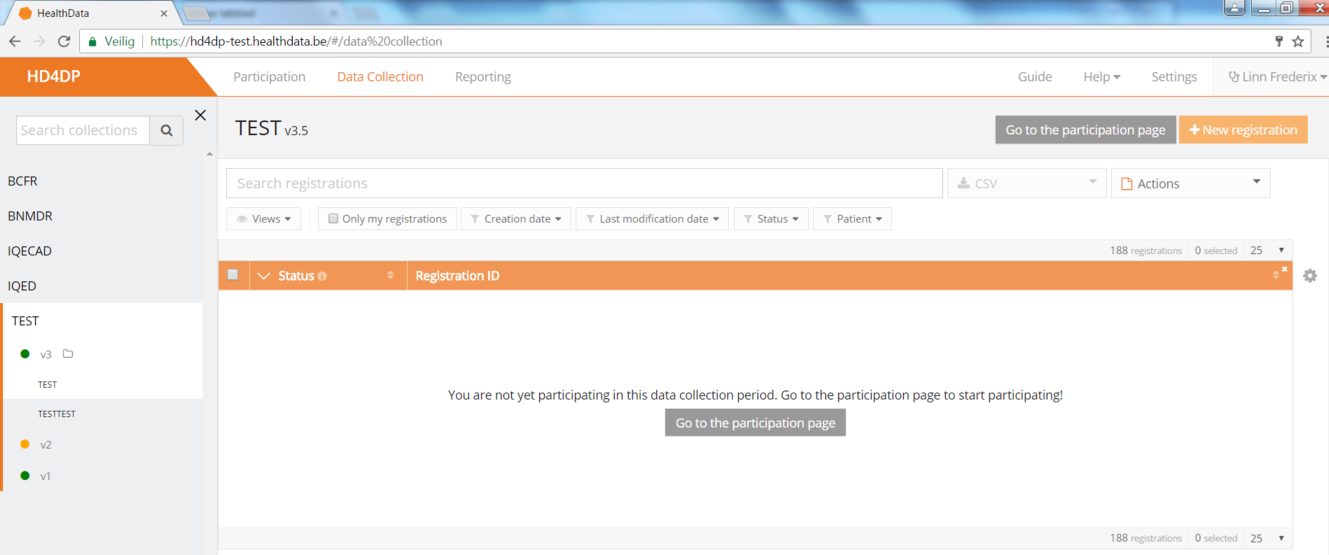
Een registratie creëren in HD4DP v1In het Data Collection-scherm ziet de gebruiker de bestaande registers. Vanuit dit scherm kan een gebruiker dan een datacollectie starten.
Het creëren en verzenden van een registratie bestaat uit vier stappen:
- Selecteer het register om een registratie te creëren.

- Klik op de knop Nieuwe registratie.
- Vul het registratieformulier in en gebruik volgende knoppen om de registratie op te slaan of te versturen.

- Sla de registratie zo nodig tijdelijk op. De status van de record is Open voor opgeslagen registraties.
- Verstuur de registratie indien er geen validatiefouten meer zijn. De status van de registratie verandert in In transit.

- Wanneer de registratie is verwerkt, verandert de status in Verstuurd.

Zodra een registratie verzonden is, verschijnt in de kolom van de bevestigingsstatus de melding Pending.
- Bij ontvangst van de registratie verschijnt de melding OK; als de registratie niet binnen de 48 uur is ontvangen, verschijnt de melding NOK. Bij de status "NOK" zal de software tot 10 dagen na de initiële verzending automatisch proberen om de registratie te verzenden.
- Voor de statussen In transit, Correcties nodig en Goedgekeurd is de statusbevestiging leeg, omdat de registratie nog niet is verzonden.
- Een registratie kan eventueel Opnieuw geopend worden, zolang de status van de registratie "Verstuurd" is.
Een registratie wijzigen in HD4DP v1
Een registratie wijzigen in HD4DP v1Een gebruiker kan een registratie wijzigen en voltooien in vier stappen:
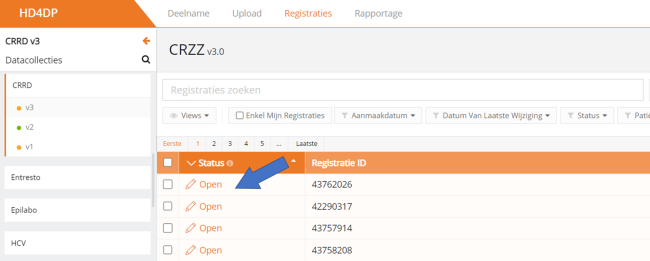
- Selecteer het register waarvan u een of meer registraties wenst te wijzigen.

- Klik op de registratie die moet worden gewijzigd, en vul het formulier volledig in. De status van de record is dan:
- Open voor registraties die handmatig werden opgeslagen of door een csv-bestand up te loaden
- Correcties nodig voor registraties met fouten

- Sla de registratie tijdelijk op indien nodig. De status van de record wordt Open voor opgeslagen registraties.

- Verstuur de registratie als er geen validatiefouten meer zijn.
- De status van de registratie verandert in In transit

- Wanneer de registratie is verwerkt, verandert de status in Verstuurd.

Zodra een registratie verzonden is, verschijnt in de kolom van de bevestigingsstatus de melding Pending.
- Bij ontvangst van de registratie verschijnt de melding OK; als de registratie niet binnen de 48 uur is ontvangen, verschijnt de melding NOK. Bij de status "NOK" zal de software tot 10 dagen na de initiële verzending automatisch proberen om de registratie te verzenden.
- Voor de statussen In transit, Correcties nodig en Goedgekeurd is de statusbevestiging leeg, omdat de registratie nog niet is verzonden.
- Een registratie kan eventueel Opnieuw geopend worden, zolang de status van de registratie "Verstuurd" is.
Een registratie verwijderen in HD4DP v1
Een registratie verwijderen in HD4DP v1Alleen registraties met de status "open" en "correcties nodig" kunnen worden verwijderd.
De volgende stappen zijn nodig om de registratie te verwijderen:
- Selecteer het register en de versie waarvoor u een registratie wilt verwijderen:

- Selecteer de registratie(s) die u wilt verwijderen.
- Selecteer de knop "Acties" en kies de optie "Registraties verwijderen".

- Selecteer "ja" om te bevestigen

Technische handleiding van de applicatie HD4DP v1
Technische handleiding van de applicatie HD4DP v1 Bart.ServaesHD4DP v1 csv upload
HD4DP v1 csv uploadThe upload center is introduced to make the upload of multiple registrations more performant and user friendly.
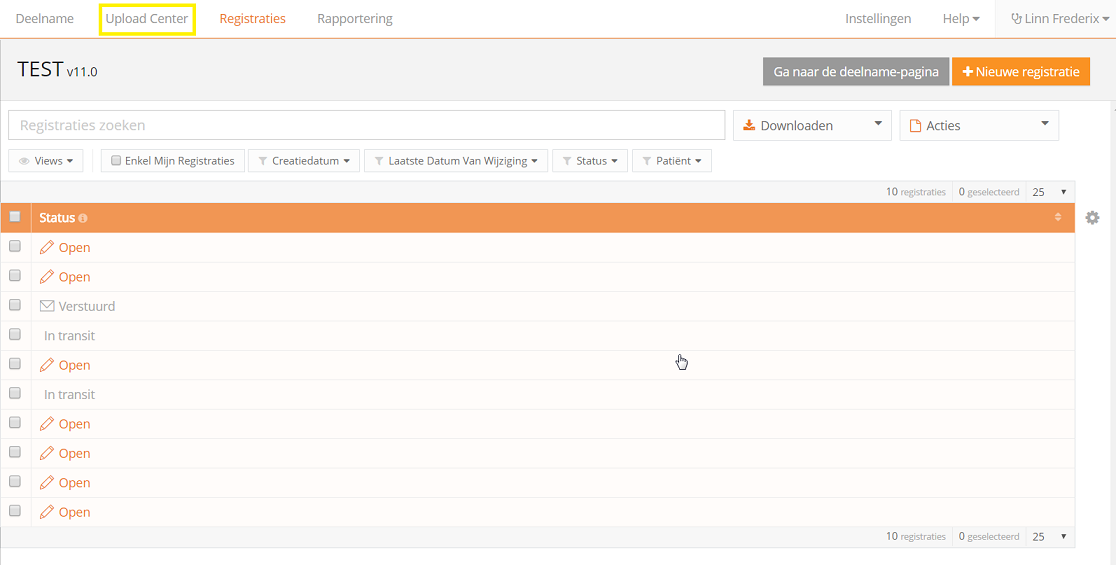
The link to the upload center can be reached by the main menu:
If uploads are processed, an overview with the name of the uploade file, the status and a visual representation of the status, the number of records that were processed, the way of uploading, the user and the upload date is saved in the main screen of the upload center is given to the user a quick and visual impression of the data uploaded in bulk by using the upload center:
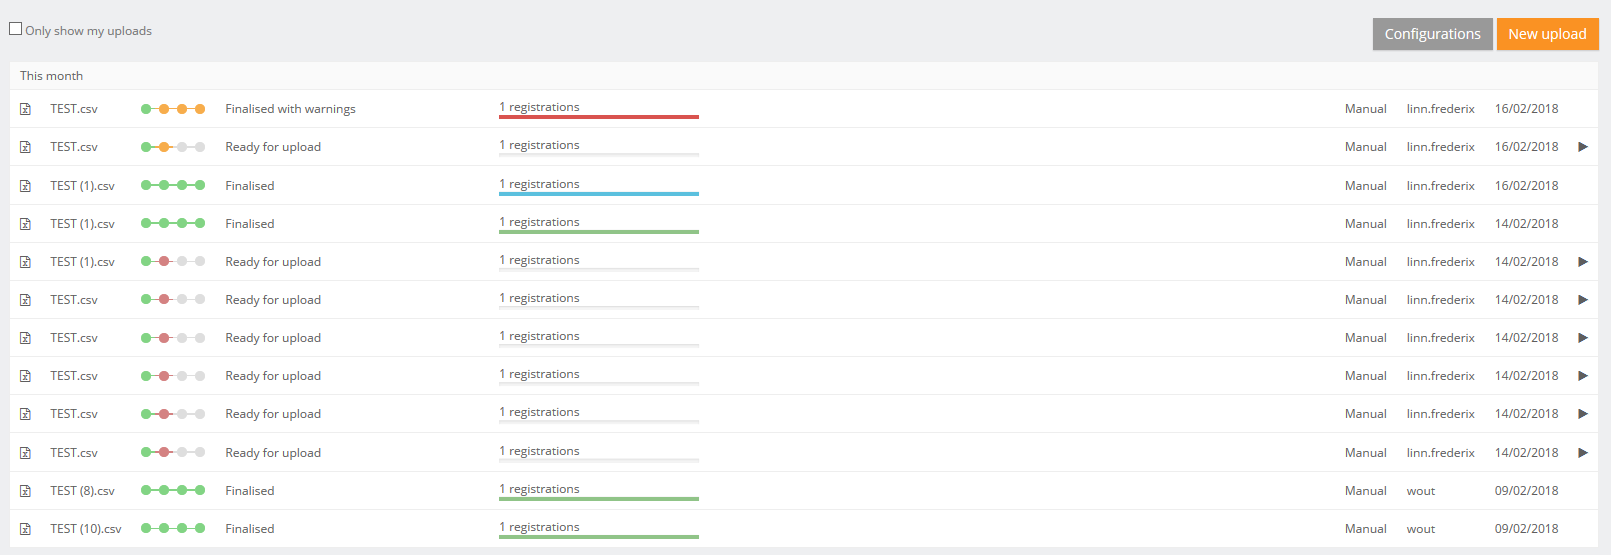
In the right upper corner two buttons are shown.
- Configuration: the default settings for a register can be set by any user that is authorized to participate in a register.
Following options are available:
- Conflict mode: what need to be done in case of conflict
- Conflict master: is the data from the new registration of from the record in the database saved in case of conflict
- Ignore duplicate records
- Autosubmit: send the data automatically for processing in HD4RES
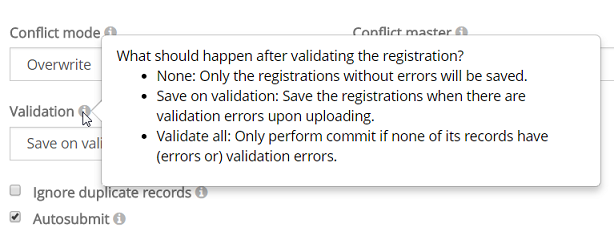
- Validation: what need to be done after validation the registration:
- None: only the registrations without errors will be saved
- Save on validations: Save the registrations when there are validation errors upon uploading
- Validate all: Only perform commit if non of its records have (errors or) validation errors
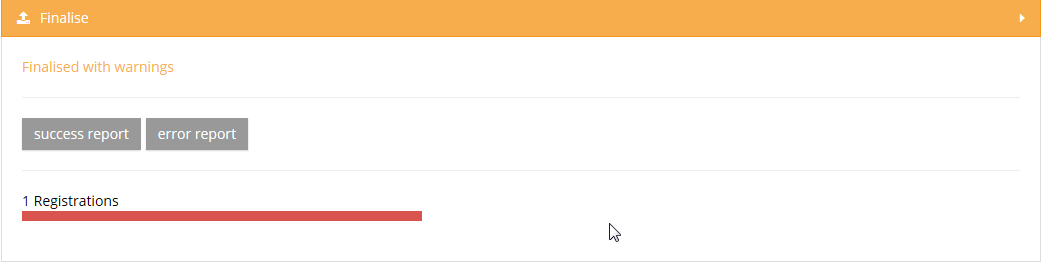
4 steps need to be executed for a new upload. When the titel bar of a separate step turns green, orange or red and the icon of the step in the overview, the step has respectively ended with success, with warnings or errors.
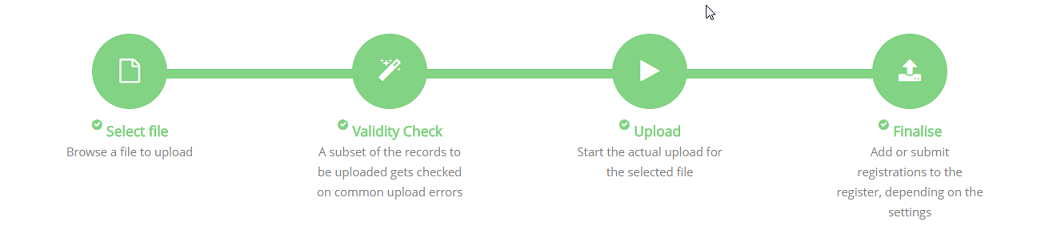
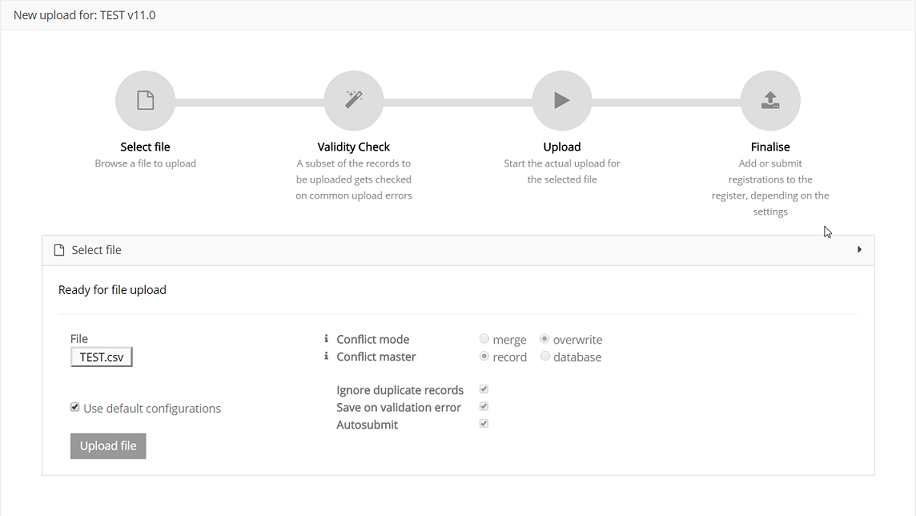
Step 1 - Select file
The first step is to select the CSV file with the data to be uploaded. The default settings for a register can be found in the Configurations on the main screen of the upload center.
Be sure to deselect the "Use default configurations" when changing the default settings:

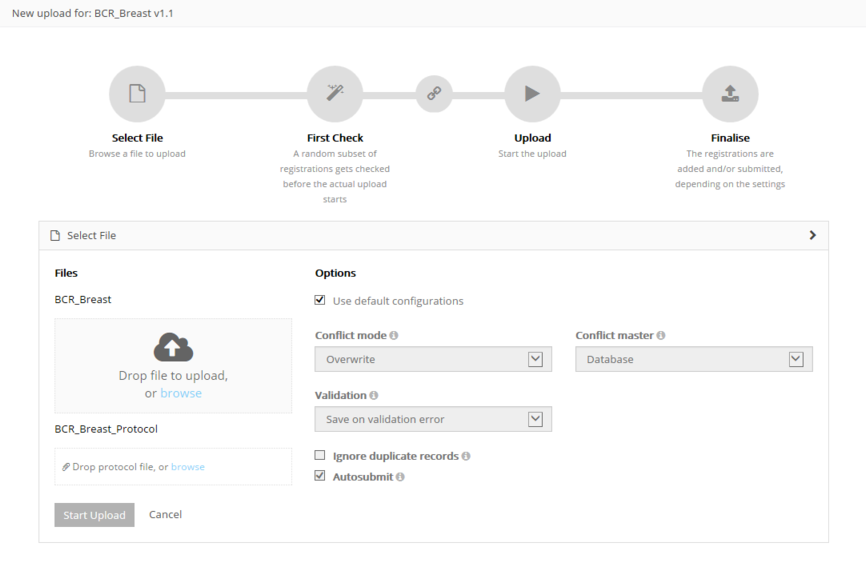
For the BCR register, the possibility exists to upload two files and link them during the process:
- Both documents will be validated separately. By using the link "Click here to see the linked upload" the user can switch between the linked documents. Refresh of push F5 on you to see the status of the upload.
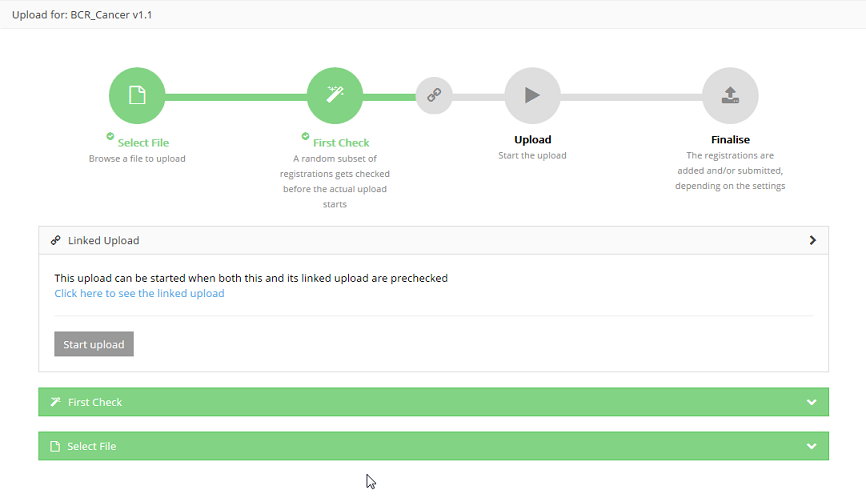
After uploading succesfully, the title bar of this step will turn green.
Step 2 - Validity Check
Validation checks are executed for every record.

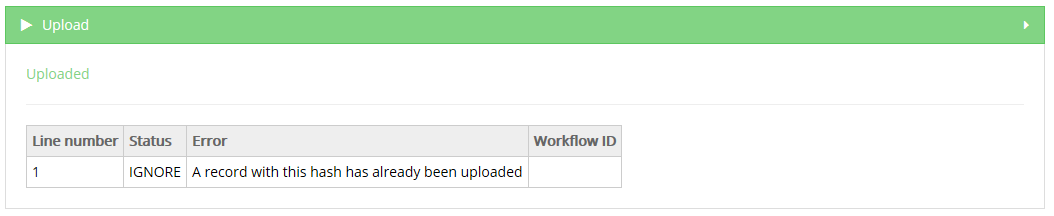
Step 3 - Upload
The file is being uploaded and the result is shown in this step per line of data added:
Step 4 - Finalize
The result is shown visually for all registrations and for all registrations in a CSV file in reports after finalization:
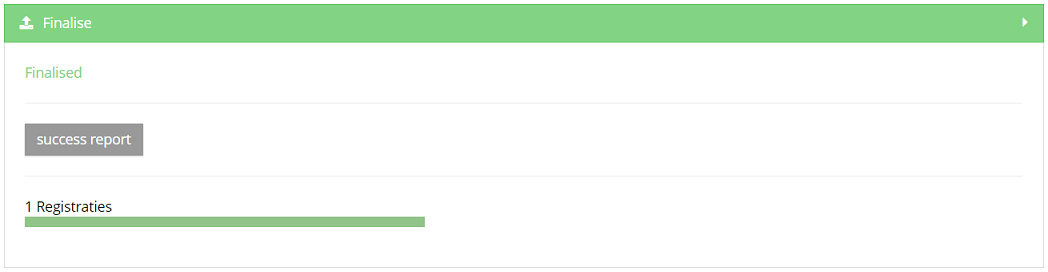
Succes report is a CSV file with all registrations who were processed succesfully.
In case of errors, a link to a detailed error report is shown too:
Please find below the movie that guides you through the functionalities of the Upload Center:
Create a csv for HD4DP v1
Create a csv for HD4DP v1Processing registrations in bulk is done by uploading CSV files. These files are plain text files which can contain multiple registrations at once and are extracted from your primary system.
The first step is to create the file correctly.
Using a CSV editor
While Excel is a fine tool to view CSV’s, we do not recommend it to edit CSVs. Instead use notepad++ or any other text editor. Here are a few risks you should be aware of when editing a CSV in Excel. Excel will interpret the content, which may lead to changes:
- Leading zeros disappear in fields that are recognized as numeric fields
- Entries like 3-9 can become March-9
- The only accepted date format DD/MM/YYYY can be modified (e.g. To DD/MM/YY)
- The decimal separator can differ from that in HD4DP, a semicolon wil lead to a correct upload
- When saving a file as .csv, Excel uses the default field separator. HD4DP only accepts CSV with a semicolon as separator. This default setting can be adapted in the properties of your computer.
- CSV encoding must be in UTF-8.
Setting up the document
Every column in the CSV file needs to be recognized as a field of the register by the HD4DP application. Therefor each column in the file must be identical by the technical name of the field in the register.
Tip: Downloading (manually) entered data from HD4DP will guide you in formatting a CSV file and may help during the development of the CSV extraction from the primary systems.
The Data Collection Definition (DCD) specifications for a register and its fields are defined and documented on this documentation portal.
Each field in the form can be completed through a value in a CSV file.
An example field is “Date of last follow-up”, shown in the screenshot below.
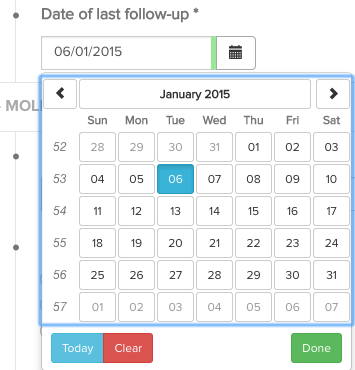
This field is of the type “date” and is required (*). Within the technical documentation of this data collection, this is shown as follows:
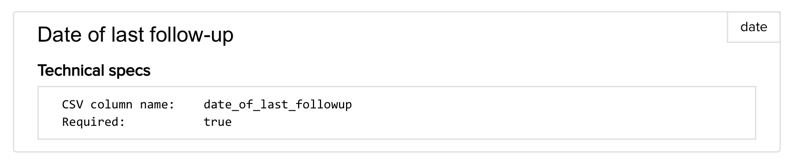
To include this field in a CSV upload file, it is sufficient to create a column with the name “date_of_last_followup” and populate it with the appropriate data i.e. a date in the format dd/mm/yyyy.
Fields can be required, read-only and computed (automatically calculated). Fields can also have a default value.
This information is present in the detailed technical description for each data collection.
General requirements
- The column separator is the semicolon (;)
- The decimal separator for numbers is the comma (,)
- The date format is dd/mm/yyyy
Basic content types
Depending on the type of the field, a different representation of the data is expected. The table below describes the different basic types and the rules on how to provide the content for these types.
| Content type | Expected format/content |
| boolean | TRUE, FALSE |
| date | dd/mm/yyyy |
| choice | code from choice list |
| list | option1_label|option2_label|etc. |
| multiline | free text |
| number | number (decimal separator = ,) |
| patientID | SSIN number. If the person does not have a SSIN, leave this field blank. |
| questionnaire | code from questionnaire answer list |
| text | ● free text ● if a binding reference list is used: a code from the reference list ● if a non-binding reference list is used: a code from the reference list or free text |
| attachment | ● expected format/content: Name of the file that must be attached (e.g. protocol.txt). ● expected extension: .txt ● file must be stored in the same folder as the folder that is used for the CSV-upload |
Advanced content types
Other than these simple types, more complex data structures can be used, as shown in the table below. Each of these types is explained in more detail below the table.
| Content type | CSV column name | Expected format |
| fields within fieldset | fieldset_label|field_label | depending on the field type |
| list (1 field) | list_label|field | value1|value2|etc |
| list (block of fields) | list_label|0|field1 list_label|0|field2 list_label|1|field1 list_label|1|field2 etc. | depending on the field type |
| nested fields below choice or multichoice | choice_label|nested_item | depending on the field type |
Fieldset
A fieldset is a collection of fields, as shown in the image below:
Anthropometry is the title of the fieldset, and this fieldset contains two fields, weight and height. Fieldsets fieldsets do not have a number cfr. image below - Anthropometry.

Sections do not have an impact on the CSV file, whereas fieldsets do. The title of the fieldset must be included in the field name column as follows: fieldset_label|field_label.
E.g. for the two Anthropometry fieldset fields weight and height below, the correct CSV column headers are: anthropometry|weight en anthropometry|height.
Lists
A list is also a collection of fields, like a fieldset, but with the additional property that the collection of fields can be repeated.
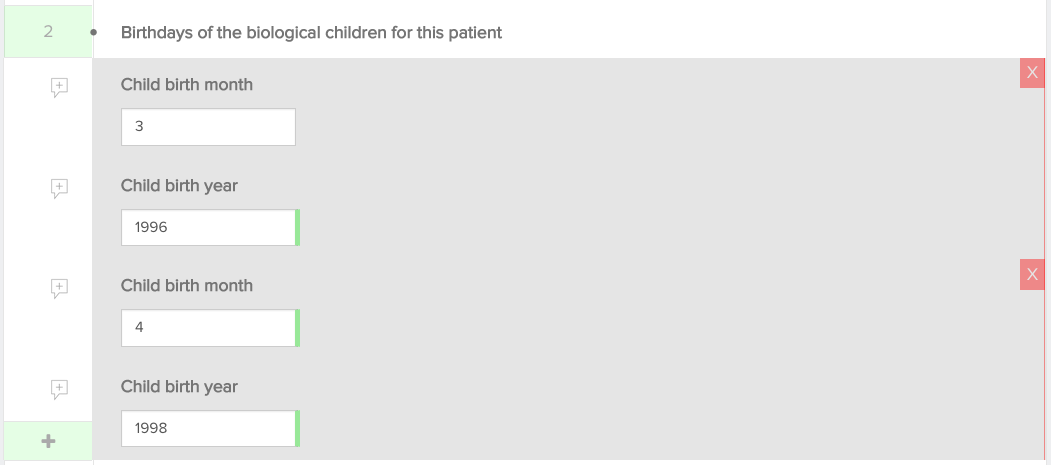
An example is shown in the image below: “Birthdays of the biological children for this patient” is a list. One list item consists of two fields, “Child birth month” and “Child birth year”. For each child, a list item can be added.
The CSV column names consist of the list header label and the field label (as for fieldsets), together with a counter to distinguish the different list items. The correct CSV column names for the two list items below are:
- birthdays_of_the_biological_children_for_this_patient|00|child_birth_month
- birthdays_of_the_biological_children_for_this_patient|00|child_birth_month
- birthdays_of_the_biological_children_for_this_patient|01|child_birth_month
- birthdays_of_the_biological_children_for_this_patient|01|child_birth_year
Please note that for every line, the numbers should increment, starting from 0 (|00|,|01|, .. is ok, |01|, |03|, ... is not). You can't have blank values for |00| and filled values for a higher number.
Please note that the numbering requires a stable format, meaning the number of characters used by the number has to be constant. You can't have one record using |00| and another using |0|. Generally we advice to use a string length of 2 digits.
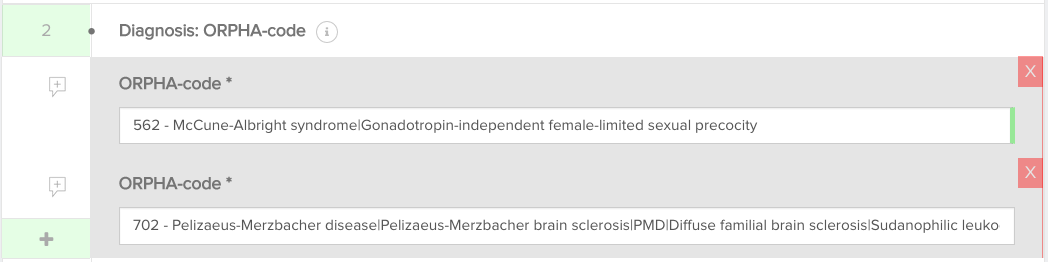
For lists consisting of 1 field a simplified implementation is possible. The CSV column header only consists of the list header label and multiple values are provided in the one column, separated by a pipe (|).
E.g. for the list in the image below, the CSV column header is diagnosis_orphacode and the content of the column is 562|702. This is the example of a text field with a reference list: providing the codes of the reference list is sufficient.
Nested fields
Nested fields are fields that only become available when specific options are selected in the form. An example is shown below: the field “Specify” only becomes available if the checkbox “Other” is marked. These fields also have a combined CSV column header, consisting of the choice list label and the field label. For the example below, the correct CSV column header is hence base_of_diagnosis|specify.

Attachments
When a CSV is prepared and put in the provisioning folder, it can contain references to attachments for data collections that specifically allow this.
These references are relative paths to the file location. If such a reference is present in the CSV file, the attachment content is uploaded and linked to the created registration. The attachment is then available in the HD4DP client as well as in the HD4RES client when the registration is submitted.
The maximum file size for attachments is 6 MB.
If a data collection permits you to send attachments you should have the column name to use in the CSV. If not, you should be able to find it at https://www.healthdata.be/dcd/#/collections or you can contact Support.Healthdata@sciensano.be.
Add the column name to the header of the CSV and add the file names as values in the column.
Example: “picture.png”
Put the CSV file in the correct provisioning folder (organization sub folder, then in the register sub folder), along with a “picture.png” file of your choice. The application picks the CSV file and creates a new registration.
Open the registration and verify the attachment has correctly been uploaded.
CSV download and upload for stable data
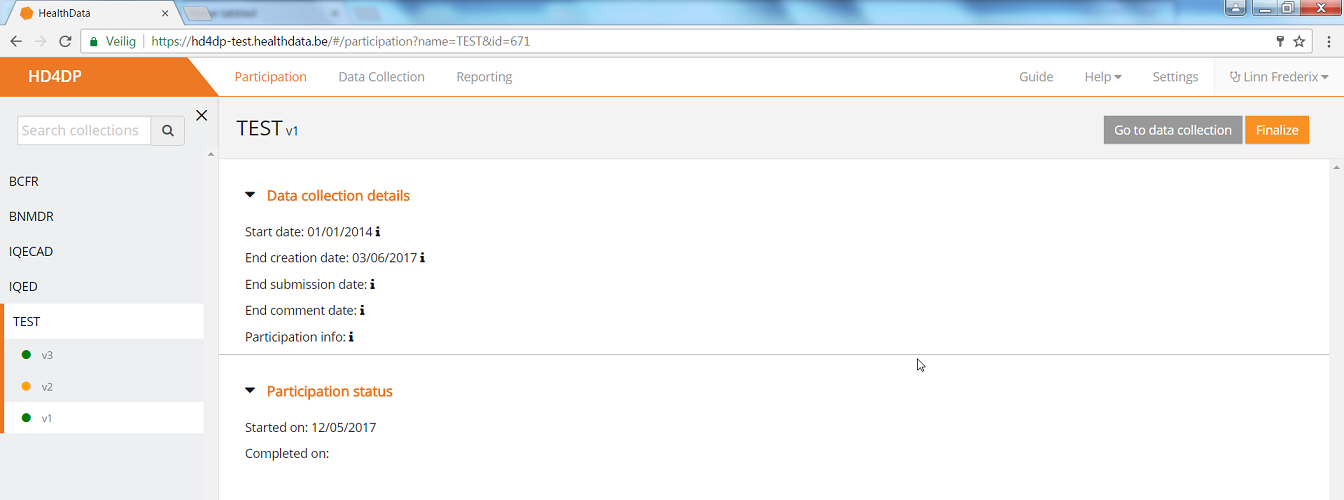
CSV download and upload for stable dataBefore starting a new data collection based on stable data of another data collection, you need to finalize the data collection which serves as the starting point of your new data collection cf. article "Finalize the data collection"
To start the new data collection select the new version in the Data collection section. In this case v3.
Click the button "Go to the participation page":
- Click on ‘Participate’:
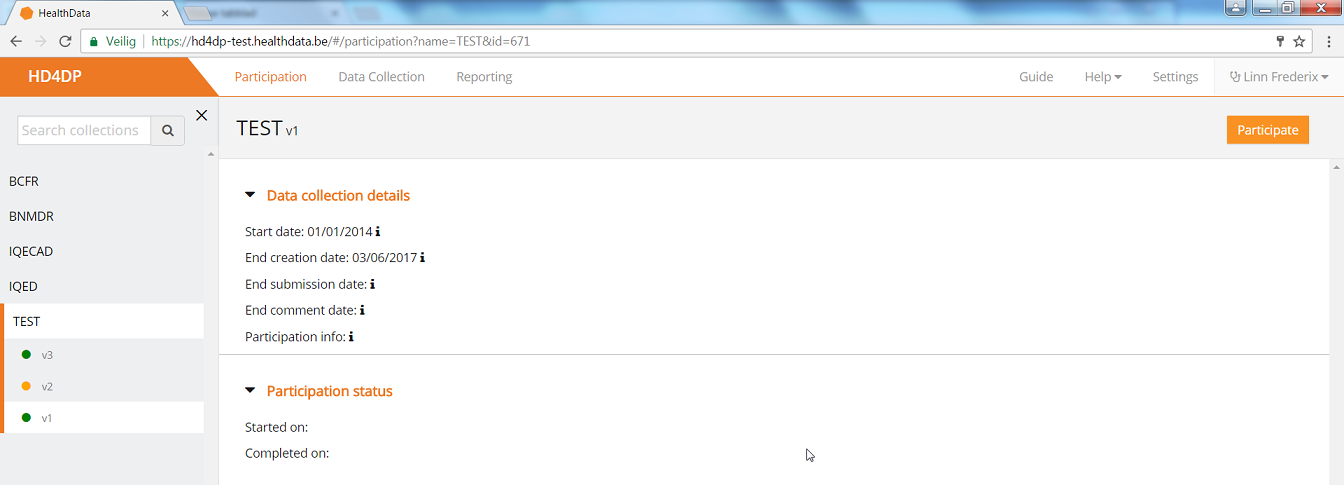
- The Start date in the Participation status will be updated and access to the new version is completed and the user can return to the Data Collection section:
- Once the previous data collection is finalized and the new one has been started, you can download data from the first version and add those to the next version.
- Go to the Registrations tab:
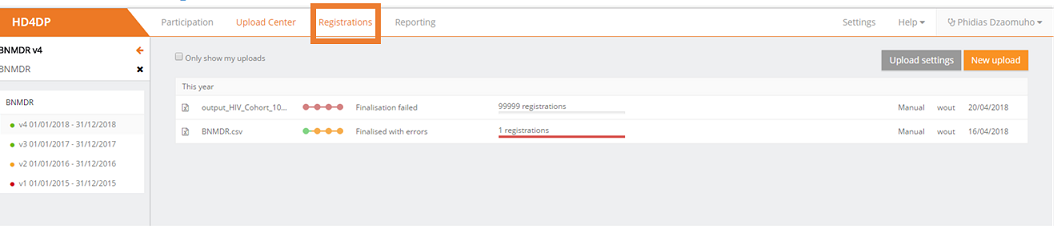
- Download the data by using the Download button "CSV Download All (Stable Data)":

When everything is downloaded, you can start uploading by Using the upload center.