HD4DP v2
HD4DP v2 Adelaide.DAmoreGeneral description of the application HD4DP v2
General description of the application HD4DP v2The HD4DP version 2.x Local is an electronic data capture (EDC) system: a computerized system designed for the collection of clinical data in electronic format for use in research supporting human public health policy. HD4DP (Health Data for Data providers) replaces the traditional paper-based data collection methodology and the proliferation of websites to streamline data collection and expedite the time to analysis and reporting.
Components and features
The HD4DP version 2.x Local application contains the following major components: NextGen Connect, Form.io, HD Connect (LOCAL Proxy), Local datawarehouse.
NextGen Connect
NextGen Connect is a health care integration engine that translates message standards into the standard required by the receiving system, including data formats and standards like HL7, DICOM, ANSI X12, ASCII, and XML. Main functionalities are filtering, transformation, extraction and routing.
The NextGen Connect component is used to handle all integrations within HD4DP 2.0 itself but also all integrations with the external world.
Data collections API: The form.io server offers a REST API which can be used to submit data for each known data collection. Data provider Master Systems cannot access this API directly but need to use the API exposed by the NextGen Connect component. This API is simply a proxy for the form.io API, but allows extra features on top of the form.io API such as security, monitoring, throttling, …
CSV API: For each data collection data can be submitted file-based using a CSV. A CSV can contain multiple data entries for a single data collection definition. These data entries are transformed and pushed by the NextGen Connect component towards the form.io server for potential manual post-processing and validation.
HL7 FHIR API: For some data collections an HL7 FHIR API will be available. The NextGen Connect component performs the transformation towards the Data Collections API and push the data into the form.io server.
Data delivery: the NextGen Connect component handles all routing of data towards the external world. This means it verifies the form.io server for completed data entries which have not yet been delivered. For each data entry that needs to be delivered, it determines where to send the data to, how it needs to be transformed and how it needs to be split. It performs all these actions in a guaranteed delivery fashion: it makes sure the data reaches its destination, possibly retrying when something went wrong.
Feedback: the NextGen Connect component coordinates the receival of feedback, potentially transforming it and pushing it towards the respective data collection entry using the data collections API.
Form.io
Form.io is a data management platform that includes a form builder with a drag and drop interface, management of data with complete API platform, management of users, offline forms, dynamic forms, automatic creation of API, and application embedding. In HD4DP v2, an Angular frontend application is available on top of the form.io server. This application provides a user interface to data providers in which they can see the different data collections for which they are allowed to record and submit data manually. A form.io backend server is responsible for providing the form definitions and registrations of new/updated entries.
HD Connect (LOCAL Proxy)
The HD Connect component is used to retrieve metadata from Master Data Management Database (MDM DB) residing on healthdata.be side.
Local datawarehouse
Each and every change in data entries on the form.io server is pushed towards the local datawarehouse (Local DWH) for easy reporting and data extraction. This local DWH consists of a PostgreSQL database.
Installation and maintenance
The application HD4DP v2 Local is provided without cost and installed remotely on the infrastructure of the healthcare organization by healthdata.be. Healthcare organizations are provided the system requirements for installation of HD4DP v2 application. Healthcare organizations that cannot provide the system requirements can opt to request access and use of a HD4DP v2 Local application of another healthcare organization. Healthcare organizations that cannot provide the system requirements and cannot access and use a HD4DP v2 Local application of another healthcare organization, can request access and use of HD4DP v2 WEB hosted by healthdata.be.
The application HD4DP v2 Local is maintained without cost remotely on the infrastructure of the healthcare organization by healthdata.be. The infrastructure on which the application HD4DP v2 Local is installed, should be maintained by the healthcare organization.
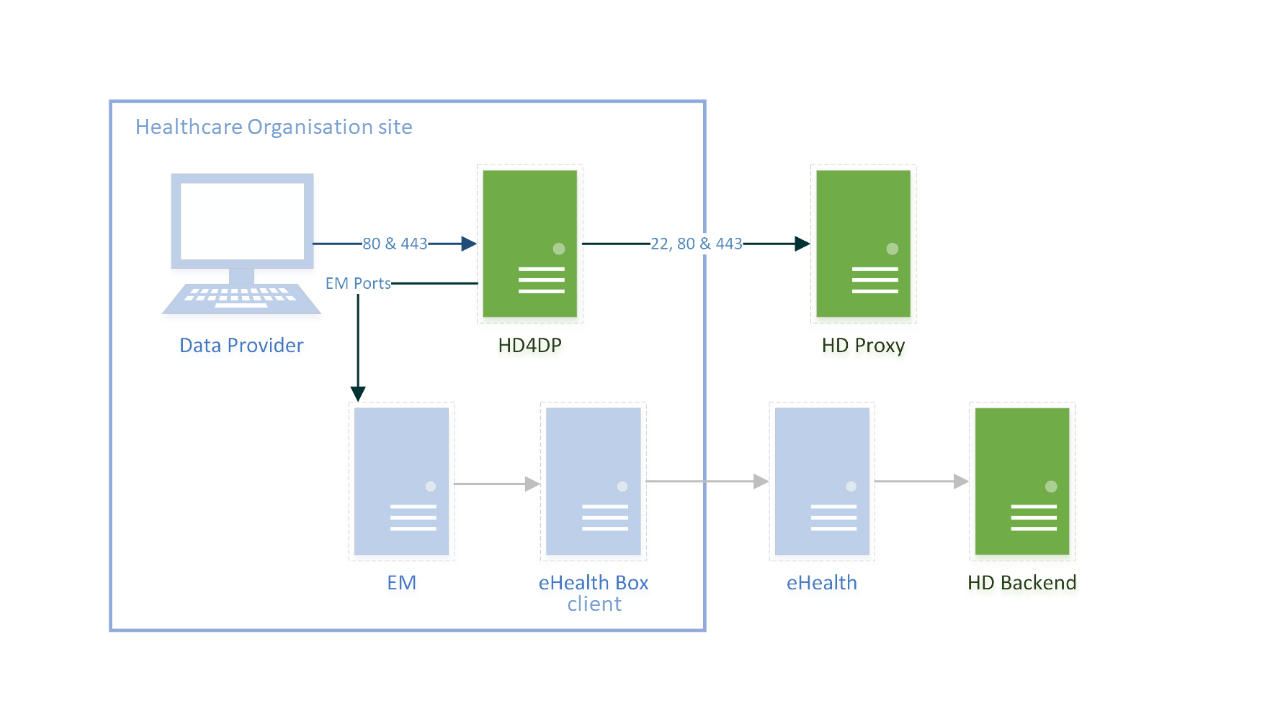
Position of HD4DP v2 in HD Architecture 2.0
Position of HD4DP v2 in HD Architecture 2.0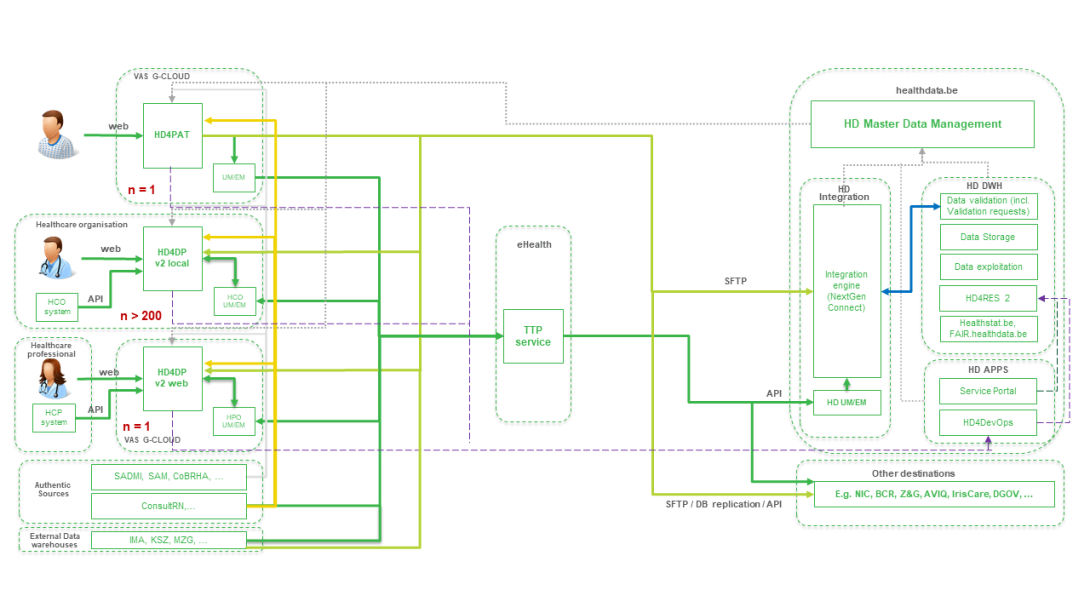
User manual of the application HD4DP v2
User manual of the application HD4DP v2In this manual we describe the following functions of the application HD4DP v2:
Request access to an HD application for a specific project
Request access to an HD application for a specific projectHealthdata.be applications such as HD4DP v2 and healthstat.be process sensitive personal information. Therefore, strictly controlled processes are used to grant access to these applications.
The Entity Access Management (EAM) portal of healthdata.be facilitates these processes. In this article we describe how to use it. To navigate to the EAM application, enter the URL https://eam.healthdata.be in your internet browser.
Note: As the documentation of the EAM portal is being updated on a regular basis, please be advised to check the Release notes first.
Select one of the following capacities that suits your position in order to request access to an HD application:
Standard End-users
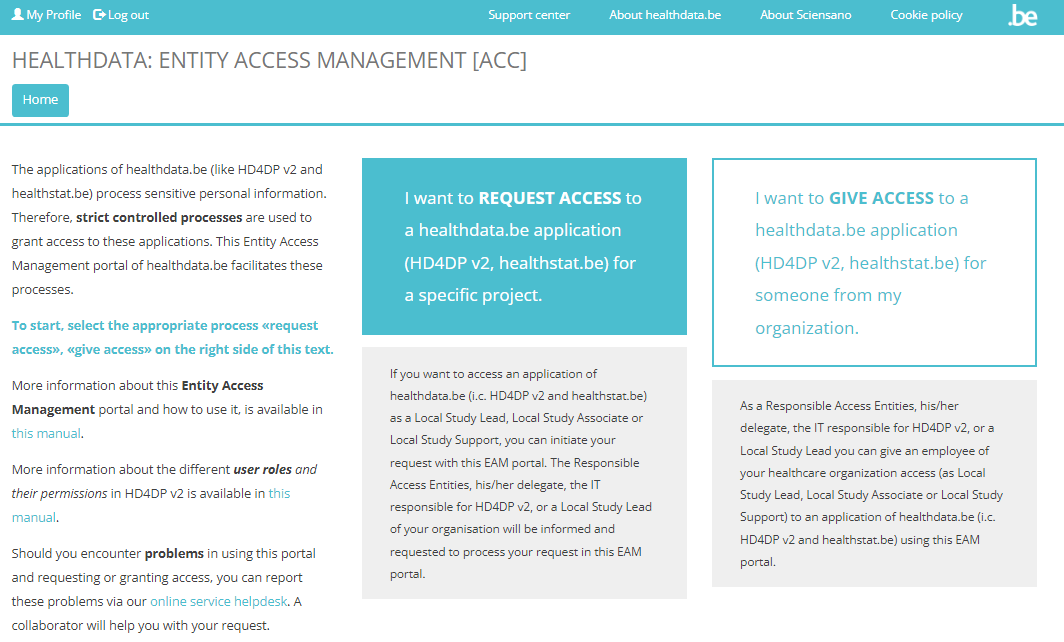
To request access to healthdata.be applications (such as HD4DP v2 and healthstat.be) as a standard end-user, you need to click on REQUEST ACCESS in the blue text box in the middle of the screen.

You will be directed to the next screen, where you select the button Log in with eID.
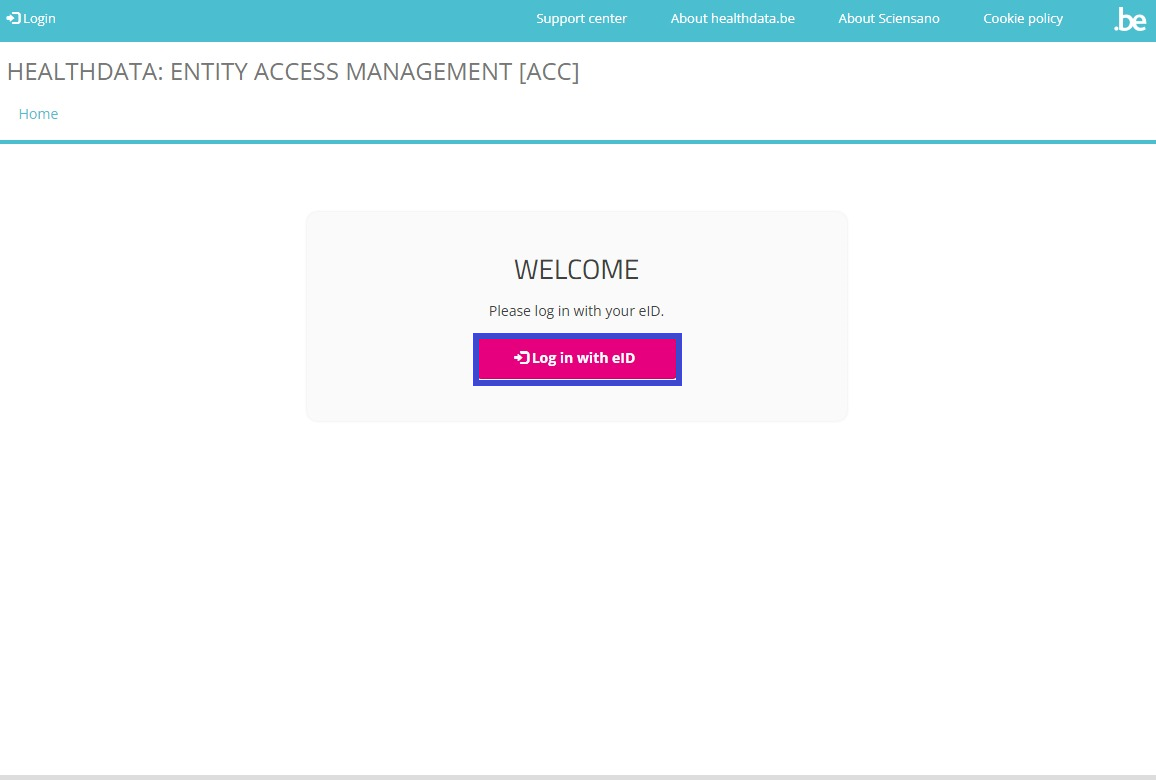
Clicking on this button leads you to the government's Federal Authentication Service (FAS), where you can log in with multiple digital keys with eID or digital identity.
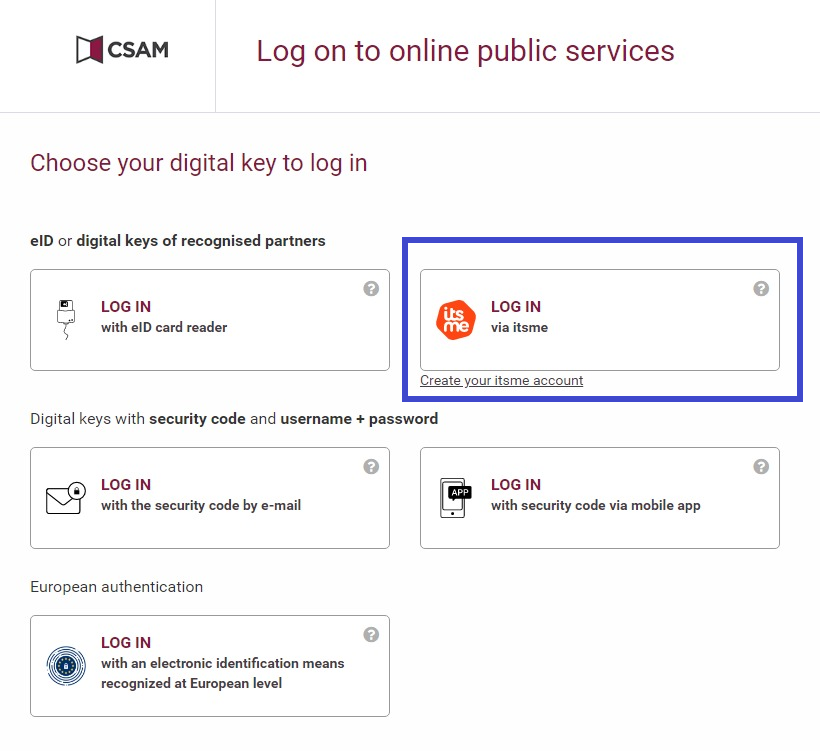
If you choose to connect with ItsMe, you can enter your cell phone number.
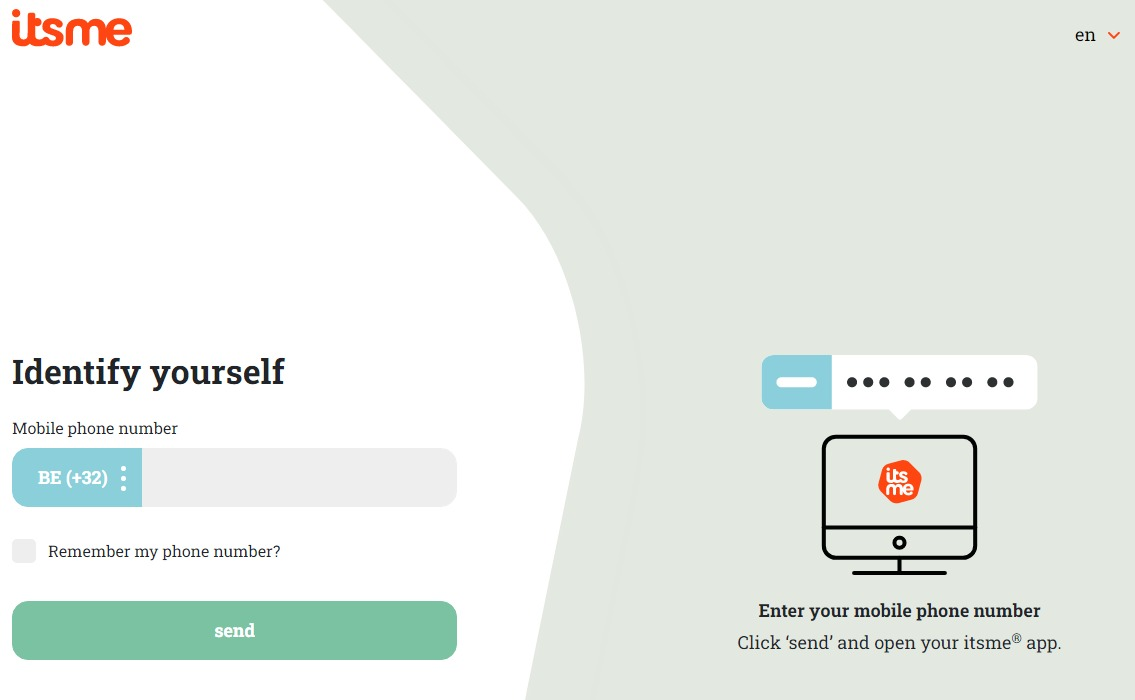
Follow the instructions on your mobile device via the ItsMe application.

Once you have run through the ItsMe login procedure, you want to select the green confirmation button (available in FR and NL) in the screen below to access the Sciensano environment.

After selection of the confirmation button, you are logged in to the EAM portal page as indicated by the available My profile and Log out options to the top-left of your screen.
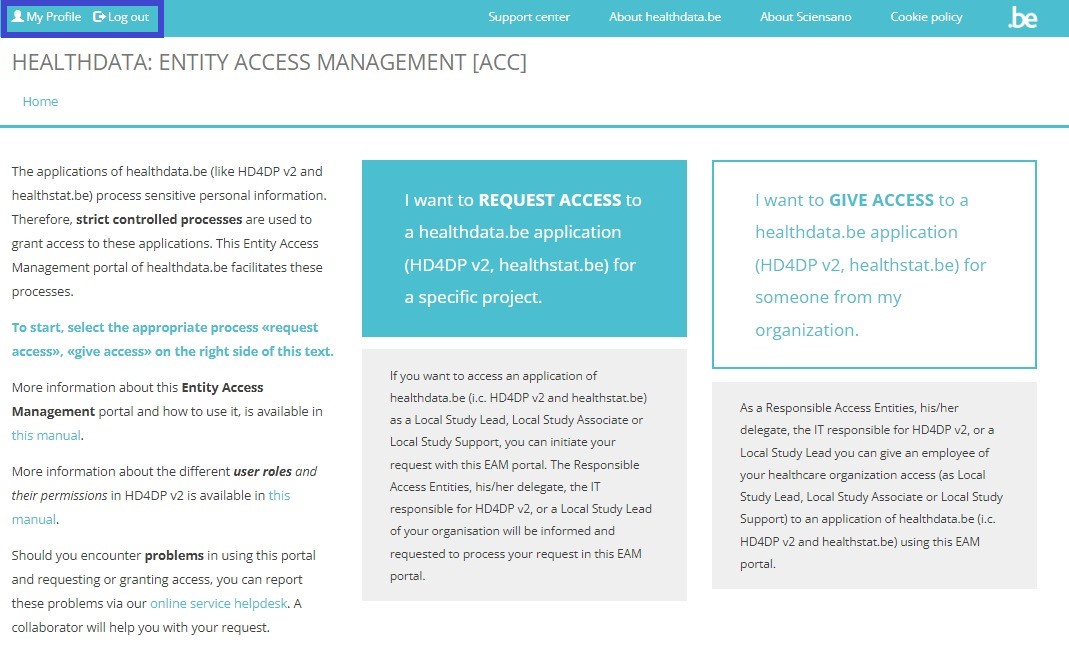
When selecting the REQUEST ACCESS link in the blue highlighted text box, in order to fill out the Request access form, the following message appears:

Click on the My profile link in the message, which redirects you to your profile page. Your user profile needs validation before being able to enter and complete the Request access form.
Select the Edit tab to complete your profile information.
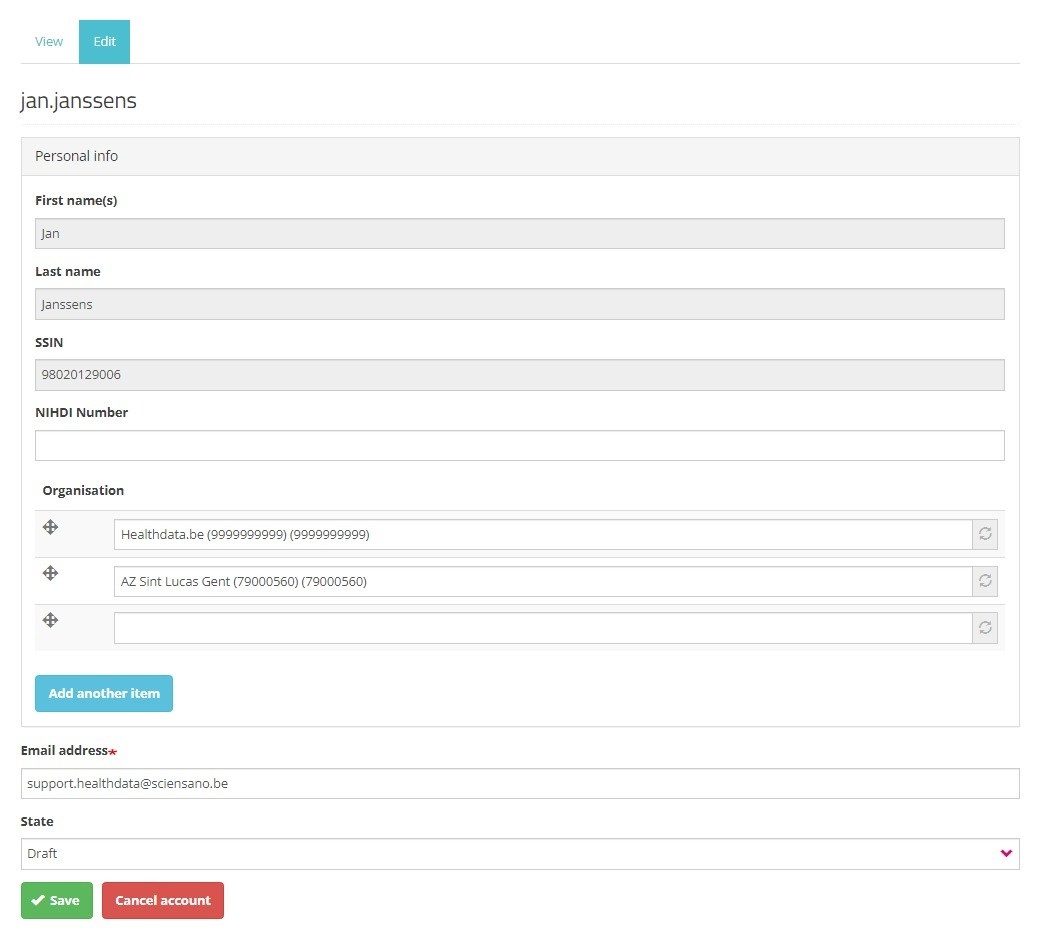
Next to the profile information that is automatically prefilled based on your eID data, you need to complete the following fields:
NIHDI Number: Your NIHDI number if available.
Organization: Add the organization(s) you are affiliated with. This field includes the name and NIHDI number of the organization.
Email address: Mandatory field for which the content can't be retrieved from the eID. Your email address will be used for communication on the profile validation and access request.
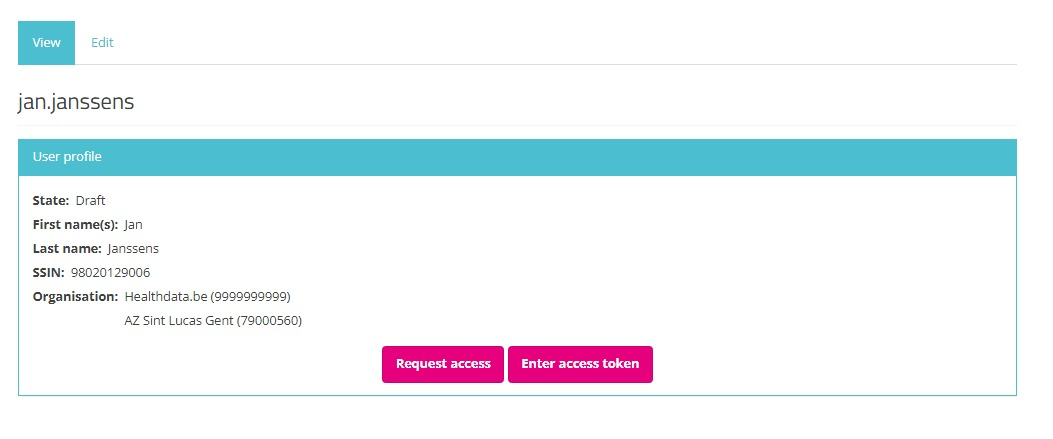
State: Select one of the options (see image underneath):
- Draft: This status indicates that you have not finished completing the profile fields yet. Only you can see the filled in data at this stage. Modification of the profile information is restricted to the status "Draft". You can however Save profile information as Draft to finalize and send it for validation lateron.
- Validation Requested: The provided user profile information is complete and you want to send it for validation to the SPOC.

Click on the Save button to send your profile information to the SPOC. An Access Denied message appears on the screen, indicating you can't modify your filled in and sent profile information anymore.
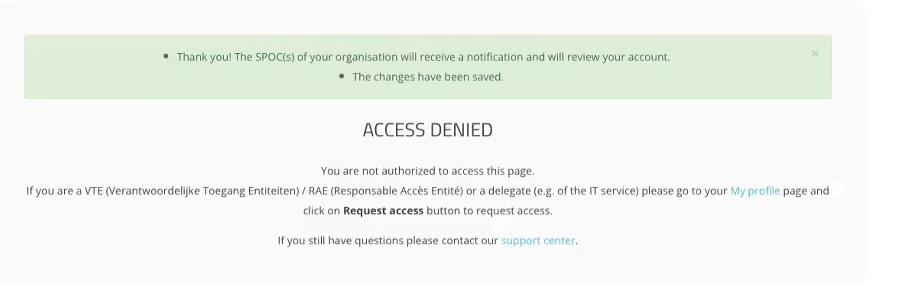
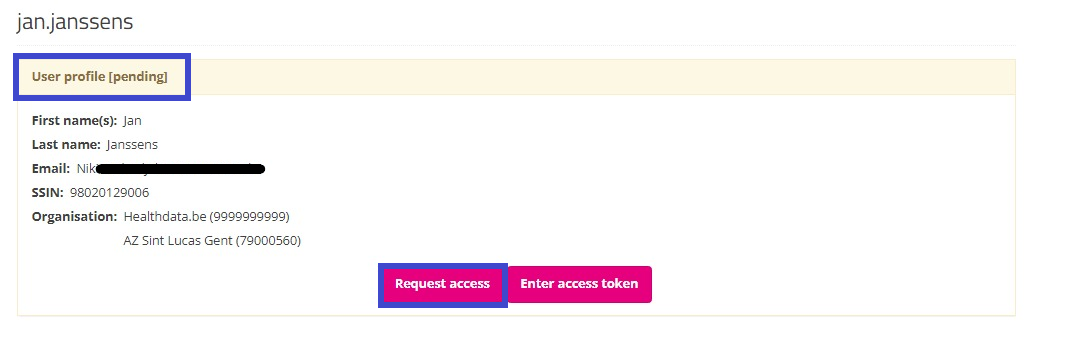
Return to the My profile page to see your profile has the pending status. Also, the Edit tab has disappeared, preventing from modifications afterwards:
Your profile will soon be validated by the SPOC, which will be visible on your profile page as follows:
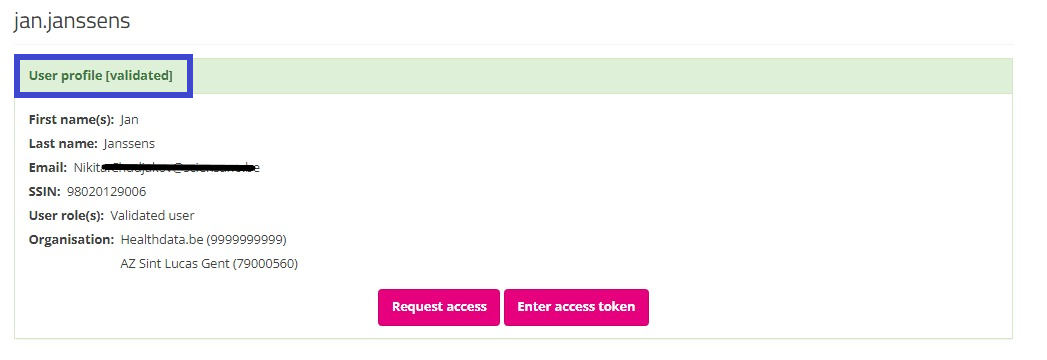
After validation of your profile by the SPOC, you select Home to return to the EAM portal page. Attention: Do not select the button "Request access" (soon: "Request SPOC rights"), since this leads to the process of requesting access as a SPOC.

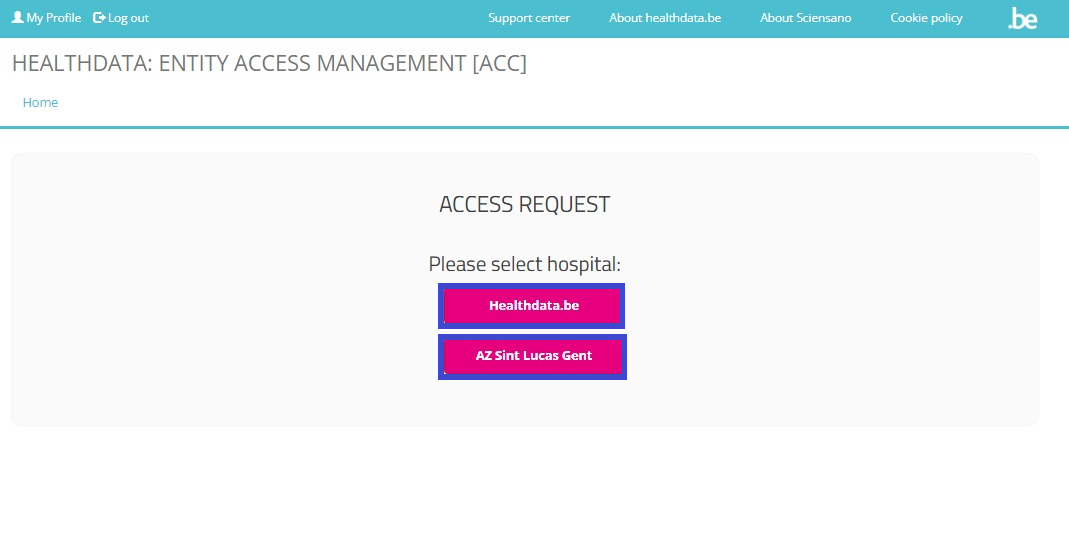
In the EAM portal page you want to select the REQUEST ACCESS link in the blue highlighted text box again.
Select the hospital you are affiliated with for the application(s) and project(s) you want to request access to.
You can now start completing the Request Access form.
Please fill in all required fields (indicated with a red asterisk *), make a selection in the mandatory drop-down lists and, optionally, tick the check boxes for additional help and/or information.
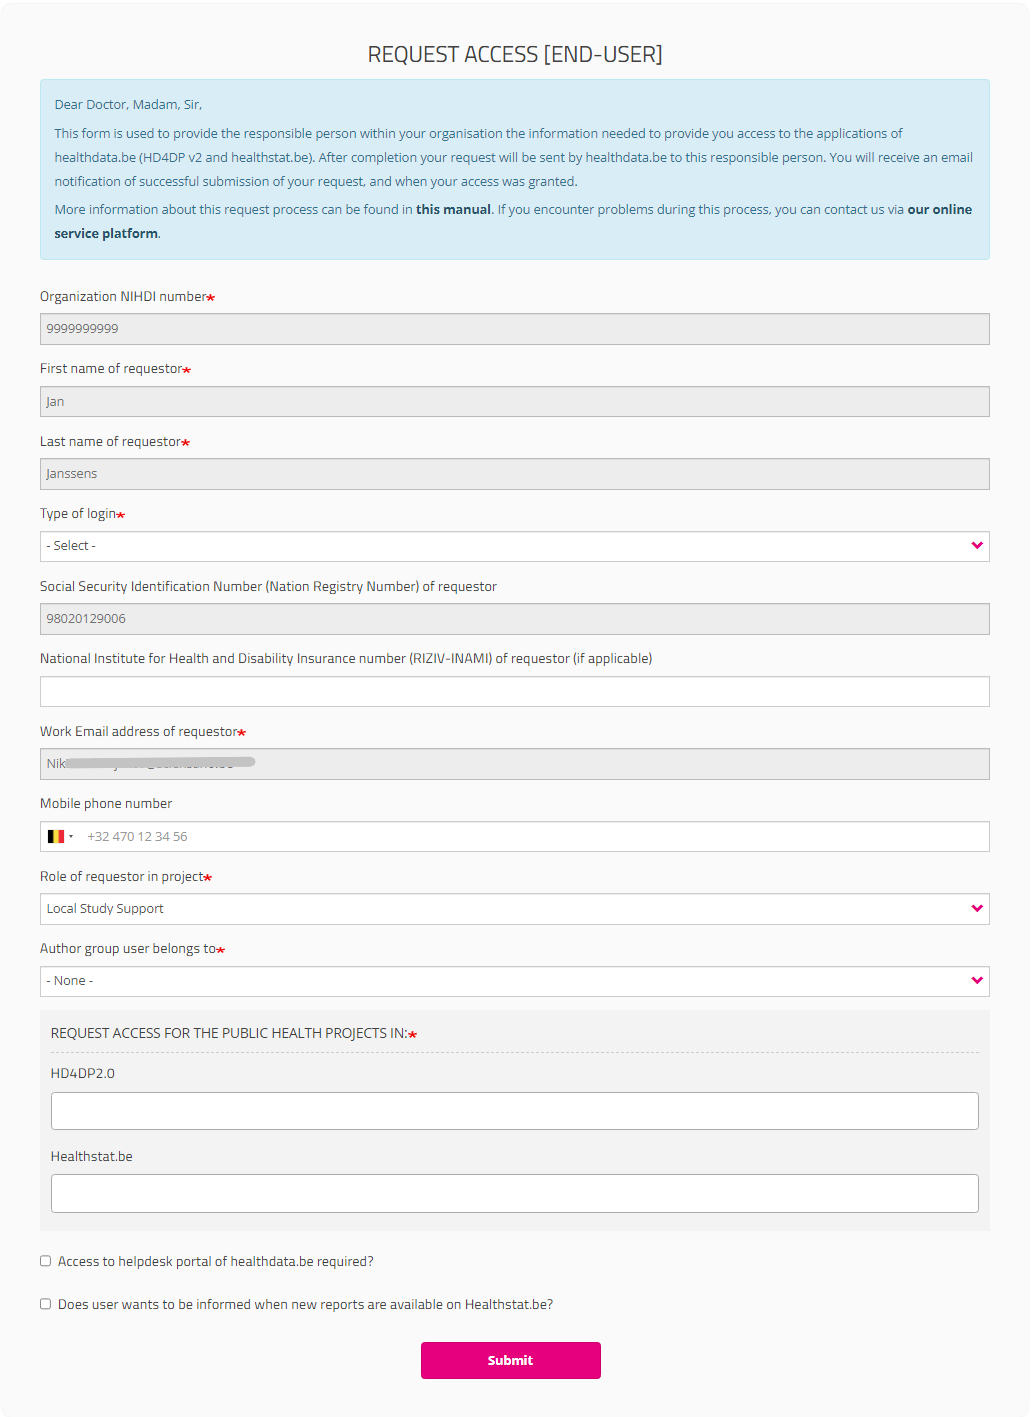
Type of login field:
If you select "Belgium resident" for the field “Type of Login”, entering the mobile phone number is optional.

If you are a "Non-Belgium resident", the Mobile phone number field becomes mandatory to allow for the two factor authentication:

Role of requestor in project field
You must indicate your role in the project (Local Study Lead, Local Study Associate or Local Study Support). Your role determines your access options in HD4DP2 for this project. Read more about the scope of the roles in User roles in HD4DP v2.

When selecting Local Study Support you will be asked to select the name of your Local Study Associate in a drop-down list. This list is automatically populated and specific to the organization you have selected earlier.

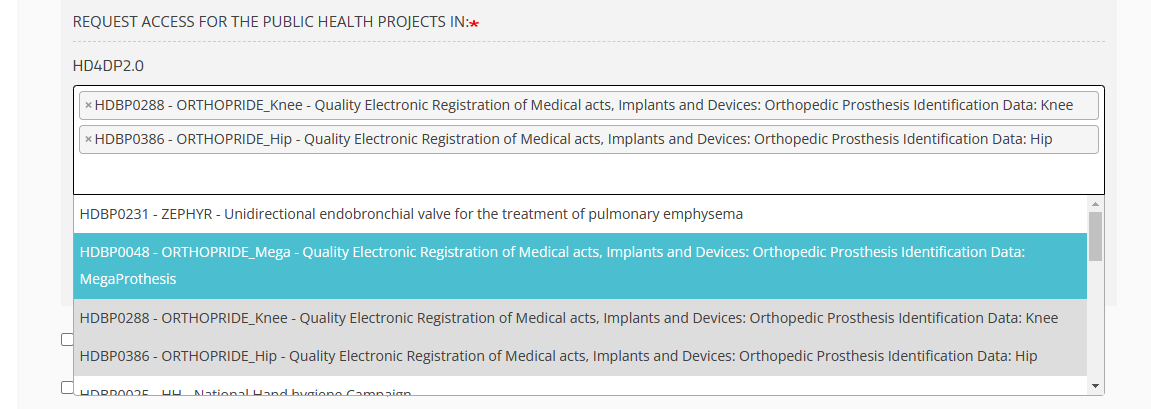
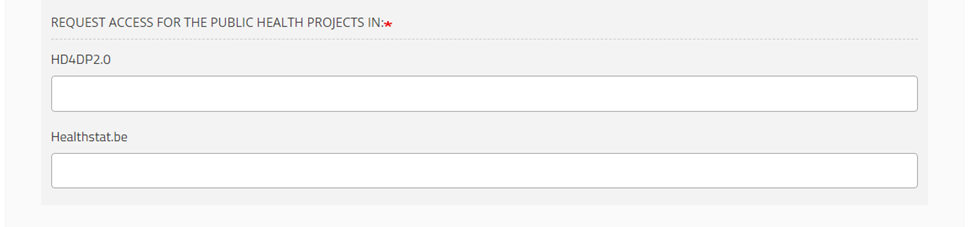
HD4DP2.0 field
Click in the field under HD4DP2.0 if you want to access the application to make registrations for the selected project:
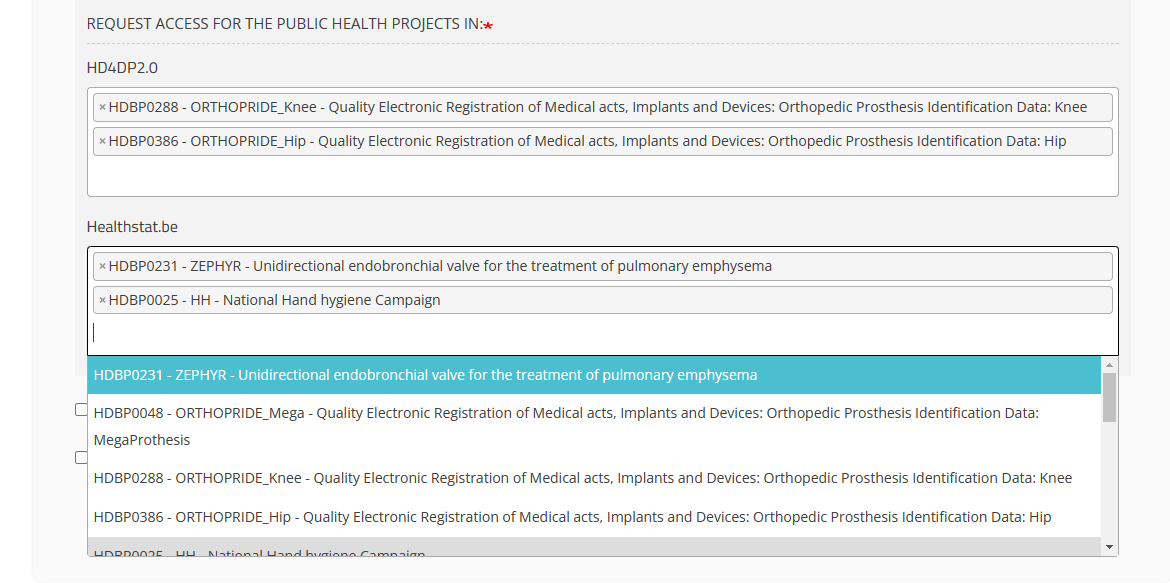
Healthstat.be field
Click in the field under healthstat.be if you want to access the reporting of the selected project:
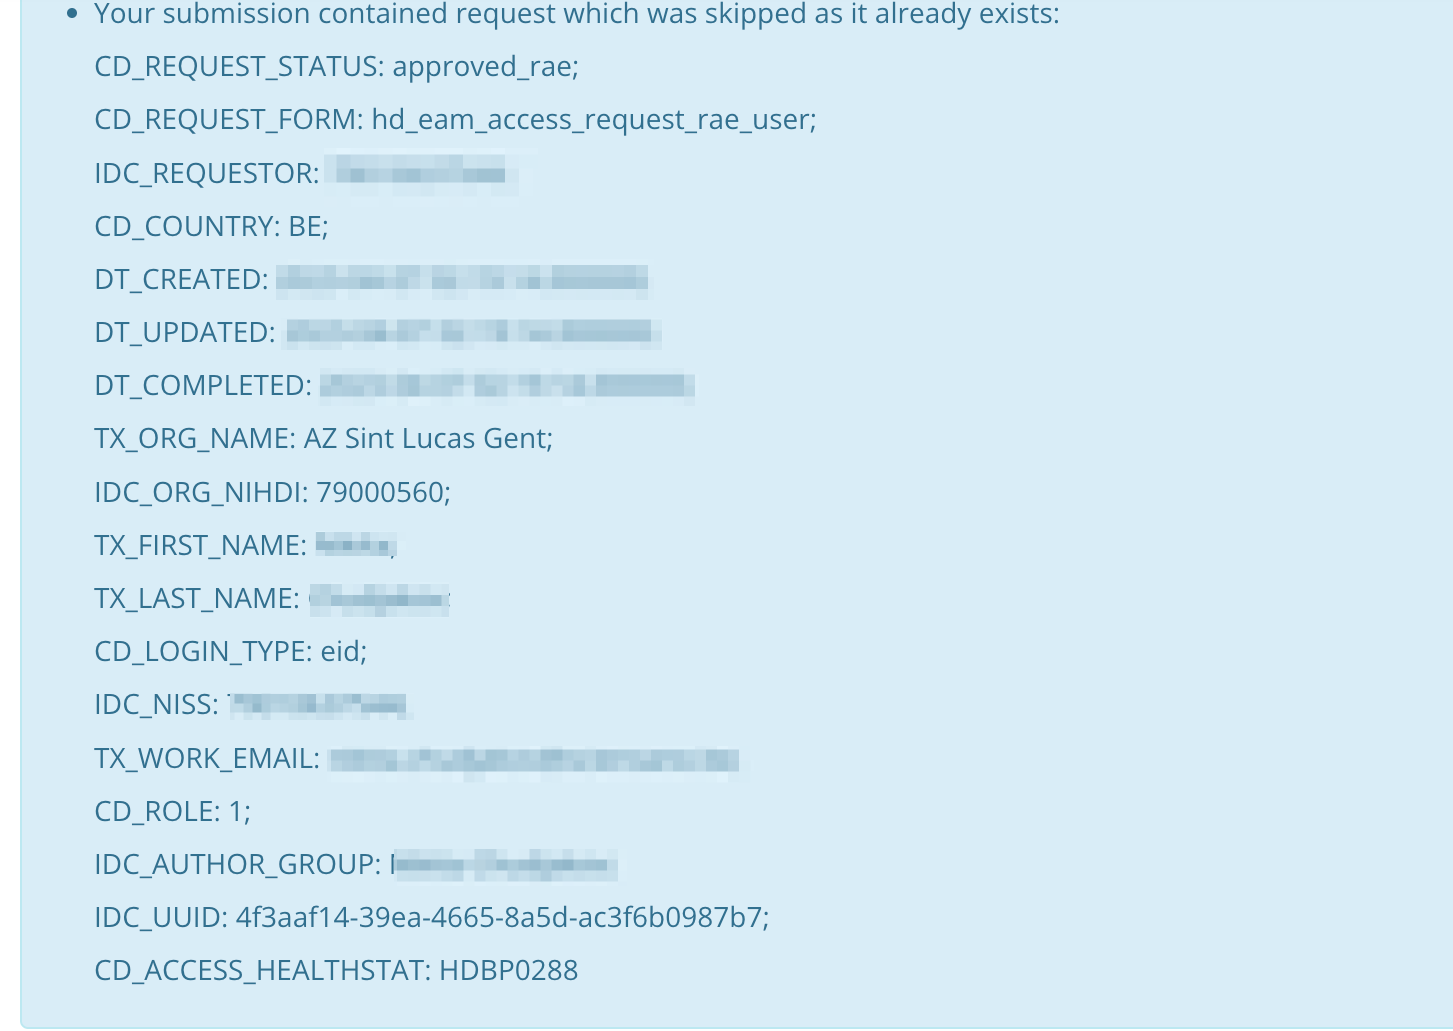
It can happen that a user inadvertently submits requests for access to the same applications and/or projects. The requests are screened for duplicates by checking on organization number, role, author group and project code. In case duplicates are detected, the end-user will receive the following message:
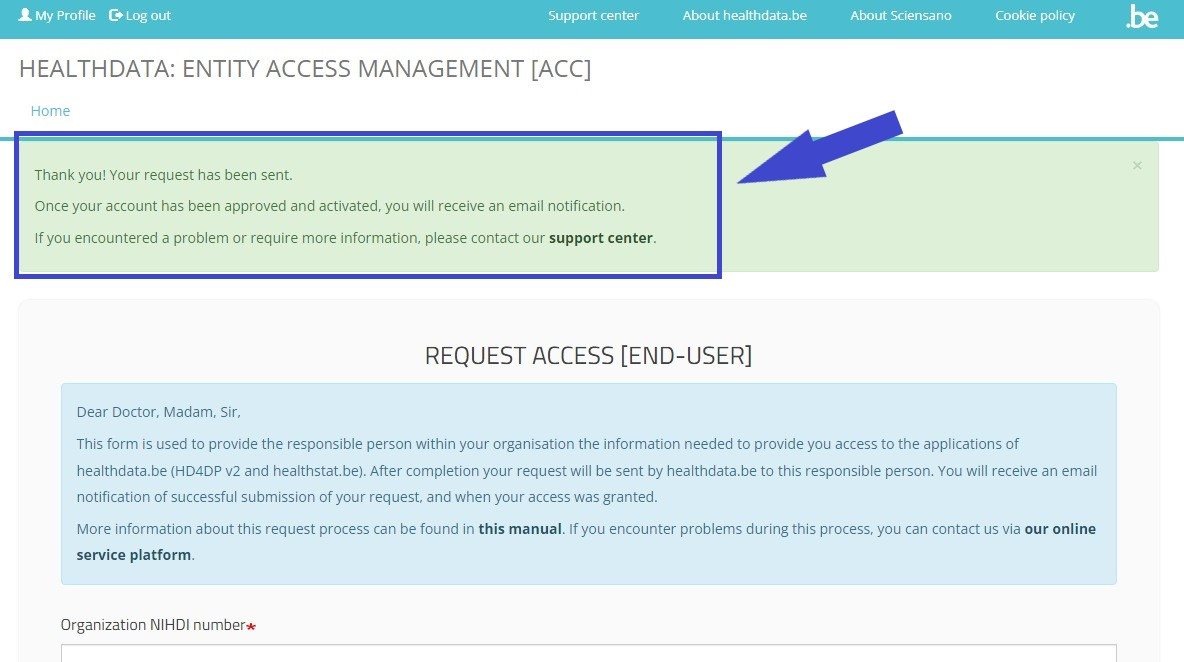
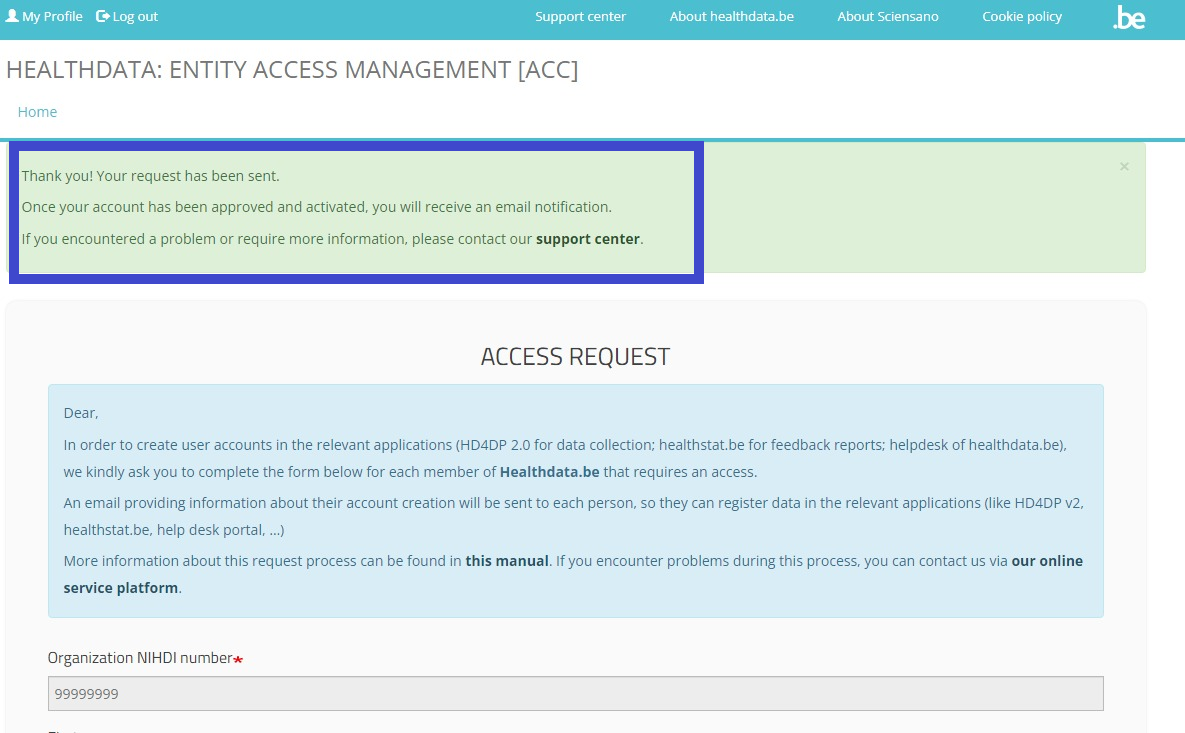
Once you have completed the Request Access form, click on the Submit button. When the submission was successful, you will receive a confirmation message.
Single IT points-of-contact (IT SPOC)
A single-point of contact or SPOC is a role that extends beyond the function of a VTE/RAE. More specific, it can be any employee within an organization whom this role has been assigned to.
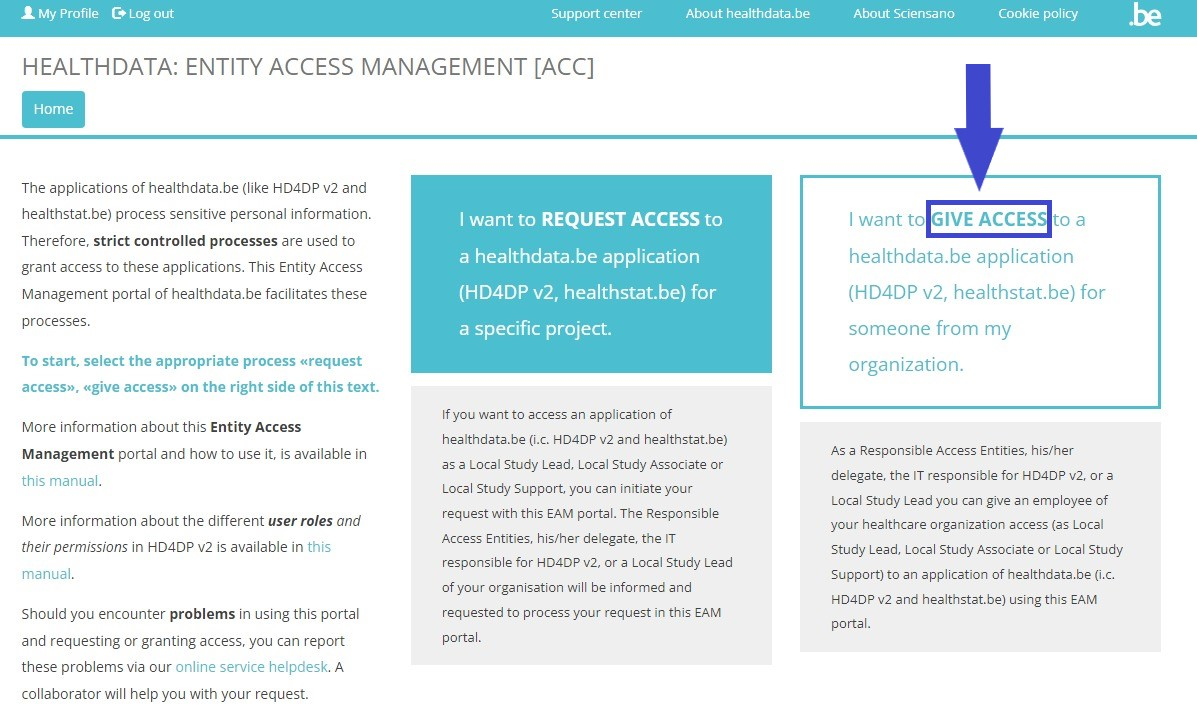
To request access to healthdata.be applications such as like HD4DP v2 and healthstat.be as a single-point of contact (SPOC), you want to select GIVE ACCESS in the white text box to the right of the screen.

If you have not yet requested access to these forms, and therefore are not recognized as a user with the SPOC role, you will receive the following message:
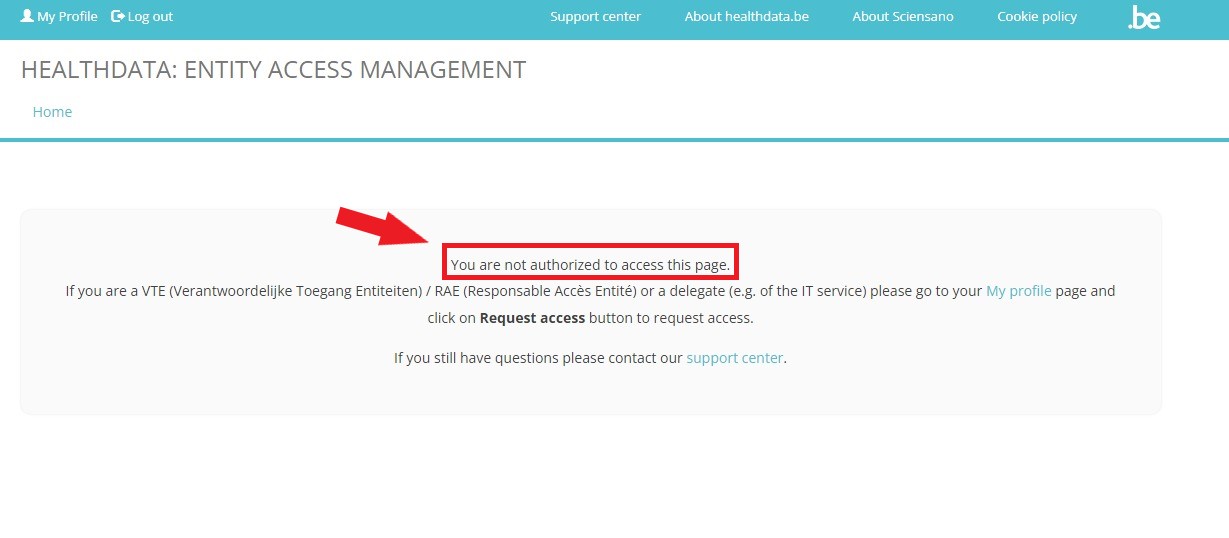
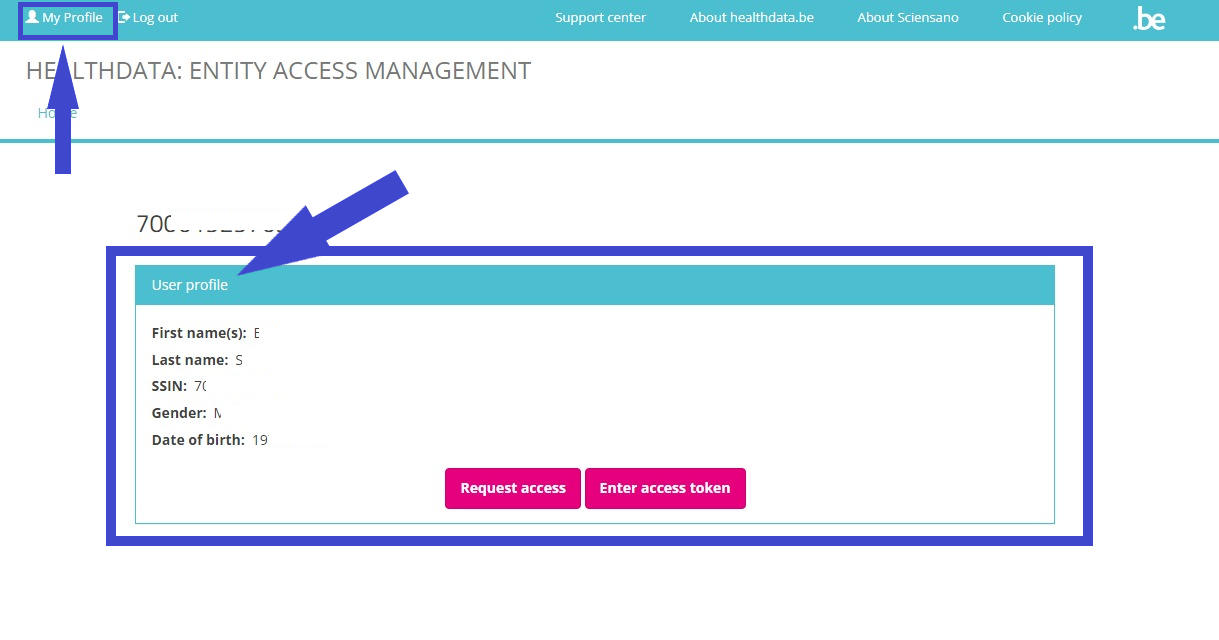
In this case you want to select My Profile (top left in the menu) and click on the button Request access (soon: "Request SPOC rights").

The Request access [RAE] screen pops up.
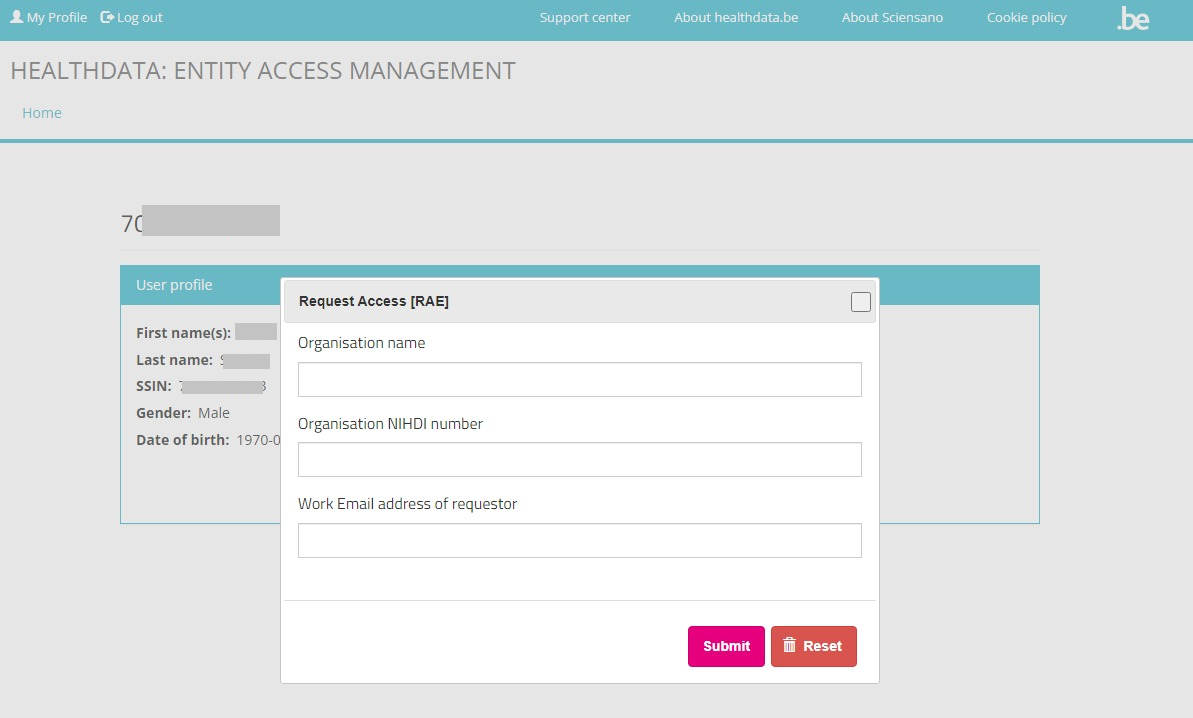
Fill in all requested fields and click on the Submit button.
After submission of the RAE form healthdata.be support carries out a background check considering your SPOC authority within the organization mentioned, and will send you a confirmation e-mail with a special token. Once you have received this token, return to the My Profile page and select the button Enter access token.
The Access token screen appears:

Fill in the NIHDI code for your organization and the access token you received per e-mail. After clicking on Submit, you will be redirected to the EAM portal page, where you again select GIVE ACCESS.
The ACCESS REQUEST form appears. By filling out the requested fields, a SPOC is able to give access to users within their organization who want to access a healthdata.be application (HD4DP2.0 or Healthstat).
Once you have completed the Access Request form, click on the Submit button. When the submission was successful, you will receive a confirmation message.
If you now return to My profile, you will see that it has been extended with the information "Responsible Access Entry" under User role(s). Also the tabs Profiles, Requests, Batch create requests and Edit have been added.
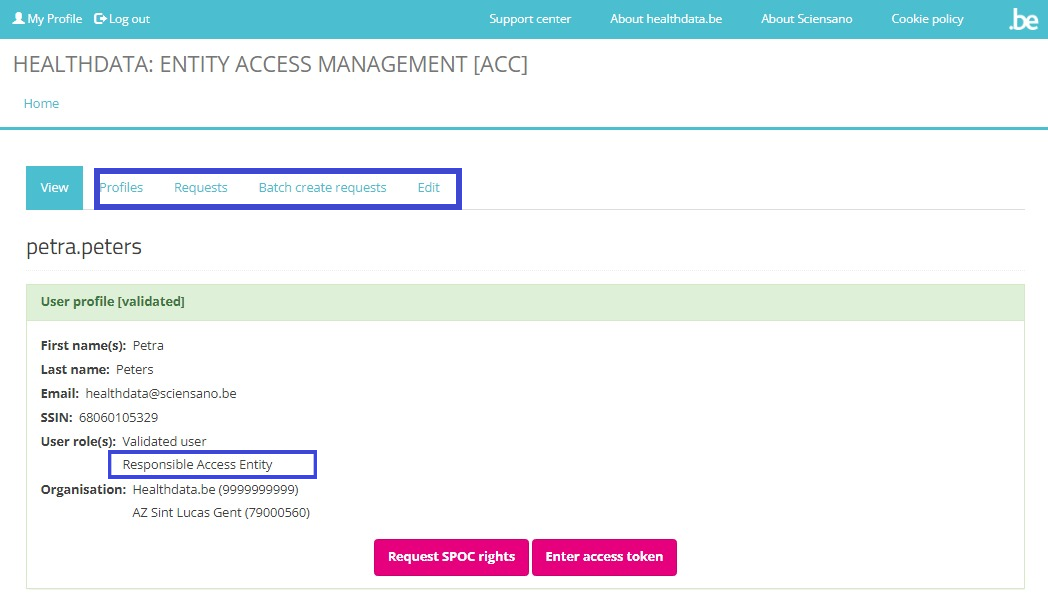
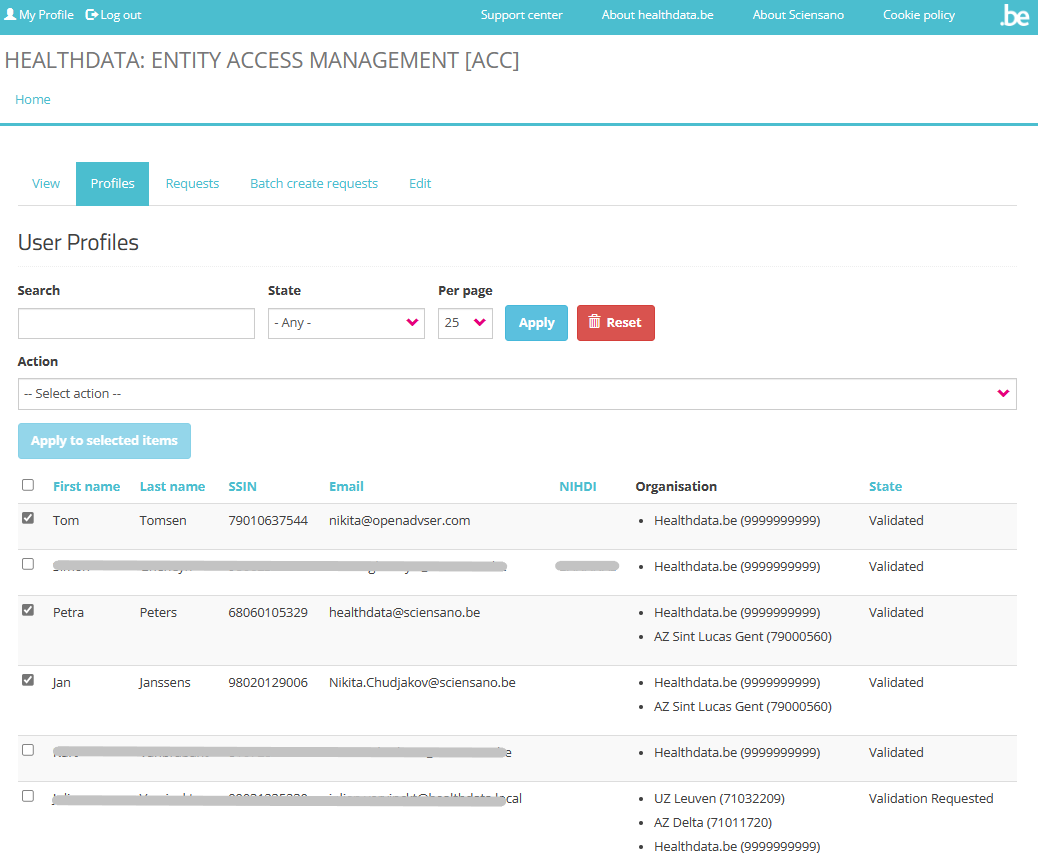
The Profiles tab of the validated SPOC profile offers the possibility to Search, Select and Sort profiles. Selected user profiles in the list can be Validated or Rejected via the Action drop-down menu.
In the Requests tab the SPOC can manage the overview of requests. More information is to be found on SPOC actions upon a request.
See documentation under Give access to multiple users in batch for more information on the Batch create requests tab.
Saved user profile information can't be modified, unless upon action of the SPOC. The Edit tab offers the option to enter the NIHDI number, add organizations, modify the email address and toggle the state between Validated or Rejected. Select the Save button to install the new profile information.
International users
For international users a link to a special form will be provided:
https://eam.healthdata.be/forms/hd_eam_access_request_user_int
Selecting this link redirects you to a more extensive Request Access form. Fill in all required fields (indicated with a red asterisk *), make a selection in the mandatory drop-down lists and, optionally, tick the check boxes for additional help and/or information:
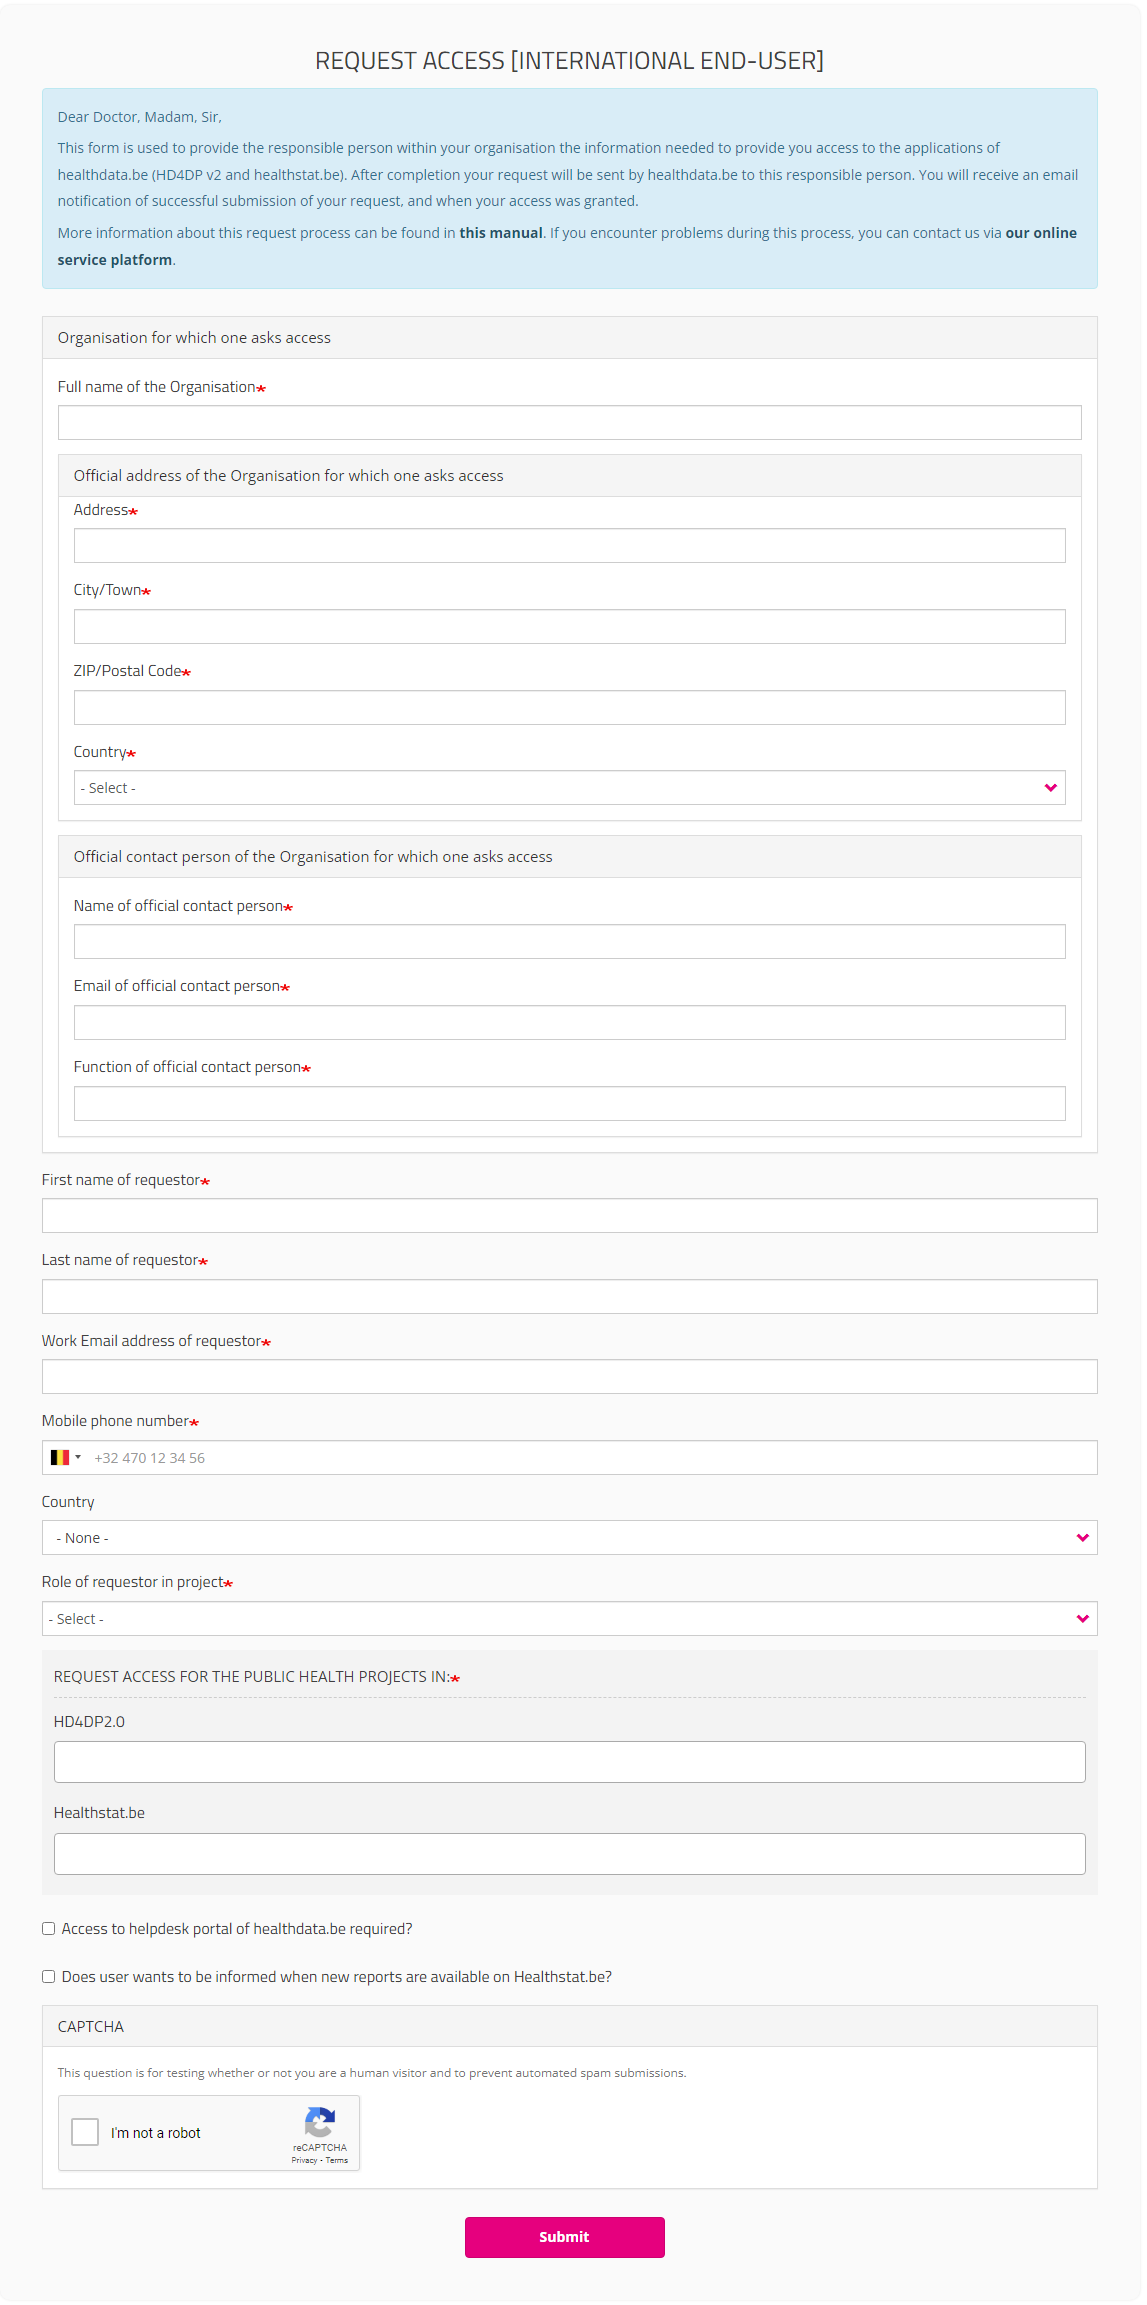
After submitting the form, an e-mail is sent to the Service Desk staff for an identification and authorization process. If the request is approved, the international user receives an e-mail with account information. International users, however, are not able to log in, nor can they consult overviews of requests at this moment.
User roles in HD4DP v2
User roles in HD4DP v2Several user roles are possible in the HD4DP v2 application:
Local Study Lead: This role takes responsibility for the study or project within the participating healthcare organization. Often this is the head of the clinical department involved in the study or project. The Local Study Lead can:
- make registrations in HD4DP v2
- view all registrations made by colleagues (regardless of role) for the study or project
Local Study Associate (author): The Local Study Associate is a healthcare professional that participates in the study or project. He/she reports/records medical information towards the researcher using HD4DP v2 and thereby assumes responsibility on the correctness of the reported information. He/she is considered to be the author of the registration. For each author an author group will be created. This will be represented in the registration form. The Local Study Associate can:
- make registrations in HD4DP v2
- only see all registrations assigned to his/her author group, not those of other colleagues (other author groups) in the same healthcare organization participating in the same study or project
Local Study Support (co-author): A Local Study Associate can delegate registration to a Local Study Support. Often this is an administrative collaborator or staff of a department medical coding. The Local Study Associate is still considered the author of the registration; the Local Study Support is considered co-author. The Local Study Associate can view and change registrations made by Local Study Support. The Local Study Support can:
- make registrations in HD4DP v2
- only see all registrations assigned to his/her author group, not those of other colleagues (other author groups) in the same healthcare organization participating in the same study or project
By default, only 1 Local Study Lead is created by healthdata.be (Sciensano) for each project within each organization. This means that only 1 person can see all registrations made for that project within that organization. This policy prevents HD4DP v2 users to see personal and sensitive information from persons they do not have a therapeutic relationship with.
In case organizations create more then 1 Local Study Leads for a project within that organization, so that they all can see each others registrations, and thus personal and sensitive information from persons they do not have a therapeutic relationship with, the organizations are fully responsible and accountable for this policy deviation. Healthdata.be (Sciensano) cannot be held responsible or accountable for this policy deviation. Professionals wanting to participate in projects are kindly suggested to contact the Data Protection Officer (DPO) of their organization to consult them about this intended policy deviation.
Give access to an HD application for someone from your organization
Give access to an HD application for someone from your organizationTo give access to the applications of healthdata.be (like HD4DP v2 and healthstat.be), you need to click on GIVE ACCESS in the white text box on the EAM portal page.
You can give access to
Give access to a single user
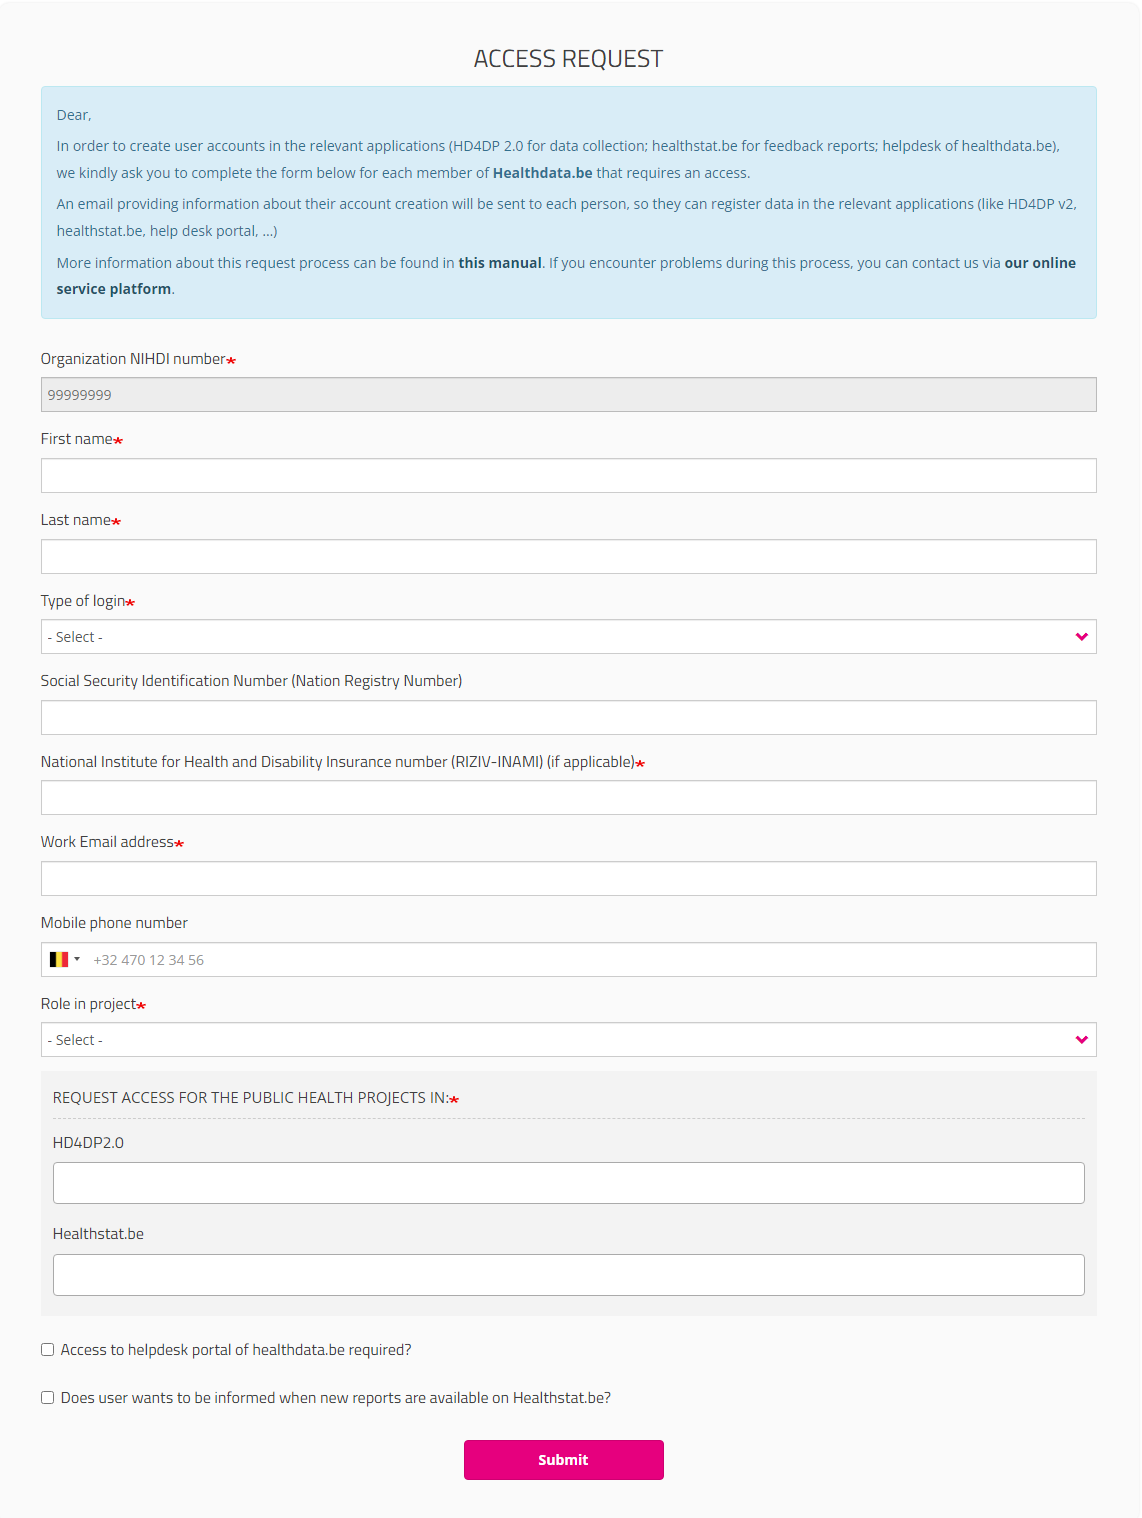
After selection of GIVE ACCESS on the EAM portal page, an ACCESS REQUEST form is shown.
Completing this form is similar to the process on the Request Access page for standard end-users. In the capacity of a SPOC, however, you will now fill in an Access Request form for a user within your organization.
Please fill in all required fields (indicated with a red asterisk *), make a selection in the mandatory drop-down lists and, optionally, tick the check boxes for additional help and/or information.
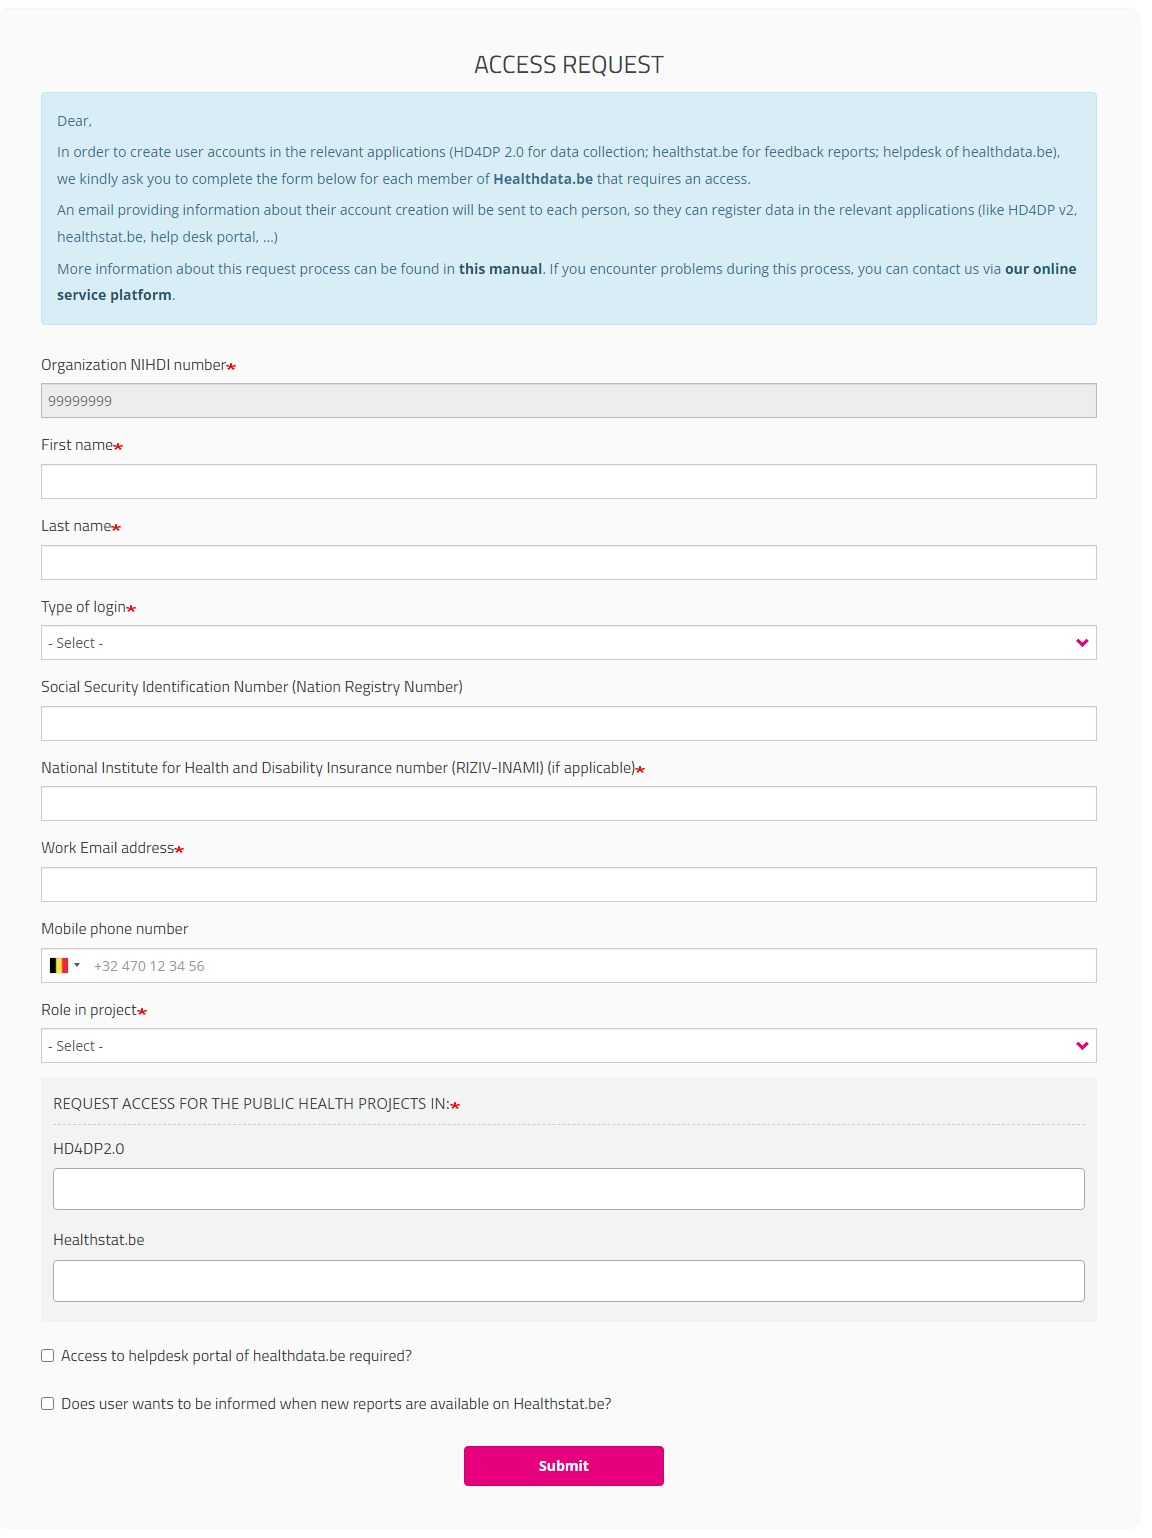
Organization NIHDI number
The NIHDI number of the organization is already provided, since your account is connected to this organization.
Role in project
When selecting Local Study Support, you will be asked to make a selection in the drop-down list of Author groups. These author groups are specified for the organization in question.
HD4DP2.0 field
Click in the field under HD4DP2.0 if you want to access the application to make registrations for the selected project:
Healthstat.be field
Click in the field under healthstat.be if you want to access the reporting of the selected project:
Once you have completed the access request form, click on the Submit button. When the submisson was successful, you will receive a confirmation message.
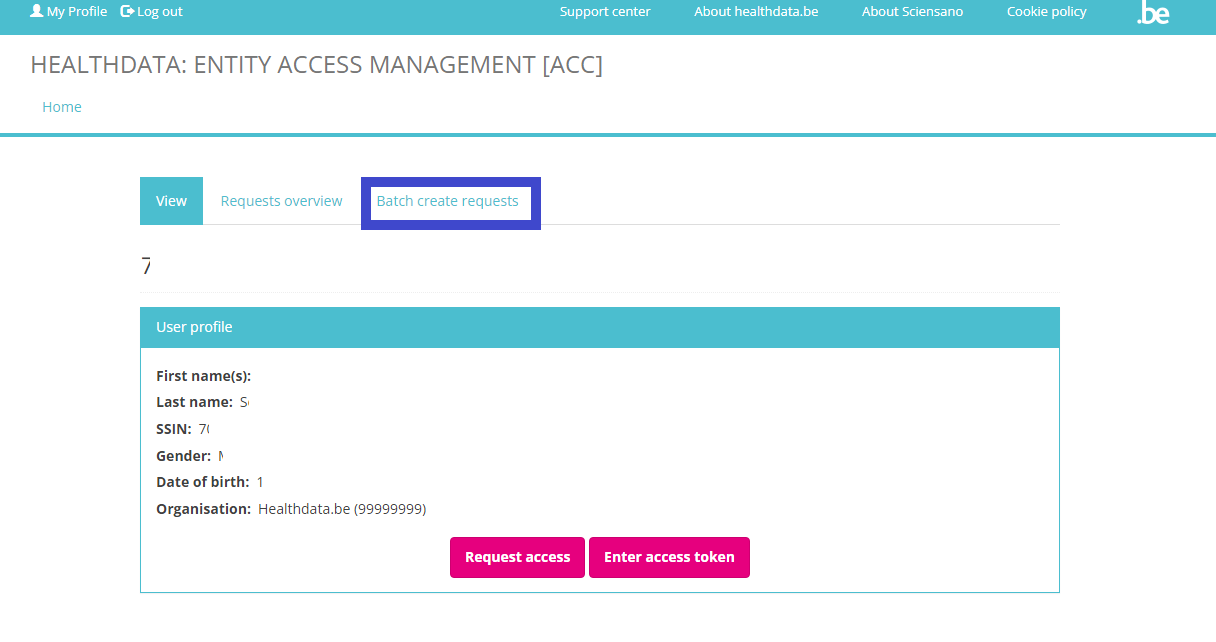
If you now return to My profile, the User profile is extended with the Organization name and code. And an extra tab Batch create requests has been added.
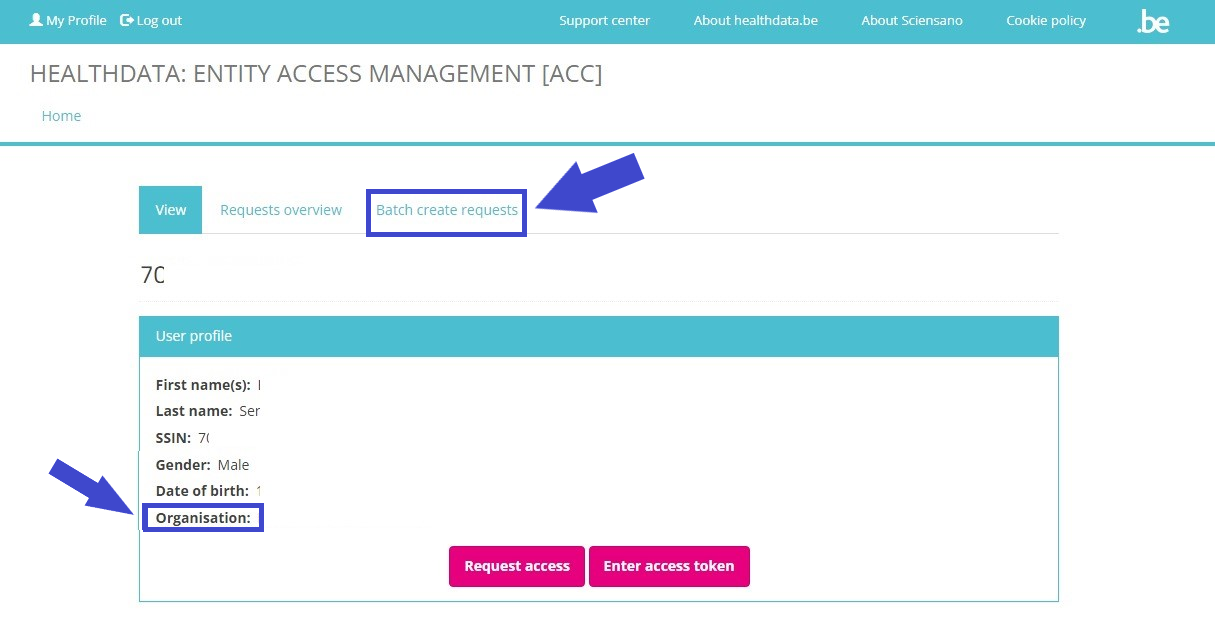
Continue to Give access to multiple users in batch in order to give access to multiple users in one operation.
Give access to multiple users in batch
The person whom has been assigned the SPOC role for the healthcare organization (HCO) is able to give access to multiple users in batch. The SPOC therefore needs to return to the User profile page and select the tab Batch create requests.
In the tab Batch create requests a CSV file can be selected via the file selection button.
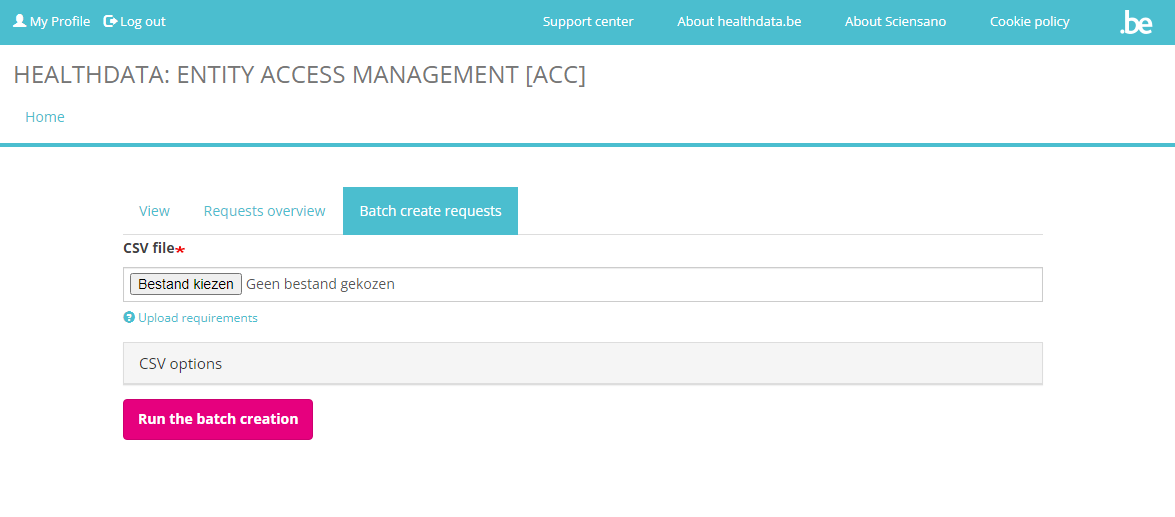
Upload the CSV file and click on the Run the batch creation button. An example of a CSV file structure is available here:
By doing so, a master request per line will be automatically generated, and then the information will be split into sub-requests (one per application or project) and saved in the healthdata.be DB2 for further processing.
A table schema (https://specs.frictionlessdata.io//table-schema/) to validate CSV looks as follows. An example file is available here: eam_csv_batch_requests_schema.json
User roles and corresponding values
To complete the “role”, 3 different choices are possible:
- 1= Local Study Lead: Only 1 Local Study Lead can be created by healthdata.be (Sciensano) for each registry within each organization.
- 2= Local Study Associate (= author). This will be the default role a user will receive, the reason why it was prefilled with “2”.
- 3= Local Study Support (= co-author). This role can be given if it is more suitable for the user. A Support will always need an Associate to which he/she will be assigned.
When selecting role 3 (= Local Study Support), the name of the ‘Local Study Associate’ is expected in the field “author_group”. To be filled in in the format <first_name last_name> of the Associate, with just 1 space (tab) between the two names).
When selecting role 2 (= Local Study Associate), the field author_group must be left empty.
Overview of the requests
Overview of the requestsAfter submission of the requests for access and receipt of the confirmation message, you are able to consult the validation process and other features of the requests via the tab Requests overview on the My Profile page.
Based on the scope of the requests overview, we can distinguish between
Overview of the requests for end-users
In order to view their own requests, end-users can open the My Profile page and click on the tab Requests overview.
The overview shown can be searched and sorted in the top row as needed (see figure below). End-users will only see a list of requests they have created for themselves.
Request UUID field
This field contains the unique ID’s of the requests. The occurence of the same unique ID in several rows indicates that this master request consists of several subrequests, each one per project and per application that has been selected in the request form. These subrequests are than saved in the healthdata.be DB2 for further processing.
Status field
The Status field indicates whether the request has been created (value “created”; meaning to be approved by the SPOC) or approved (value “approved_rae”; meaning the request was approved by the SPOC and will be ready for sharing credentials).
Role in project field
The values in this field are Local Study Lead, Local Study Associate, Local Study Support. More detailed information about these roles can be found in User roles in HD4DP v2.
Application field
This field contains the application you have selected in the Request Access (End-User) or Access Request form to access the public health projects: HD4DP2.0 or Healthstat.be.
Project code field
The value in this field is the Healthdata.be business project code. Entering this code in the publically accessible FAIR portal (fair.healthdata.be) results in the dataset for this project.
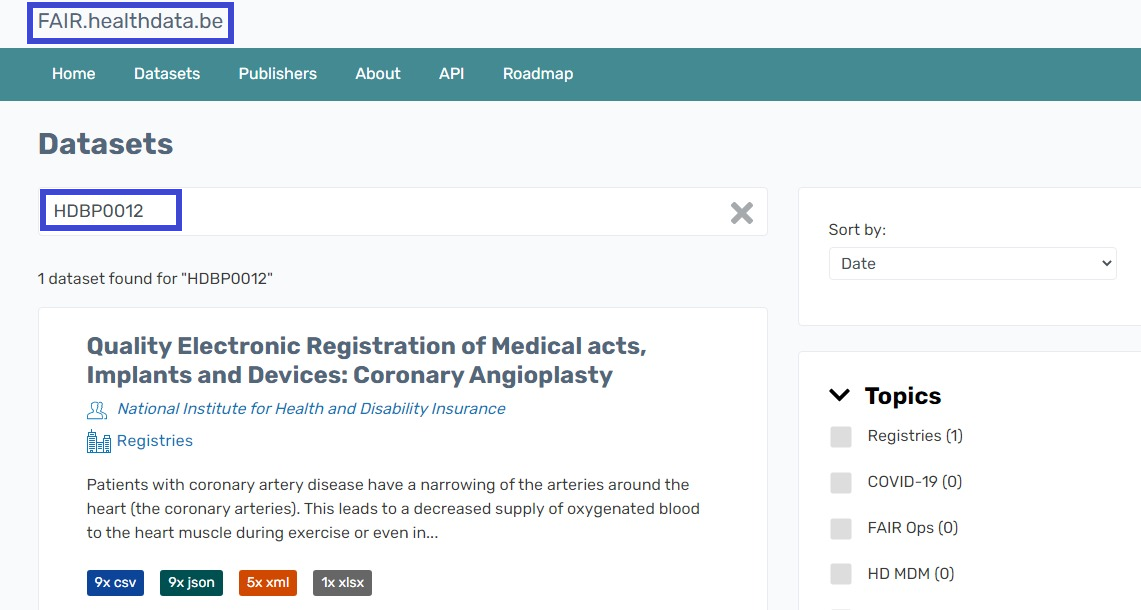
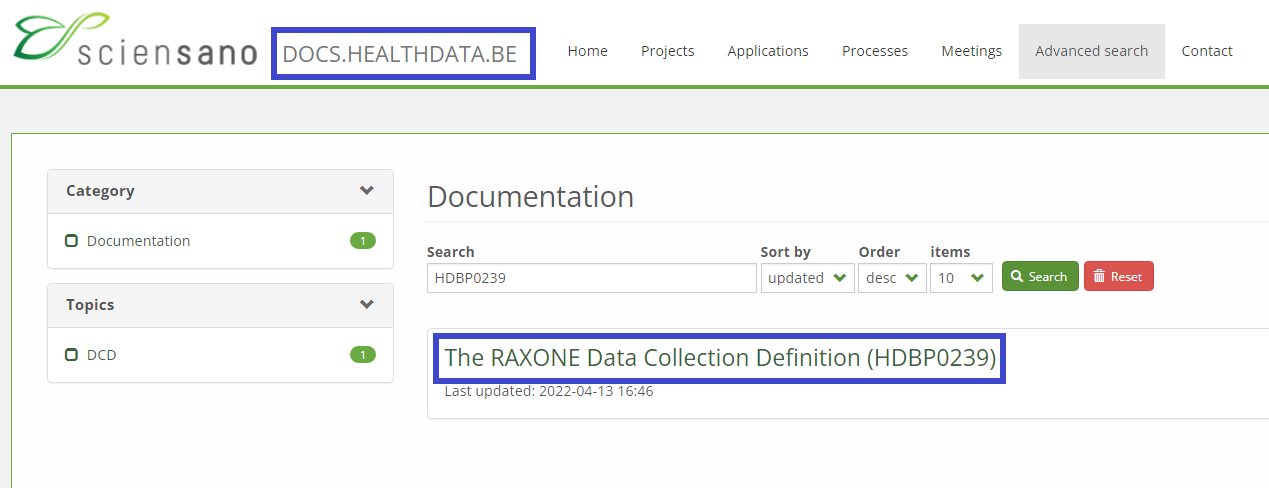
Or you can enter this code in the Advanced search field on the Healthdata.be docs pages to find the respective project’s documentation.
Overview of the requests for IT single points-of-contact (IT SPOC)
SPOCs have the capacity to view all requests for their organization.
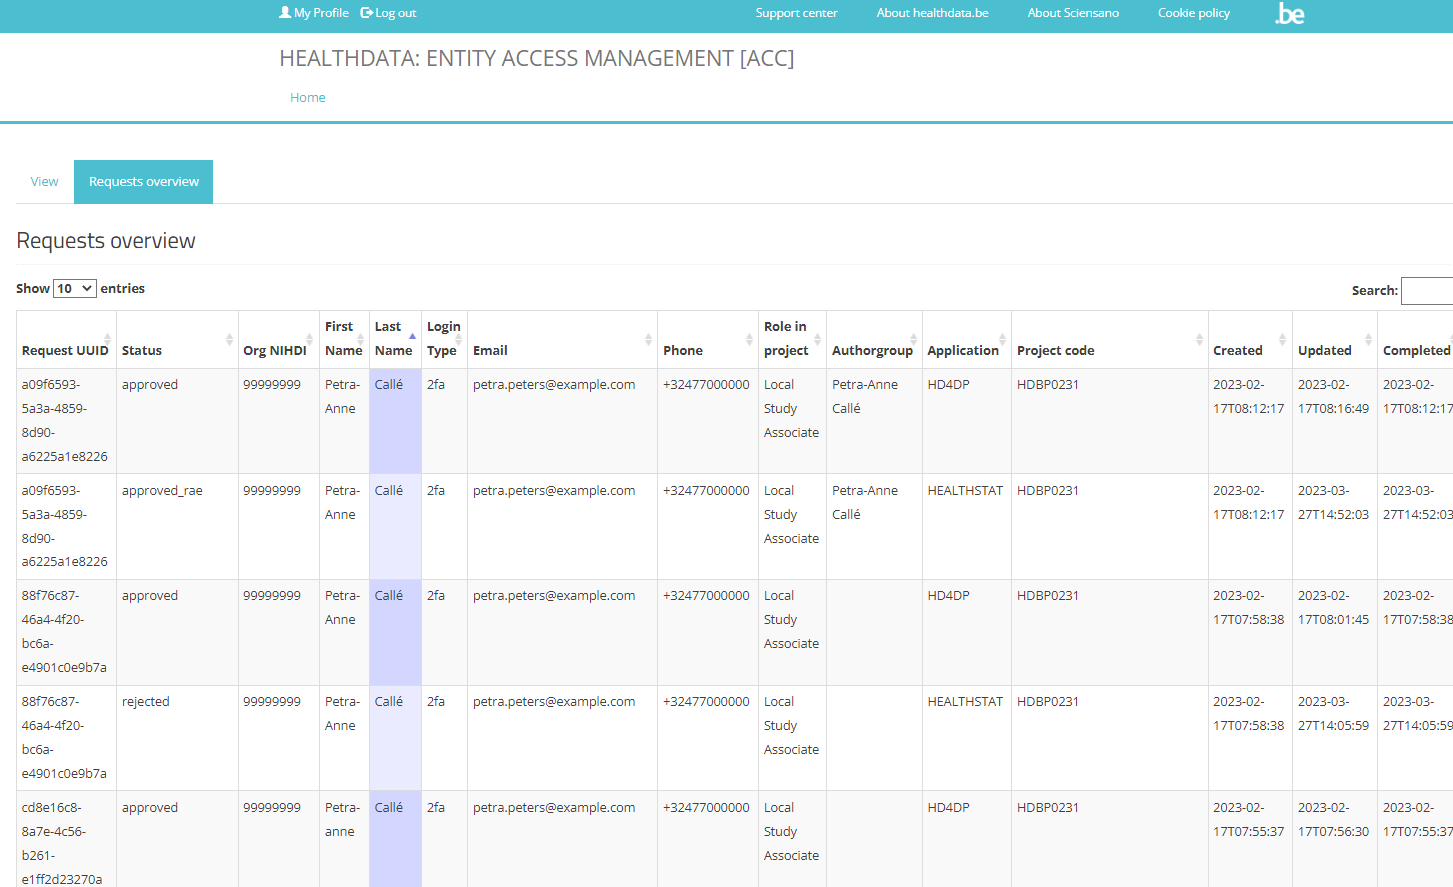
To view the Status of the request of the users of their affiliation, the SPOC needs to select the My Profile page and to click on the tab Requests overview (see screenshot below). Requests in this overview can be searched and sorted as needed.
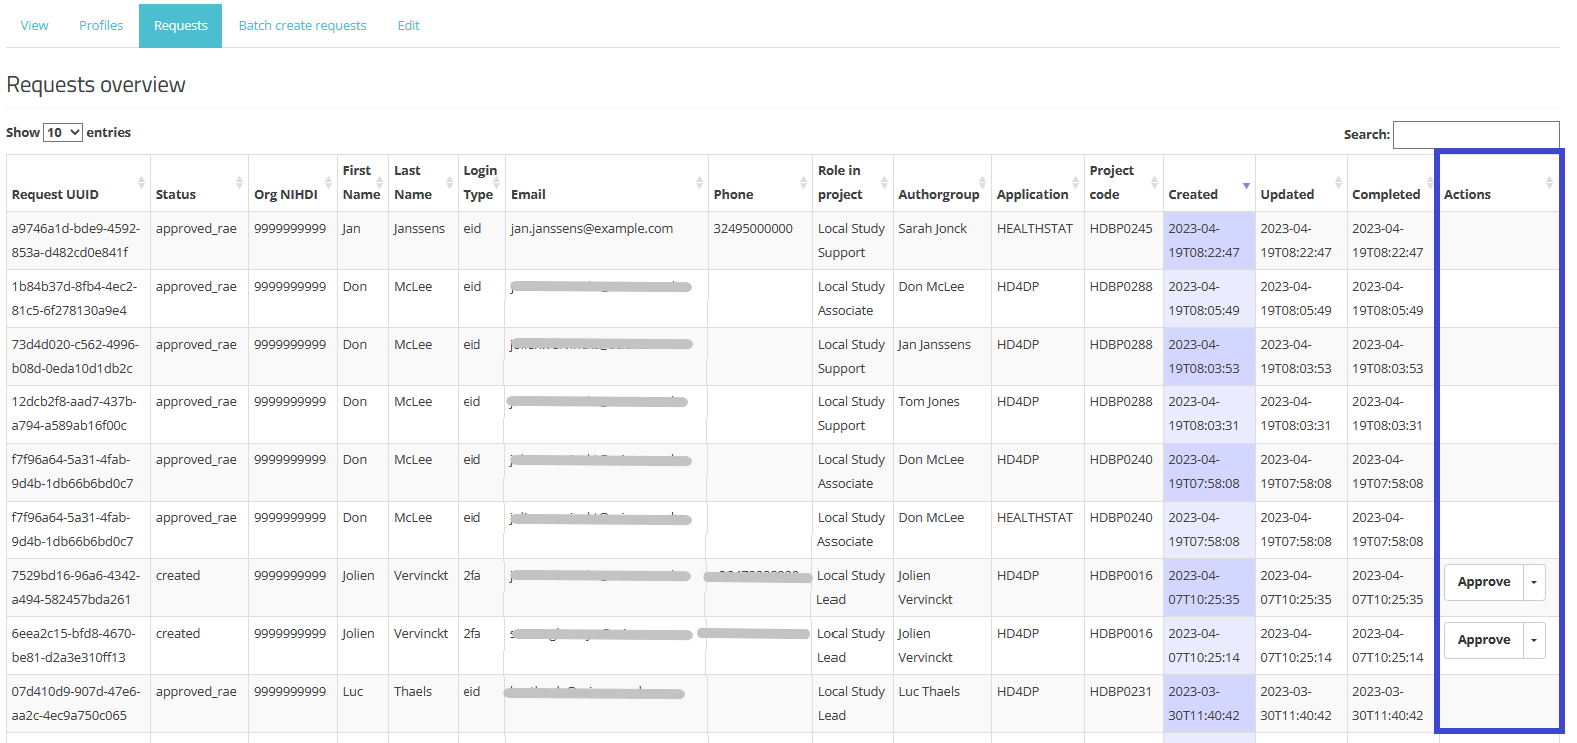
New: Actions field
This field describes the extra actions a SPOC can take, i.e. approve or reject requests. This functionality is explained in SPOC actions upon a request in more detail.
Request UUID field
This field contains the unique ID’s of the requests. The occurence of the same unique ID in several rows indicates that this master request consists of several subrequests, each one per project and per application that has been selected in the request form. These subrequests are than saved in the healthdata.be DB2 for further processing.
Status field
The Status field can only receive the status “approved_rae” since the request was made by the SPOC.
Role in project field
The values in this field are Local Study Lead, Local Study Associate, Local Study Support. More detailed information about these roles can be found in User roles in HD4DP v2.
Application field
This field contains the application you have selected in the Request Access (End-User) or Access Request form to access the public health projects: HD4DP2.0 or Healthstat.be.
Project code field
The value in this field is the Healthdata.be business project code. Entering this code in the publically accessible FAIR portal (fair.healthdata.be) results in the dataset for this project.
Or you can enter this code in the Advanced search field on the Healthdata.be docs pages to find the respective project’s documentation.
SPOC actions
SPOC actionsIn this article, we cover the different actions of a SPOC in more detail.
SPOC actions upon a request
SPOCs will be notified in case a request for access was made by a colleague, allowing them to review the overview table to manage all requests for their organization.
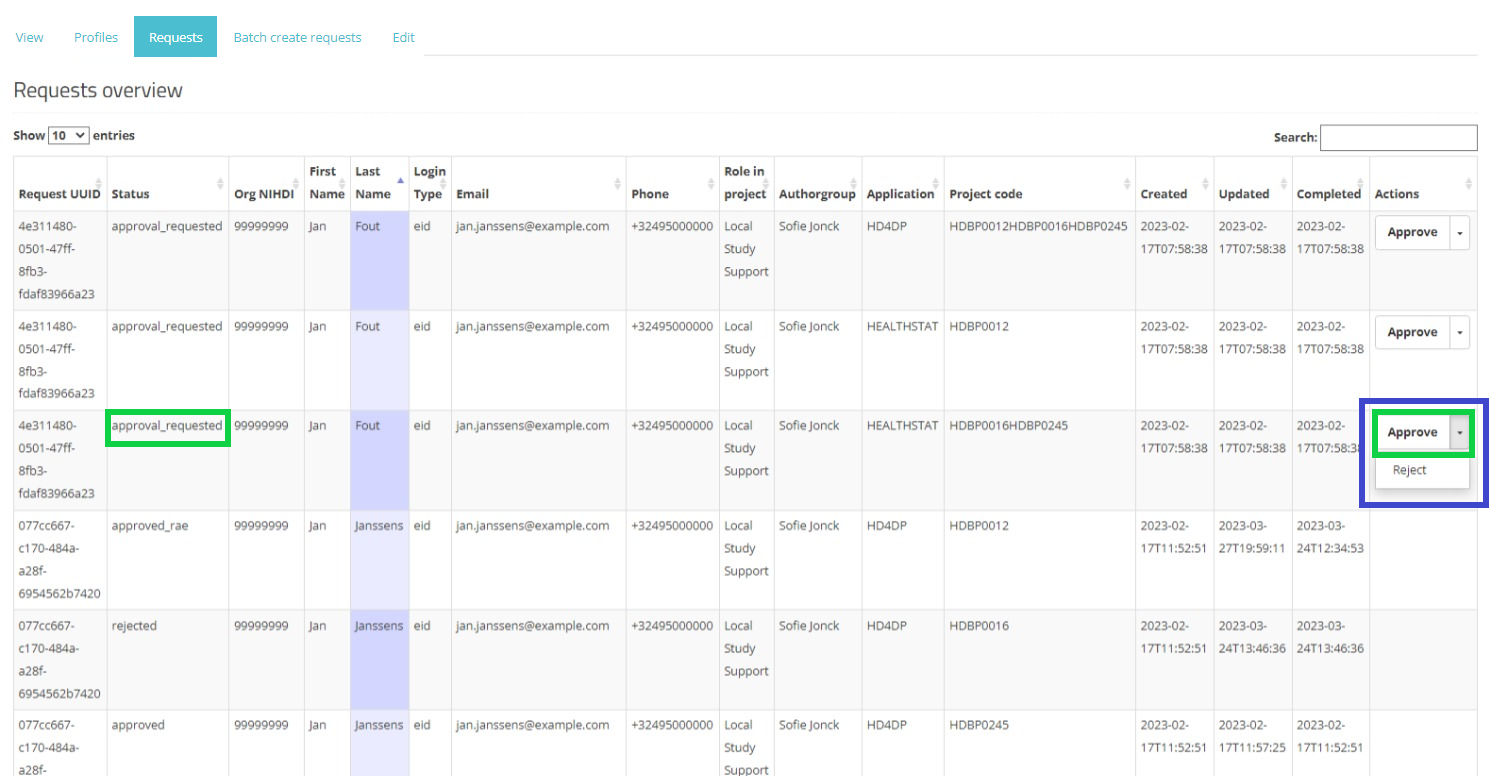
To open the overview table, the SPOC needs to navigate to "My Profile" followed by selection of the "Requests" tab. The overview of the requests appears (see below).
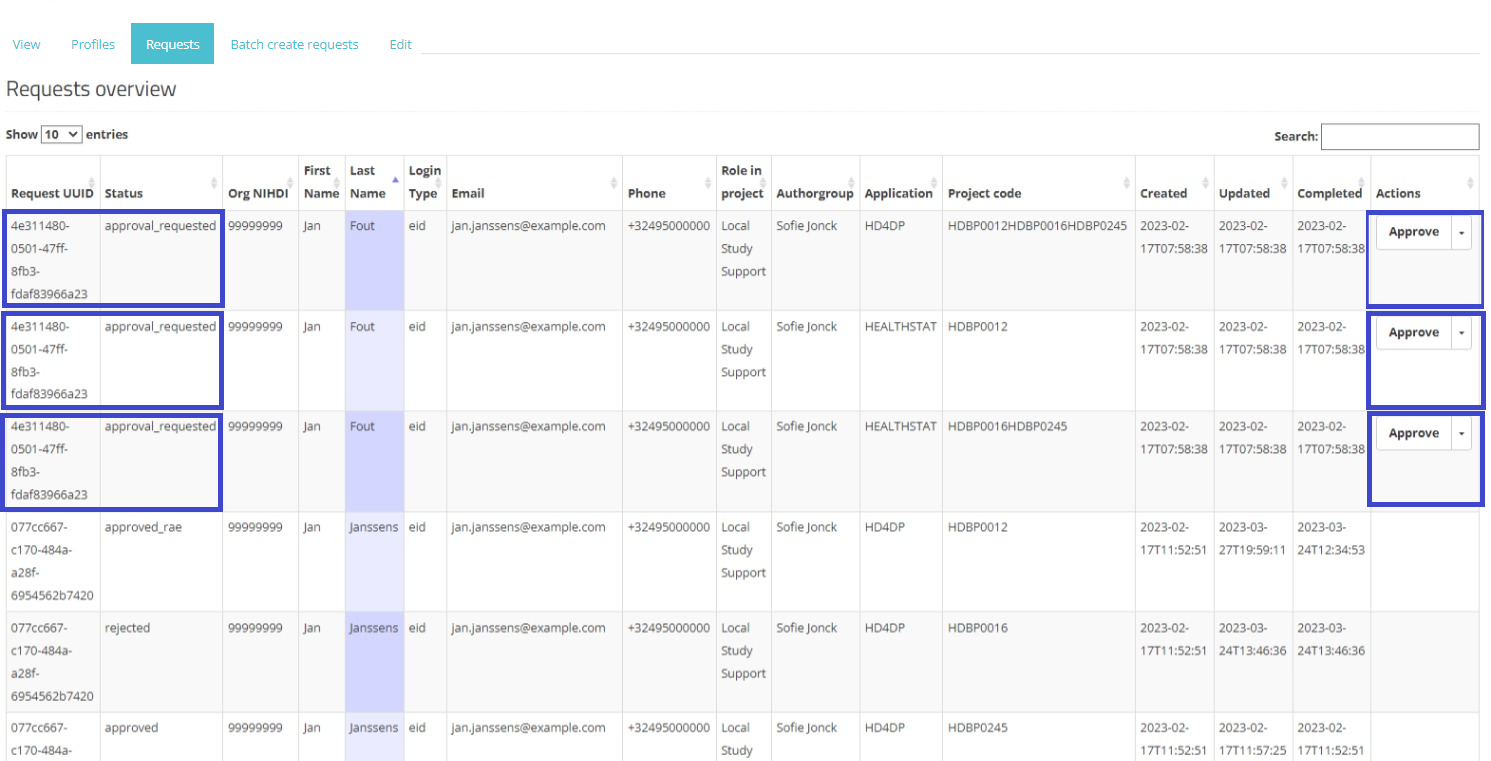
In the Actions field an Approve/Reject selection button is displayed next to each request with the status created or approval_requested (framed in blue). Two actions are possible now: the SPOC can either approve or reject the user's request.
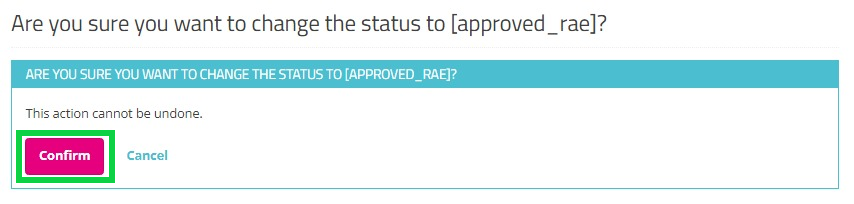
When selecting Approve, and after confirmation of this action, the status of the request changes to "approved_rae" and the dates in both fields Updated and Completed are updated accordingly as demonstrated in the screenshots below. Once the registry goes in production the account will be created automatically and the credentials will be shared to the user by e-mail.
Approve action:
Pop-up confirmation query:
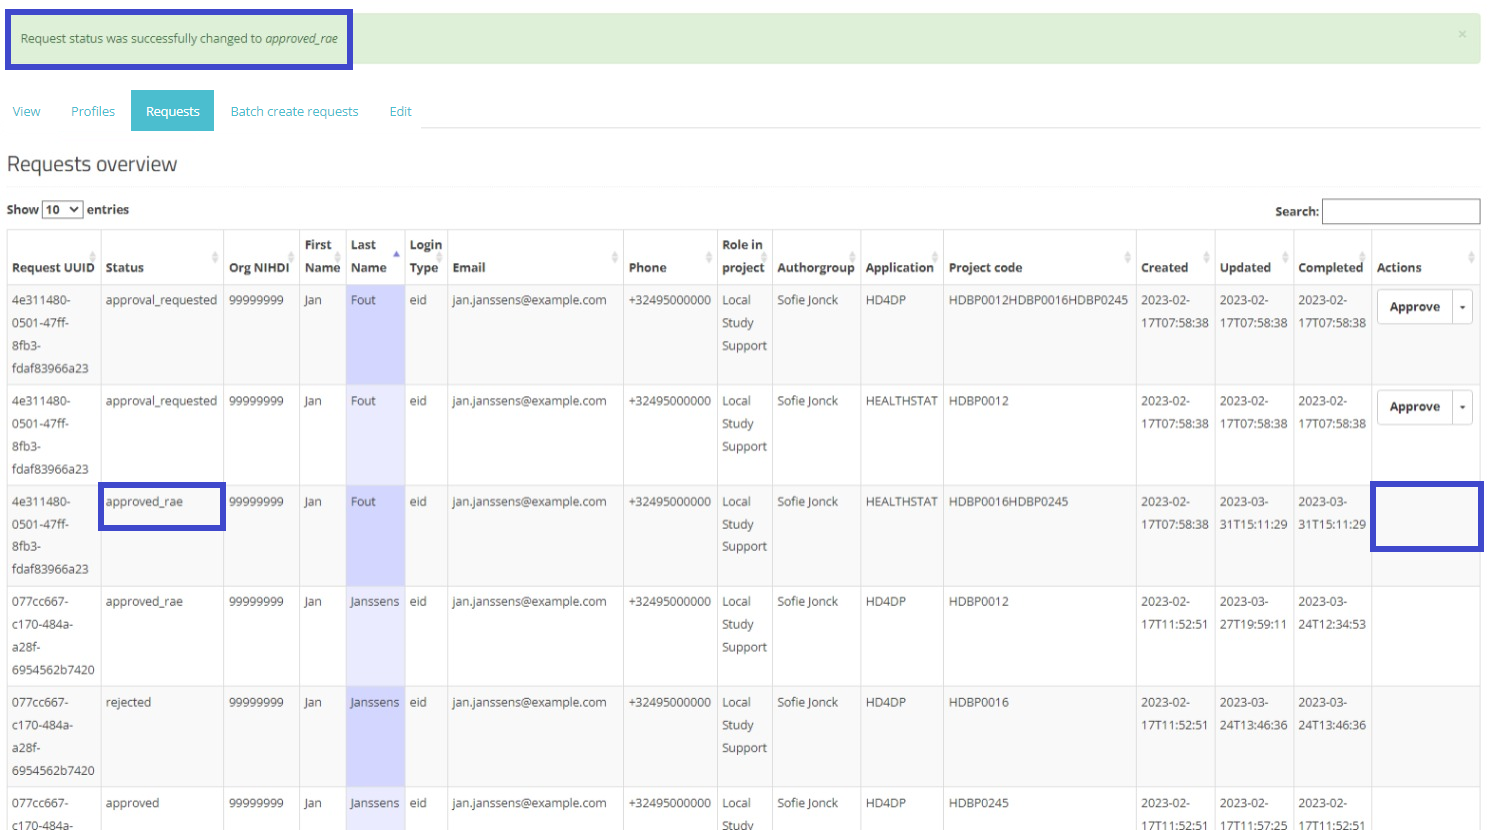
Approved:
When returning to the overview, you will notice that the status of the request has changed to "approved_rae". The Approve/Reject button in the Actions field has disappeared.
When selecting Reject, and after confirmation of this action, the request receives the status "rejected", the dates in the fields Updated and Completed are updated accordingly. A rejected request remains in the overview for information purposes. Compare following screens:
Reject action:
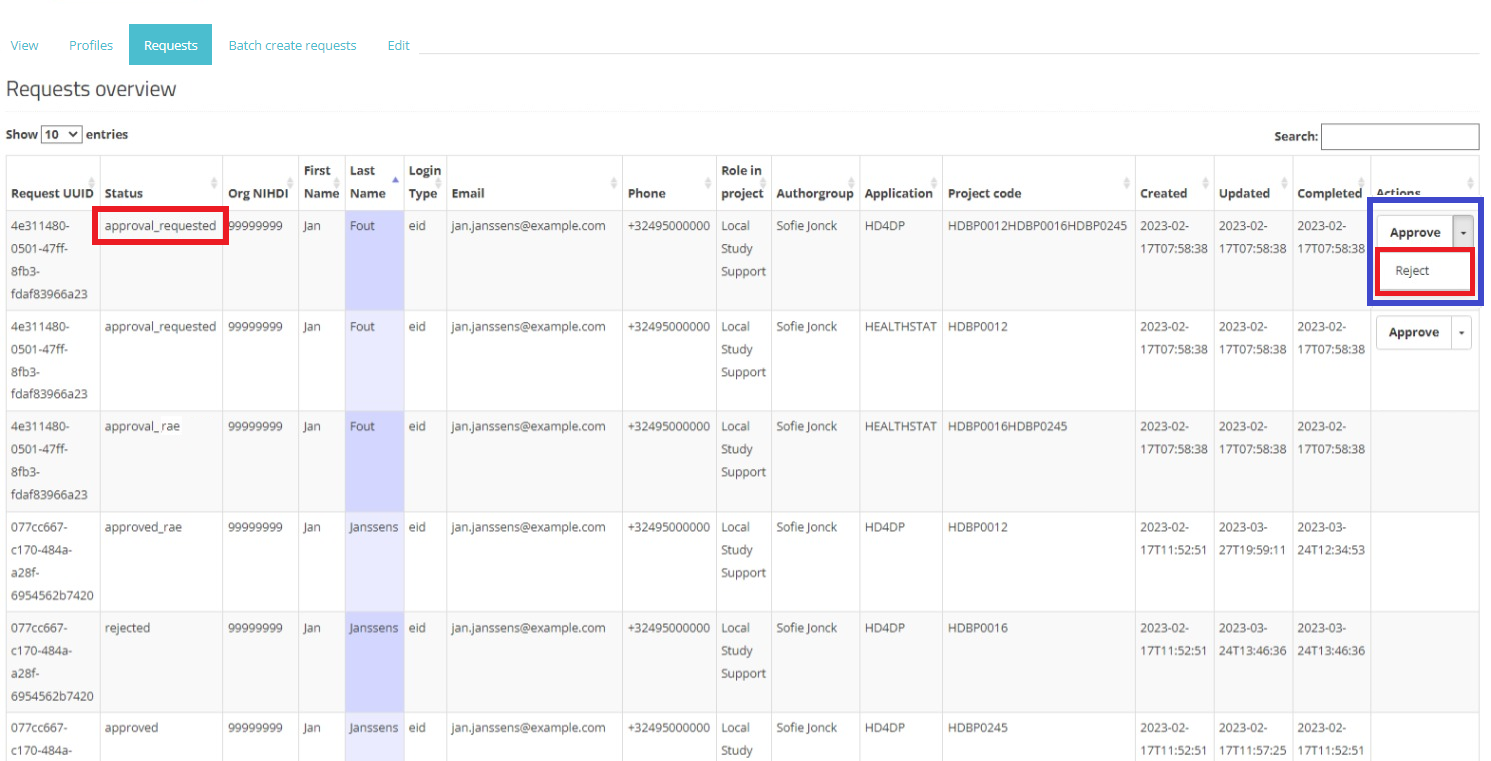
Pop-up confirmation query:
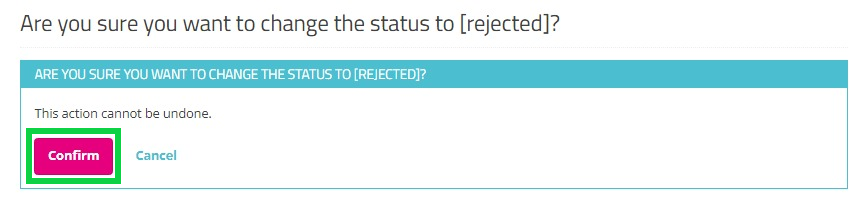
Rejected:
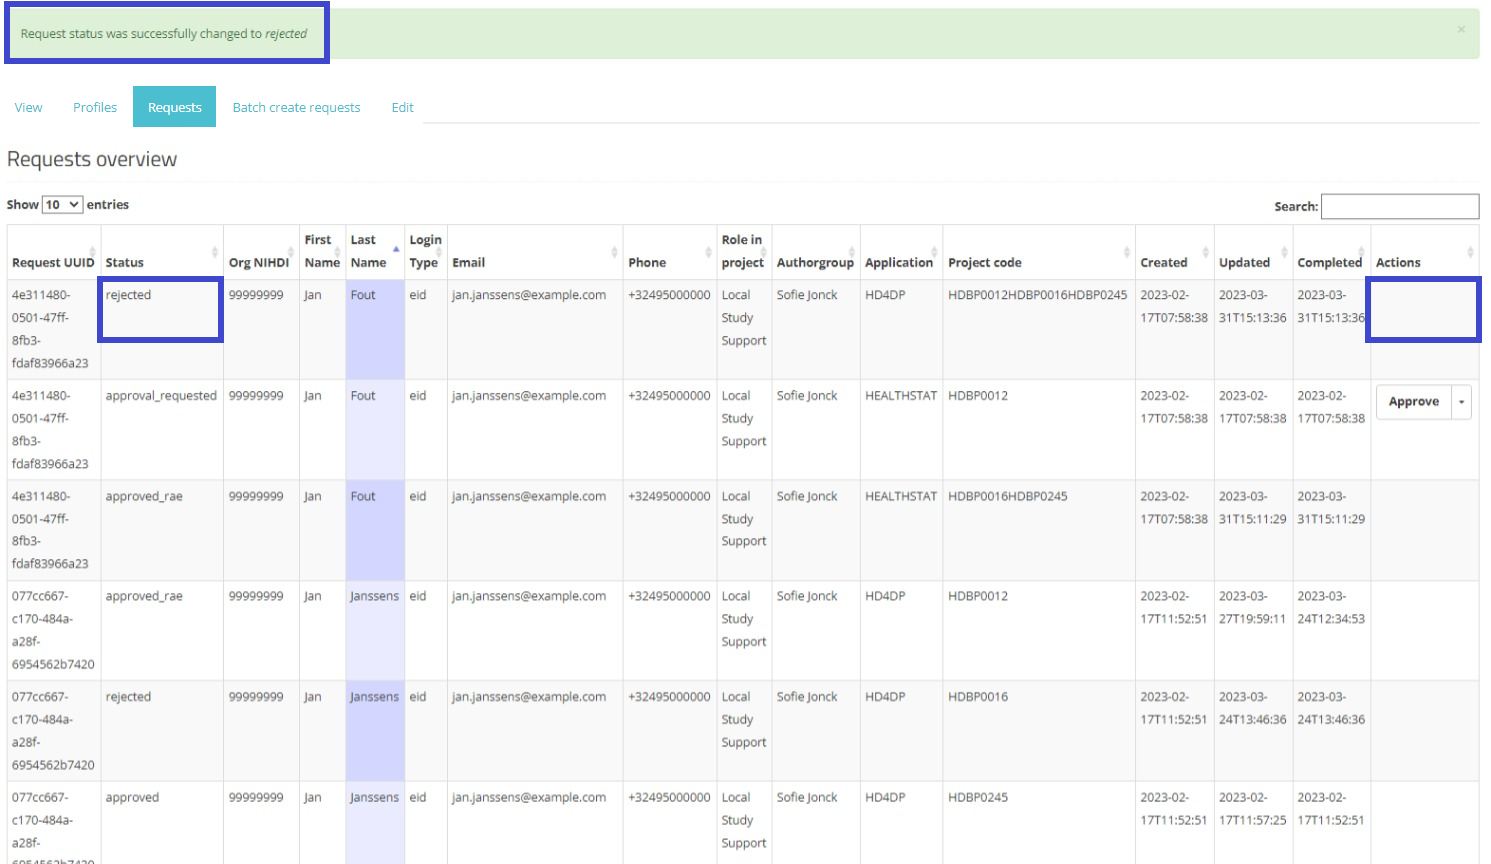
The requester will also be notified of the rejected request by e-mail:
Dear,
Your request for access to EAM was rejected.
Please contact your HD4DP SPOC for more information.
Best regards
Healthdata Support
Access the application HD4DP v2
Access the application HD4DP v2To access the application HD4DP v2, you must first request an account. If you do not have an account yet, please read the article "Request access to an HD application for a specific project" first.
Once your account has been created, you will receive an e-mail with following information (Note that the text between the [ ] will be adapted.):
- Organization: [RIZIV number - Name]
- Login: [email]
- Password: [password]
- Application URL: [url]
With these credentials you can access the application HD4DP v2 of your organization:
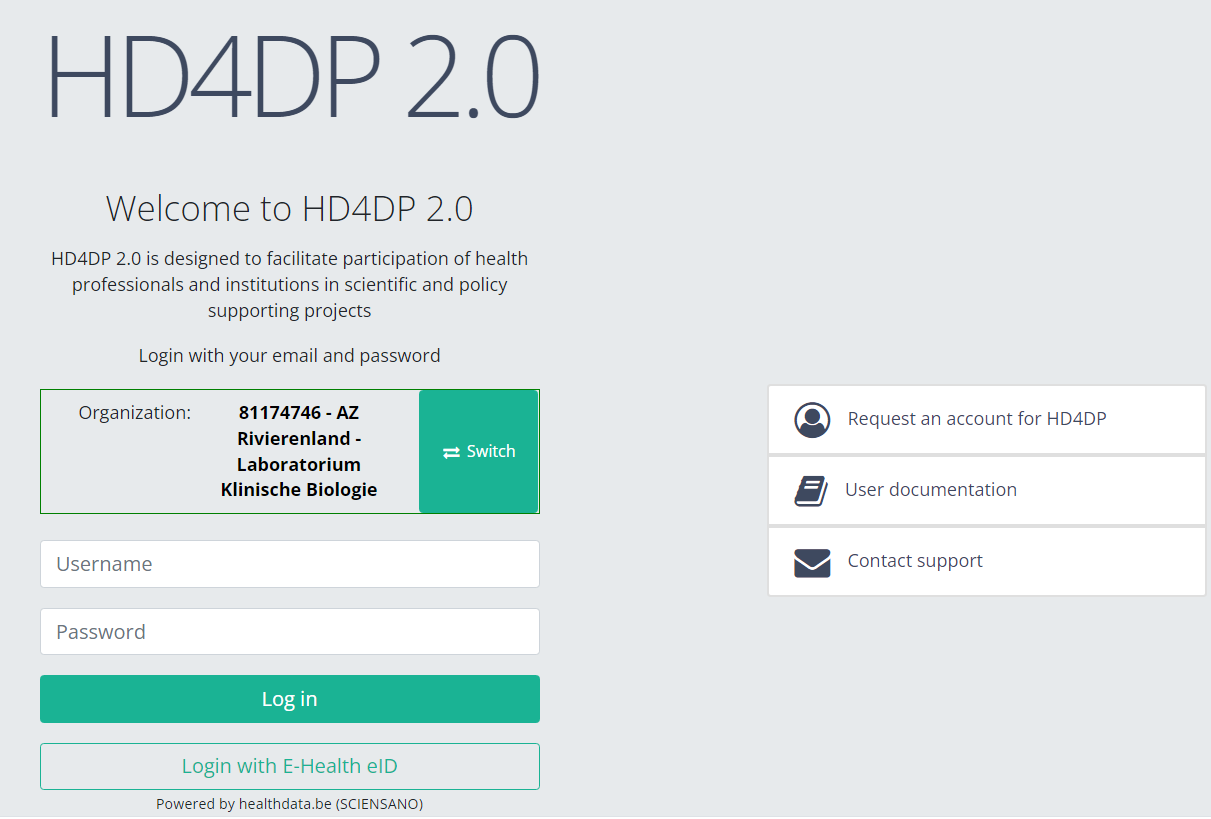
- Go to the url mentioned in the email
- Select "your organization" from the list
- Your organization: [RIZIV number – Name]
- Click on "Next"
- Fill in your "username" and "password"
- Click on "Log in"
Navigate to the HIV INC project
Navigate to the HIV INC project Adelaide.DAmoreCreate a HIV INC registration
Create a HIV INC registration Adelaide.DAmoreFind a HIV INC registration
Find a HIV INC registration Adelaide.DAmoreUpdate a HIV INC registration
Update a HIV INC registration Adelaide.DAmoreDelete a HIV INC registration
Delete a HIV INC registration Adelaide.DAmoreSubmit a HIV INC registration
Submit a HIV INC registration Adelaide.DAmoreSend a correction registration
Send a correction registrationSuppose you want to send a correction to a submitted registration. In that case you need to navigate in the dark blue left menu to the study program and next to the study project concerned. Then, select the respective part.

Important: A correction registration can only be added, if the status of the registration is submitted.
A correction registration can be added in two ways:
- via the overview table;
- via the preview page of a registration.
Send a correction via the Overview table
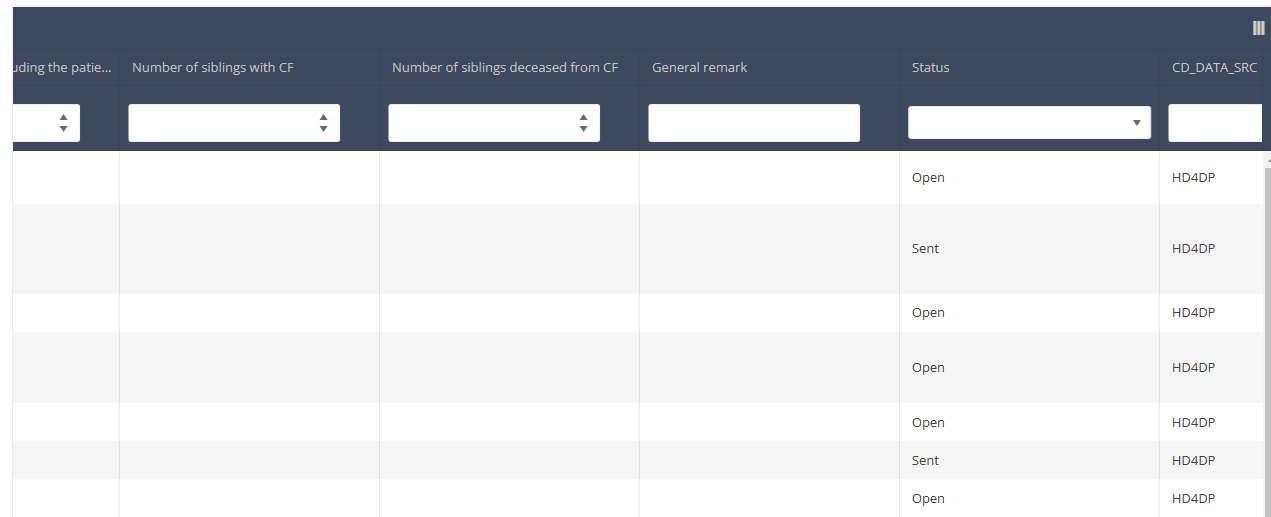
When the registration was submitted, the correction registration can be added via the overview table. This table will appear in the main part of your screen, when selecting a version of a study section. It contains, among others, the following items: Registration ID, Progress, Author, Co-author, Unique ID, Business Key, Registration Code, National Registry ID of the patient…
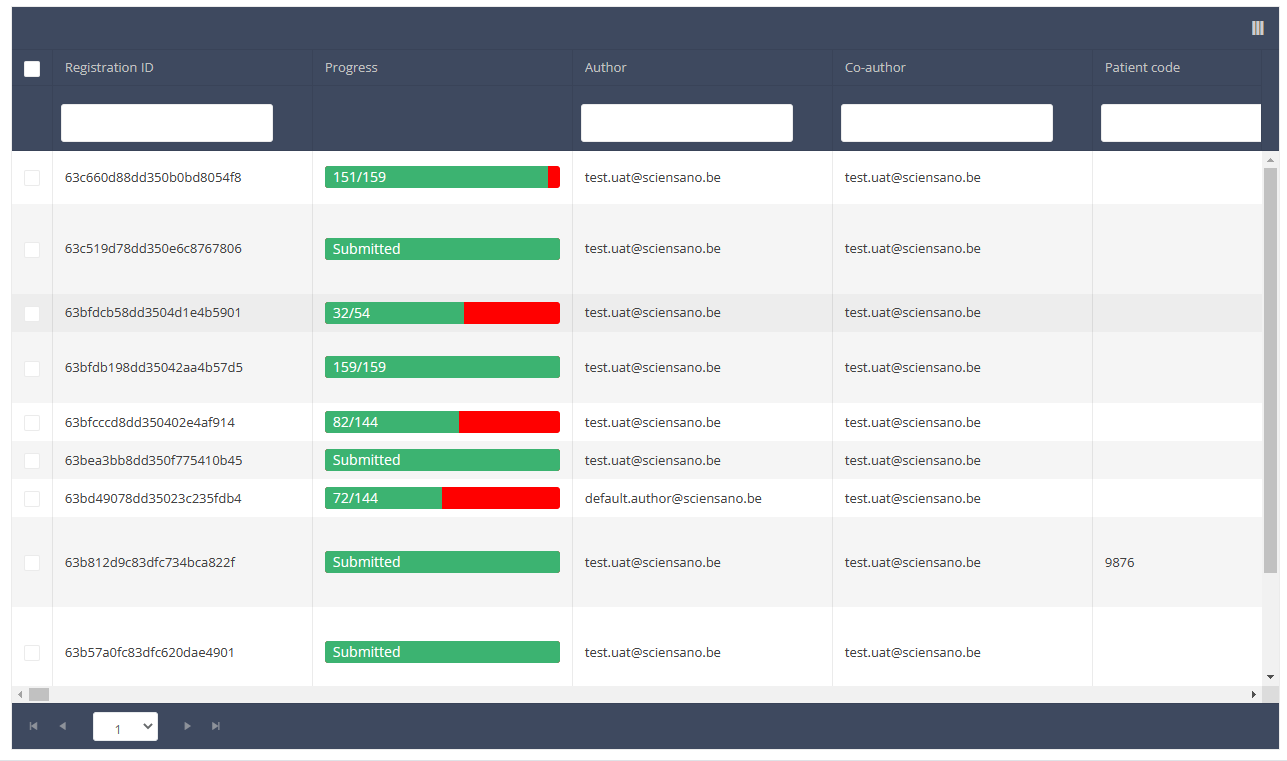
Use the filters in the table header to find the registrations that need a correction. For example, you can use the "Status" (set to "Sent") filter to get only submitted registrations.
Then, you must select the "Action" button at the top right of the overview table.
Three options are displayed: "Submit", "Delete" and "Add correction", but only the option "Add correction" is available for submitted registrations. Now select "Add selection".

After you have selected "Add correction", a pop-up window will appear asking you to confirm the action of adding a correction registration for the selected registration. If you are sure of this action, click on "Confirm". If not, click on "Cancel".
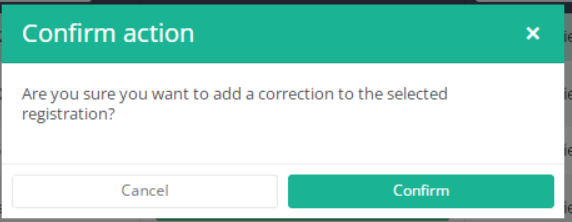
If you confirm, you will be redirected to the correction registration form.
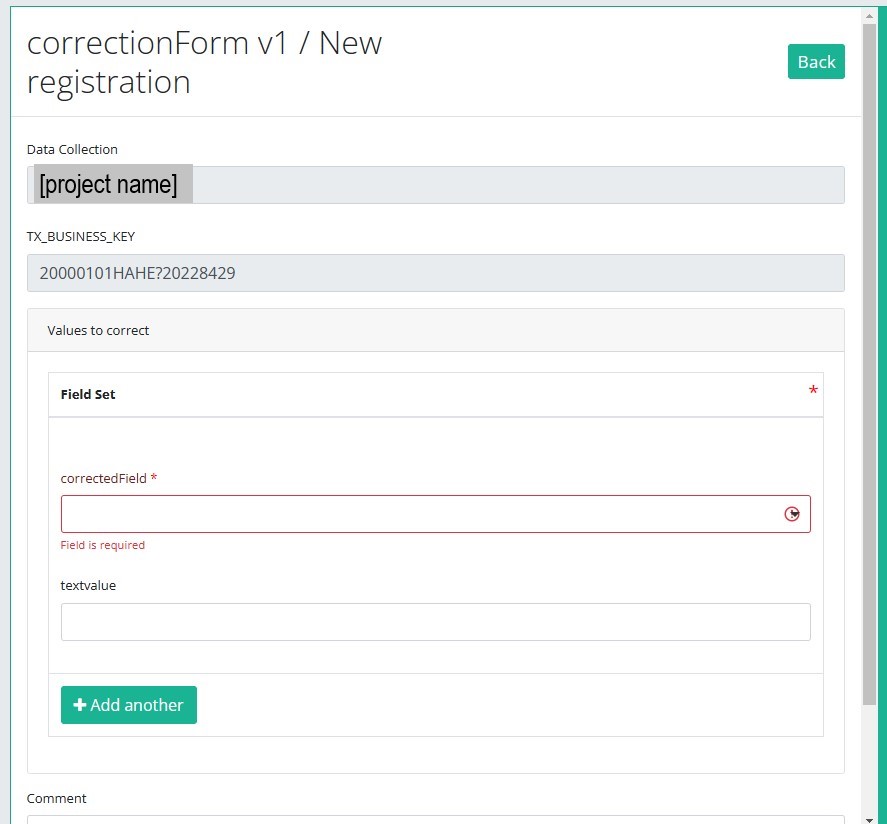
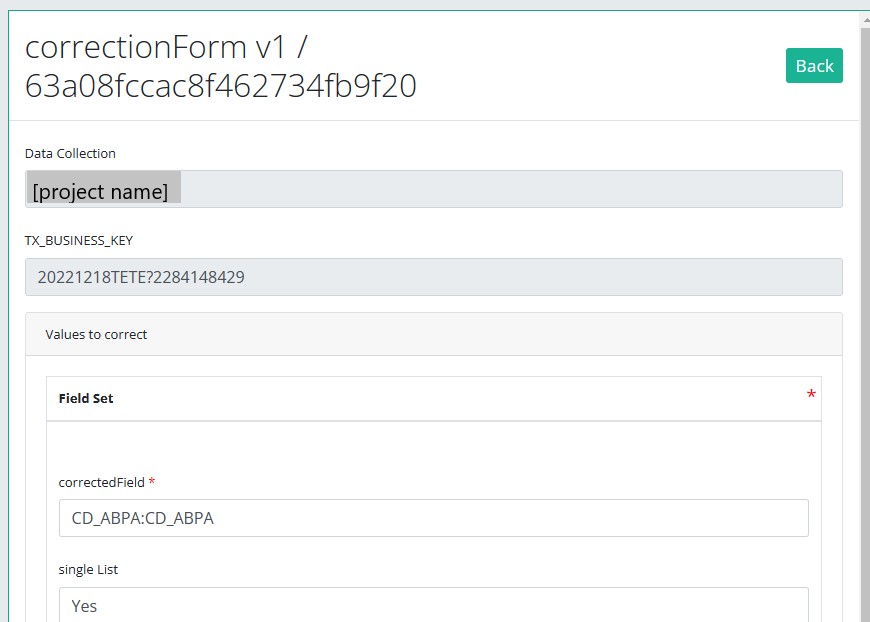
The correction DCD only contains:
- Business key of original registration,
- The name of Data Collection,
- The field or variable which is wrong,
- The correction value,
- Comment field.
Some fields are automatically filled with values of the original registration, e.g "Data collection " and "Business_KEY" .
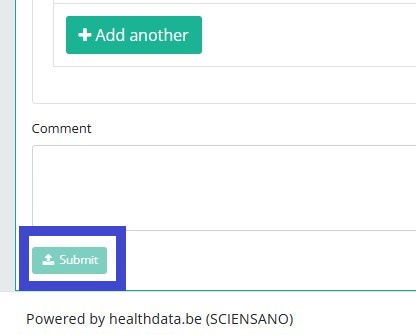
The number of fields to correct in the same correction registration is limited to three. You can add another field to correct by clicking on "Add another".
When you finish filling the correction registration, you can add a comment and send the correction by clicking on the "Submit" button.
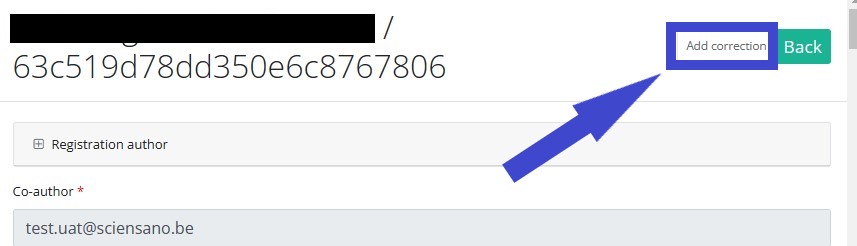
Send a correction via the Preview page
We can also add a correction form in the preview page of a registration. Therefore, open the overview table and click on the registration you want to correct. Now, you will be redirected to the preview page.
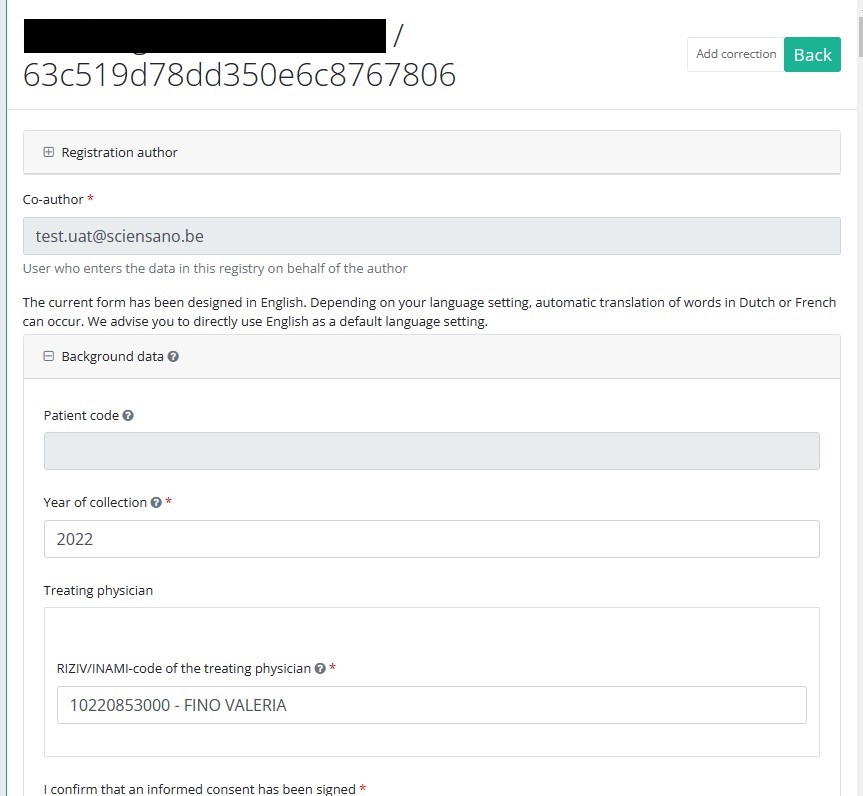
Click on the "Add correction" button to add a correction for current registration.
Follow same steps described in previous section (See "Send a correction via the Overview table")
Preview a correction registration
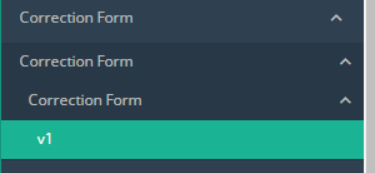
The correction form is a generic form available in the left dark blue menu for all projects and DCDs.
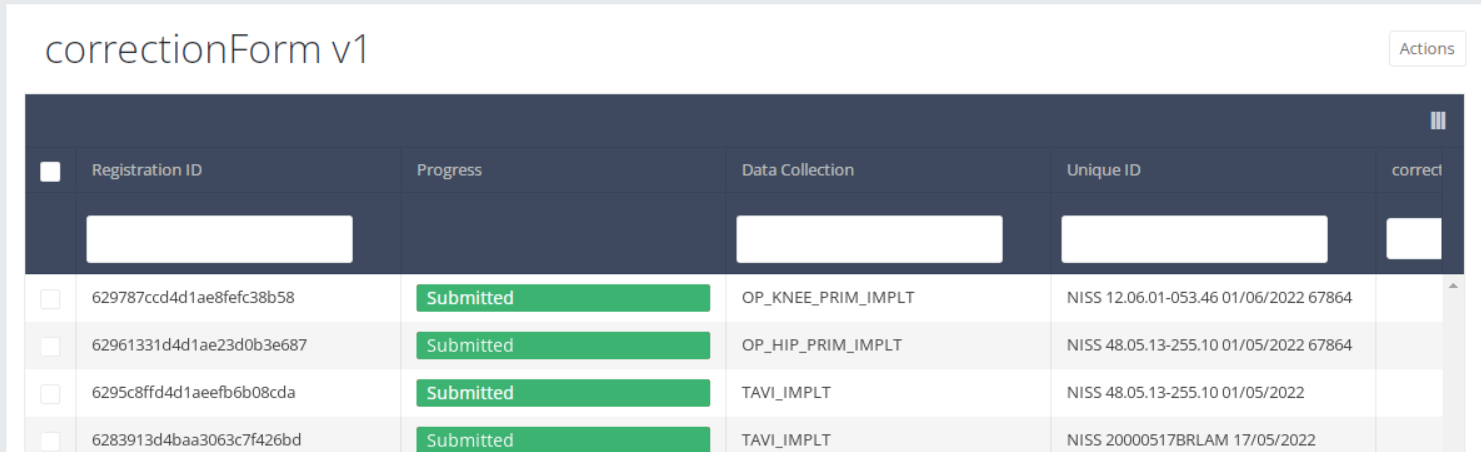
If you want to preview "correction registrations" already submitted, you navigate to the study program Correction form and then to the study project Correction form. Finally, you select the last version of "Correction form" in the dark blue left menu.
All correction registrations (of different projects) will be displayed. You can use the filters in the table header to find a specific registration.
If you want to preview a correction registration, you need to click on the desired registration in the overview table. You will now be redirected to the preview page.
Registration statuses in HD4DP v2
Registration statuses in HD4DP v2This article explains the different registration statuses in HD4DP v2.
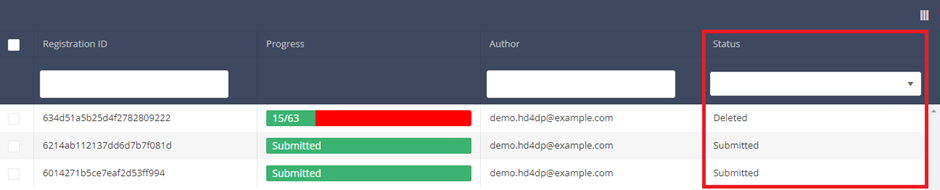
Statuses are shown in Status column
You can select the columns you want to display via the menu Select visible columns located in the top-right corner:
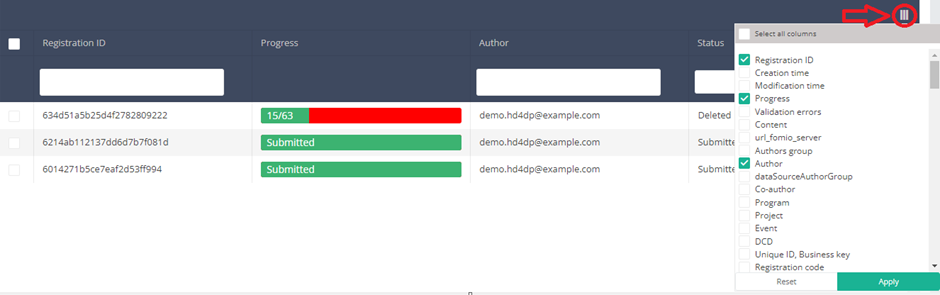
Select the columns you want to display and click on Apply.
Description of the statuses:
Open: Registration is created and stored. It has not been submitted
Deleted: Registration has been deleted.
Submitted: Registration has been submitted and sent.
Technical manual of the application HD4DP v2
Technical manual of the application HD4DP v2This information is only available in English. For linguistic coherence within the project navigation the titles of the respective components have been translated in NL and FR. Please select the EN language button in the top-right corner of your screen, when you are still in the NL or FR environment.
Technical user roles in HD4DP v2
Technical user roles in HD4DP v2IT administrator: An IT administrator has the highest level of all roles and permissions and can:
- log in using Active Director;
- grant access to Local Study Lead, Local Study Associate and Local Study Support;
- select and access all projects;
- create, find, update, delete, send (to healthdata.be, MyCareNet and other destinations) and correct a record using the form.io component;
- create, update, send and correct a record using the API data collection;
- create, update, send and correct a record using CSV upload;
- create and send a MyCareNet record using MyCareNet XML;
- view all records for all projects;
- harvest all records for all projects from the local DWH using the PostgreSQL database.
HD4DP v2 Installation
HD4DP v2 InstallationHD4DP v2 Local is an application installed on the infrastructure of the Health Care Organisation participating in research projects facilitated by healthdata.be.
The installation of HD4DP v2 Local is executed by the DevOps team of healthdata.be.
Server Installation and Configuration
Installing and configuring the server requires the following actions:
- install and configure the server as described in the article "HD4DP 2.0 Infrastructure instructions";
- complete and return to support.healthdata@sciensano.be the server configuration file "HD4DP v2 Infrastructure Sheet".
The HD4DP v2 application is more modular and will support scaling up to meet the requirements of the various data collection projects we facilitate. It will offer several micro-services that will run concurrently on the same machine.
The server should therefore require more resources than the one currently hosting the HD4DP 1.0 application. Furthermore, the resources allocated should be increased. It is therefore on the one hand imperative to use virtualization for the creation of the machine. On the other hand. It is also imperative to store files and make regular backups to a file server.
Below we take up our three categories of organizations sending data to healthdata.be and the resources we recommend allocating to their virtual machine:
- "Small": Small data provider;
- "Medium": Medium data provider;
- "Large": Big data provider.

Finally, we also offer the possibility for each hospital to have an integration server and a production server. Healthdata.be will deploy the new release of the application on the integration server. This will allow you to accept or decline the promotion of a new release of the HD4DP 2.0 application to the production server. This option is highly recommended, but not mandatory.
Therefore, could you answer the question: Do you want to first deploy HD4DP on an integration server? Yes/No. If Yes, Could you provide a server whose label used for specifications is "Small" (following the instructions in section 1 of this mail), that is:
- Processors number: 1
- Physical cores/Processor: 8
- RAM memory: 16 Go
- Disk space: 100 Go
- Network Station Mount with Space for Backups
- Operating System: Linux Ubuntu v18.04
- Virtualization
Server installation timing
In order to establish the deployment schedule for the HD4DP 2.0 application within your organization, we would like to know when the server could be installed and configured. To this end, could you give us the 2 dates relating to the installation of the server:
- Starting date;
- Finalization date.
Based on these dates, an employee of healthdata.be will regularly monitor the operations linked to the installation of the server.
For any request for information on installing the HD4DP 2.0 server, please send an email to hd-architecture-20@sciensano.be.
HD4DP v2 Infrastructure instructions
HD4DP v2 Infrastructure instructionsIntroduction
This document is written for IT staff / system engineers of data providers and therefore assumes technical knowledge. It acts as a guide through the on-boarding process of HD4DP v2 and covers installation of the server, user configuration, network configuration and remote access.
The order of steps in this document should be respected during execution.
Overview
HD4DP v2 consists of a modular application stack, which allows healthdata.be to seamlessly upgrade individual elements.
An HD4DP v2 deployment comprises of following components:
- Form.io component
- MongoDB
- PostgreSQL
- Nextgen Connect
As it is the case in HD4DP 1.0, an Encryption Module with a connection to the eHealthBox is still required for HD4DP v2 and must be provided by the data provider.
Network configuration
IP
The HD4DP server needs to be accessible via domain names in DNS, and must have a static IP in your private network.
DNS
The application stack of HD4DP v2 requires four domain names pointing to the IP of the locally installed HD4DP v2 server. Use the following names in your DNS:
- nextgenconnect.hd4dp.<yourdomain.be>
- hd4dp.<yourdomain.be>
- metabase.hd4dp.<yourdomain.be>
- admin.hd4dp.<yourdomain.be>
Firewall
The following connections should be possible in the firewall flow:
- To and from (a) machine(s) in your IT department on port 22 for initial configuration and local support.
- To and from the Encryption Module server. The protocol and ports depend on your local EM implementation. Contact your EM vendor if more information is necessary.
- Reachable by your staff who uses HD4DP, on ports 80 and 443 for HTTP(s) traffic.
- To and from the LDAP server (this is not mandatory if you are not using LDAP to authenticate) (port 389 by default)
The healthdata.be proxy server is used as a gateway to the internet for the security of HD4DP servers. The configuration of this proxy server will be provided to you by healthdata.be at a later date.
Server installation
To install the application stack of HD4DP v2, healthdata.be requires a fresh installed operating system, specifically Ubuntu Server 18.04 LTS.
Please use these instructions even if you have previous experience with installing this operating system, as its configuration is specific for healthdata.be.
These instructions assume that the network configuration described in the previous section is completed.
Instructions
HD4DP v2 requires a (virtual) machine running Ubuntu Server 18.04 LTS.
We assume knowledge of loading a .iso file onto a (virtual) machine. Healthdata.be can’t provide instructions for this, as the environment of your center is unknown. Should you have any trouble, however, please contact Healthdata.be support so that we can help out.
Please find the installation steps below.
Installation steps
- Download the .iso file from the link below.
Download Ubuntu Server 18.04 LTS - Create a new (virtual) machine with Linux Ubuntu 64 bit as the OS family
- When prompted, select the .iso file downloaded in step 1.
- After some time, you will be prompted to select a system language. Select English.
- “Keyboard configuration”
Select your preferred keyboard layout and press enter - “Network Connections”
Highlight the network interface and press enter. Navigate as follows:
Edit IPv4 -> Manual -> enter the network details -> save -> Done - Proxy IP -> Leave default/empty.
- “Configure Ubuntu Archive Mirror” -> leave default
- “File system Setup” -> Use An Entire Disk
- Proceed until “Confirm destructive action” -> press continue. The installation process starts, this can take several minutes.
- In the meantime, create the user for Healthdata.
username = healthdata,
Password = choose a secure password and communicate it to healthdata.be. - Mark “Install OpenSSH server”. This will be used for remote access. “Import SSH Identity” -> no -> done
- “Featured Server Snaps” -> Select nothing and press Done.
- Wait until installation is finished.
Configuration steps
Connecting to the server
Log into the machine with the healthdata.be user created in the previous section.
Instructions (from a Windows machine):
- Install the tool Putty and open the application.
- On the configuration screen, enter the following (replace cursive text with the appropriate values)
- Host Name: healthdata@server_private_ip
- Port: 22
- Connection type: SSH
- Click Open. Enter the password (you will not see text as you type, you can paste into putty by right-clicking in the terminal).
- You should now be logged in and see a prompt “healthdata@server_name:~$”
Administrator account for internal use
An administrator account for internal use can be created on the HD4DP v2 server.
The configuration of remote access (described below) should not happen on this account, but on the Healthdata.be account.
The internal account can later be used to install and configure OS monitoring software and antivirus software by the internal IT team. For more information, see the section on Antivirus and Monitoring.
(Text with a gray background should be entered as a command in the terminal of the server)
Create the user:
sudo adduser <username>
Add the user to the sudo group
sudo usermod -aG sudo <username>
Installation and configuration of the software stack
Healthdata.be support will instruct you when to execute the next step, which is to enable remote access so that Healthdata.be can execute the software installation and configuration.
Backups
The configuration of the HD4DP v2 server is administered by healthdata.be and does not require backups.
HD4DP v2 regularly dumps its databases automatically to the /backup directory on the server. A network storage should be mounted at this location.
Please fill out the infrastructure sheet with the required credentials, domain name/url, protocol… to connect to the network drive. The connection will then be configured by healthdata.be.
Patching and Updates
Healthdata.be configures HD4DP v2 servers to automatically receive recommended security updates. The choice for Ubuntu 18.04 is motivated by the long-term support for this version. Security flaws are rare in this distribution, and security updates are quick and often don’t require a system reboot.
If the IT department of your organization prefers to manage patches, this is possible but not encouraged. Please use the account for internal use created in Section 3 for this purpose.
Antivirus and Monitoring
Most data providers will want to manage their own antivirus and OS monitoring on all machines in their network. Installation of such software on the HD4DP v2 server is allowed, but healthdata.be should be informed about all extra software installed on the server. Additionally, healthdata.be will not provide support for the installation of this software.
Contact information
HD4DP v2 Infrastructure sheet
HD4DP v2 Infrastructure sheetThe HD4DP v2 Infrastructure Sheet contains information that healthdata.be needs in order to start the installation of the HD4DP 2.0 Software at your organization.
Below you can find the description of the necessary information:
SERVER CONNECTION
Healthdata.be performs its installation and support tasks remotely (using VPN or remote port forwarding via SSH). Please provide the required credentials.
- Type of connection (VPN / Remote port forwarding via SSH)
- Link (IF VPN)
- Username, token, other (if VPN)
- Password (if VPN)³
- Public SSH Key (if remote port forwarding)
³ For security reasons, we advise to communicate passwords to us either by phone, or via a link using a secret-sharing service such as onetimesecret.com.
SERVER MACHINE
- Server Name
- Internal IP-Address
- Ram (in GB)
- CPU (number of CPU's and number of cores)
- Disk space (in GB)
- Username: Healthdata
- Password ³
³ For security reasons, we advise to communicate passwords to us either by phone, or via a link using a secret-sharing service such as onetimesecret.com.
ATTACHED DRIVE FOR BACKUPS
HD4DP 2.0 regularly performs data dumps for backup purposes. Please provide connection information to a network share volume.
- Link / IP address
- Path
- Username
- Password ³
³ For security reasons, we advise to communicate passwords to us either by phone, or via a link using a secret-sharing service such as onetimesecret.com.
USER MANAGEMENT
HD4DP can either connect to a LDAP server or use its own application database for performing user authentication and management. Please check the user management mechanism you want to use.
- LDAP user management : Yes / No
- Application user management : Yes / No
LDAP configuration (Optional)
If you chose ‘LDAP user management’ as user management mechanism, please provide the following information that allows us to connect to your LDAP system.
- Connection URL
- Username
- Password³
³ For security reasons, we advise to communicate passwords to us either by phone, or via a link using a secret-sharing service such as onetimesecret.com.
SOFTWARE CONFIGURATION
Encryption Module interface
HD4DP communicates with the Encryption Module (EM) either using the file system interface or by calling a REST web service. Please choose which interface HD4DP should use for its communication with the Encryption Module.
Note: if the encryption module is not yet purchased (or developed), HD4DP can already be installed; the EM can then be configured in HD4DP once it is available. Please note that HD4DP 1.x and HD4DP 2.0 cannot use the same EM.
- REST web service
- File system
REST web service interface
If you chose to communicate with the Encryption Module using a REST interface, please provide the web service URLs that should be used by HD4DP for its communication with EM.
- "Outgoing flow URL: Example: http://host:8080/encryptionmodule/send"
- "Incoming flow URL : Example: http://host:8080/encryptionmodule/receive"
File system interface
- "Incoming directory: Directory where HD4DP checks for incoming files"
- "Incoming directory: Directory where HD4DP writes outgoing files"
- "Incoming directory: Directory to which HD4DP moves successfully processed files"
- "Incoming directory: Directory to which HD4DP moves unsuccessfully processed files"